Contents Before You Start... Cleaning Your Cooker Personal Safety Electrical Connection Safety Glide-out Grill™ Peculiar Smells Control Panel and Doors Ventilation Multifunction Oven Maintenance Steam Cavity Induction care Cleaning Table Grill/Glide-out Grill™ Care Troubleshooting Cooling Fan Installation Cooker Care Cleaning Dear Installer Safety Requirements and Regulations Cooker Overview...
Before You Start... Your cooker should give you many years of Before operating the ovens please refer • trouble-free cooking if installed and operated to the oven shelf installation, in the correctly. It is important that you read this Accessories section. section before you start.
Electrical Connection Safety Fig. 1.1 WARNING: THE APPLIANCE MUST BE EARTHED. The cooker is preset for a single-phase earthed electrical connection. It is essential to install a multi-pole circuit breaker that completely ArtNo.132-0001 - 1 phase 240Vac 50Hz disconnects the appliance from the mains, with a minimum contact break distance of 3 mm.
The appliance must be installed in Maintenance • accordance with the regulations in force It is recommended that this appliance is • and only in a well ventilated space. serviced annually. Failure to install the appliance correctly • WARNING: Before replacing the bulb, •...
NEVER try to extinguish a fire with water, Induction care but switch off the appliance and then IMPORTANT INFORMATION FOR cover the flame e.g. with a lid or a fire • PACEMAKER AND IMPLANTED blanket. INSULIN PUMP USERS: The functions NEVER leave a chip pan unattended.
Page 9
Take care NOT to scratch the surface when • Fig. 1.3 placing cookware on the glass panel. Only certain types of glass, glass-ceramic, • earthenware or other glazed containers are suitable for hotplate cooking; others may break because of the sudden change in temperature.
Page 10
We recommend that you avoid wiping • Fig. 1.8 any surface unit areas until they have cooled and the indicator light has gone off. Sugar spills are the exception to this (see ‘Cleaning your Cooker’). After cleaning, use a dry cloth or paper towel to remove any ArtNo.324-0001 Steam burst cleaning cream residue.
Make sure the shelves are pushed firmly DO NOT place plastic or aluminium foil, or • • to the back of the oven. DO NOT close the plastic containers on the hob. door against the oven shelves. Always turn the control to the OFF position •...
NEVER store flammable materials in the Cleaning • drawer. This includes paper, plastic and Isolate the electricity supply before • cloth items, such as cookbooks, plastic carrying out any thorough cleaning. Allow ware and towels, as well as flammable the cooker to cool. liquids.
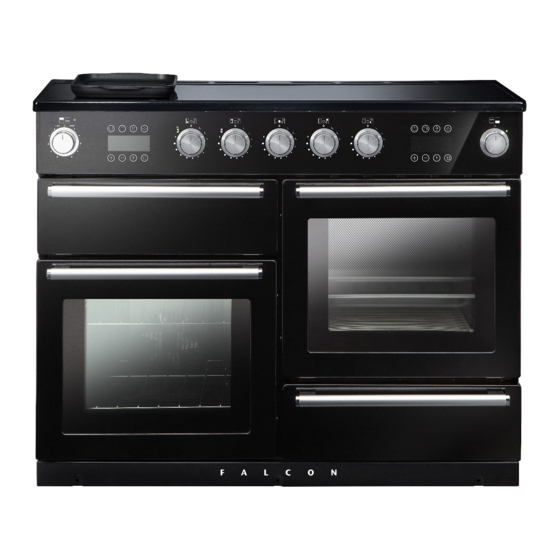
Cooker Overview Fig. 2.1 Your 110 induction cooker (Fig. 2.1) has the following Fig. 2.2 features: 5 induction cooking zones Control panel Glide-out grill with 4 position trivet Multifunction oven Steam cavity Bread Proving/Storage Drawer The Hob Fig. 2.3 Use only pans that are suitable for induction hobs. We recommend stainless steel, enamelled steel pans or cast iron pans with enamelled bases.
The very best pans have bases that are very slightly curved Fig. 2.4 up when cold (Fig. 2.3). If you hold a ruler across the bottom you will see a small gap in the middle. When they heat up the Max: 1.85 kW Max: 1.85 kW Max: 1.85 kW...
Residual Heat Indicator, H Fig. 2.6 After use, a cooking zone will remain hot for a while as heat dissipates. When a cooking zone is switched off the residual heat indicator symbol [H ], will appear in the display. This shows that the cooking zone temperature is above 60 °C and may still cause burns.
Power Boost Setting, P A & B linked Fig. 2.8 All of the induction cooking zones have Power Boost available, activated by turning the control knob clockwise until [P ] is shown on the hob control display. Power Boost allows additional power to be made available for each of the cooking zones.
DO NOT turn the two left-hand knobs individually Fig. 2.14 to heat the griddle plate. This can cause excessive temperatures and damage the coating on the griddle plate. Overheat Function This function identifies when the temperature of the pan rises rapidly and works to maintain a safe level of pan temperature.
Bread Proving Drawer Fig. 2.15 The Bread Proving Drawer is found on the right at the base of the cooker (Fig. 2.15). Within the Bread Proving Drawer there are slots in the base to allow warmed air to flow through into the drawer from the element underneath.
Telescopic runners Fig. 2.17 A glide-out oven shelf is available for either oven (Fig. 2.17). Note: The Handyrack must be removed before fitting the glide-out shelf. The rungs on the shelf supports are in pairs. The glide-out shelf runners can be fitted to any pair except the top. To fit the glide-out shelf runners FRONT Hook the rear of the runner over the top rung of a pair of shelf...
Using the Glide-out Grill™ DocAUS.020-0004 - Overview - 110DF - Elan Fig. 3.2 Fig. 3.1 Nearest to the element Middle High Middle Low Furthest from the element Four grill height positions refer to Fig. 3.5 Fig. 3.4 Fig. 3.3 To switch on both elements To switch on the right half element Four grill height positions Fig.
The Multifunction Oven The clock must be set to the time of day before the oven Symbol Function will work. See the section on ‘The Clock’ for instructions on A full cooking function, even heat setting the time of day. throughout, great for baking References to ‘left-hand’...
Page 22
ECO Mode Fig. 4.2 This setting saves energy, cooking in fanned mode, for foods requiring a cooking time of 45 minutes or less. No preheating . Note: The oven door must remain closed during ECO mode. Failure to do so will result in the oven continuing to cook after the pre-set 45 minutes.
Accessories Fig. 4.3 Front Glide-out Oven Shelves bracket Rear stop The left-hand oven is supplied with 2 glide-out oven shelves. To fit the glide-out shelf, hook the front of the shelf onto the runners as shown (Fig. 4.3). The rear of the shelf should rest on the runners, in front of the rear stop (Fig.
Page 24
The Handyrack (Optional extra) Fig. 4.11 The Handyrack (Fig. 4.11) fits to the left-hand oven door only. Food cooking on it is easy to attend to, because it is accessible when the door is open. The maximum weight that can be held by the Handyrack is 5.5 kg (12 lb).
Page 25
Once the specified time has elapsed an alarm will Fig. 4.17 sound. It will stop automatically after 10 seconds. To cancel the minute minder, and enter a new time, tap the clock button whilst the [ ] symbol is active. To stop the multifunction oven after a specific time Set the cooking function and temperature (see “Operating the Multifunction Oven”...
Cooking Tips General oven tips The wire shelves should always be pushed firmly to the back Tips on cooking with the timer of the oven. If you want to cook more than one dish, choose dishes that Baking trays with food cooking on them should be placed require approximately the same cooking time.
Cooking Table The oven control settings and cooking times given in the table below are intended to be used as a Top (T) guide only. Individual tastes may require the temperature to be altered to provide a preferred result. ArtNo.050-0007 Centre (C) Oven shelf positions Food is cooked at lower temperature in a fan oven than in a conventional oven.
The Steam Cavity Fig. 5.1 Water Tank Door Seal 1 x Rack 1 x Pan 1 x Perforated Pan Door Sponge The Steam Cavity (right-hand) Fig. 5.2 The steam cavity is shown in Fig. 5.1. Fig. 5.2 shows the touch sensitive control panel for the steam cavity.
Operating the Steam Cavity Fig. 5.4 Note: The steam cavity may start a pump out cycle (Fig. 5.12) when first turned on. This is normal and it should be allowed to complete. The cycle will take approximately 2 minutes. Touch and hold the standby button to switch the steam cavity on (Fig.
Steam Cavity Functions Fig. 5.13 The steam cavity has three main functions: steam grill descale Switch the oven on and tap the [ + ] or [ - ] buttons to scroll through these functions. Program Modes The steam cavity has pre-programmed modes for different food types.
The Clock / Timer Fig. 5.14 The clock above the multi-function oven must be set to the time of day before the multi-function oven or steam cavity will work. See "Setting the clock" on page 20. Note: The steam cavity control does not show the time of day.
Cleaning Your Cooker Isolate the electricity supply before carrying out any Fig. 6.1 major cleaning. Allow the cooker to cool. NEVER use paint solvents, washing soda, caustic cleaners, biological powders, bleach, chlorine based bleach cleaners, coarse abrasives or salt. DO NOT mix different cleaning products – they may react together with hazardous results.
Glide-out Grill™ Fig. 6.2 The grill pan and trivet should be washed in hot soapy water. Alternatively, the grill pan can be washed in a dishwasher. After grilling meats or any foods that soil, leave to soak for a few minutes immediately after use. Stubborn particles may be removed from the trivet using a nylon brush.
Control Panel and Doors Fig. 6.6 Avoid using any abrasive cleaners, including cream cleaners. For best results, use a liquid detergent. The same cleaner can also be used on the doors. Alternatively, use a soft cloth wrung out in clean hot soapy water. You can use the same method for cleaning the control panel and knobs.
Steam Cavity Fig. 6.8 Before cleaning your oven or performing maintenance, please switch off the power supply. In order to prolong the service life of steam cavity, please note the following points: The enameled or stainless steel parts should be washed with lukewarm water without using any abrasive powders or corrosive substances which could scratch, stain and damage the oven.
Cleaning Table Cleaners listed (Table 6.1) are available from supermarkets or electrical retailers as stated. For enamelled surfaces use a cleaner that is approved for use on vitreous enamel. Regular cleaning is recommended. For easier cleaning, wipe up any spillages immediately. Hotplate Part Finish...
Troubleshooting DocNo.050-0001 - Troubleshooting - Induction GENERIC Interference with and repairs to the hob MUST NOT The cooling fan be carried out by unqualified persons. Do not try The induction hob incorporates a cooling fan. This cooling to repair the hob as this may result in injury and fan is active when either the grill or the oven(s) are on.
Page 38
The oven is not cooking evenly Fig. 7.1 Do not use a baking tray with dimensions larger than those specified in the section on ‘General Oven Tips’ . If you are cooking a large item, be prepared to turn it round during cooking.
Page 39
The left-hand oven door is misaligned Fig. 7.3 The bottom hinge of the left-hand oven door can be adjusted to alter its angle (Fig. 7.3). Loosen the bottom hinge fixing screws and use the notch and a flat bladed screwdriver to move the position of the hinge to set the hinge position (Fig.
INSTALLATION Check the appliance is electrically safe and gas sound when you have finished. Installation Dear Installer Location of Cooker Before you start your installation, please complete the details The cooker may be installed in a kitchen/kitchen diner but NOT in a room containing a bath or shower. below, so that, if your customer has a problem relating to your installation, they will be able to contact you easily.
INSTALLATION Check the appliance is electrically safe and gas sound when you have finished. Positioning the Cooker Fig. 8.1 Fig. 8.1 and Fig. 8.2 shows the minimum recommended 75 mm 75 mm distance from the cooker to nearby surfaces. 650 mm The cooker should not be placed on a base.
INSTALLATION Check the appliance is electrically safe and gas sound when you have finished. Lowering the Two Rear Rollers Fig. 8.5 To adjust the height of the rear of the cooker, first fit a 13 mm spanner or socket wrench onto the hexagonal adjusting nut (Fig.
INSTALLATION Check the appliance is electrically safe and gas sound when you have finished. Electrical Connection Current Operated Earth Leakage Breakers This appliance must be installed by a qualified electrician The combined use of your induction cooker and other to comply with with current AS/NZS 3000 Wiring Rules domestic appliances may cause nuisance tripping, so we and regulations in force.
INSTALLATION Check the appliance is electrically safe and gas sound when you have finished. Connection in New Zealand Fig. 8.13 Type of cord in accordance with IEC 60227 with a minimum rating of 90°C. Cord size recommended for this application is 3 x 10 mm², three-core cable (Power cables may be sized to take into account the coincidence factor AS/NZS 60335.2.6:2014).
INSTALLATION Check the appliance is electrically safe and gas sound when you have finished. Final Checks Fig. 8.17 Hob Check Check each cooking zone in turn. Be sure to use pans of the correct size and material. Grill Check Turn on the grill control and check that the grill heats up. Oven Check Set the clock as described earlier, and then turn on the ovens.
WARNING – SERVICING TO BE CARRIED OUT ONLY BY AN AUTHORISED PERSON Disconnect from electricity before servicing. Check appliance is safe when you have finished. Servicing Disconnect from the electricity supply before Assemble the new switch to the bezel by lining up the key servicing, particularly before removing any of the sections and pushing home.
Page 47
WARNING – SERVICING TO BE CARRIED OUT ONLY BY AN AUTHORISED PERSON Disconnect from electricity before servicing. Check appliance is safe when you have finished. 5.2 To Remove the Left-hand Oven Inner Back Fig. 9.1 Open the left-hand oven door. Remove the screws and washers securing the inner back to the back of the oven (Fig.
Page 48
WARNING – SERVICING TO BE CARRIED OUT ONLY BY AN AUTHORISED PERSON Disconnect from electricity before servicing. Check appliance is safe when you have finished. Remove the 2 screws ‘A’ and allow the plate to drop down Fig. 9.3 (Fig. 9.3). Remove the 2 screws ‘B’ , lower the upper plate and remove through the slot in the cooker back (Fig.
Page 49
WARNING – SERVICING TO BE CARRIED OUT ONLY BY AN AUTHORISED PERSON Disconnect from electricity before servicing. Check appliance is safe when you have finished. 6.5 To Change the Oven Door Latch Fig. 9.9 Remove the outer door panel (see 6.4). Remove screws ‘B’ , which hold the latch assembly to the inner door panel (Fig.
10. Circuit Diagram Earth On Terminal Block N(6) N(4) On Terminal Block INDUCTION UNIT DISPLAY L(2) L(3) w/br w/br INTERFACE On Terminal Block BOARD w/br w/br w/br The connections shown in the circuit diagram are for single-phase. The ratings are for 230 V 50 Hz. Code Description Code Colour...
Page 51
Oven Induction Unit Connector Steam Oven The connections shown in the circuit diagram are for single-phase. The ratings are for 230 V 50 Hz. Code Description Code Description Code Colour Grill Energy Regulator Proving Drawer Element Blue Brown Left Hand Grill Element Neon Black Right Hand Grill Element...
Power PCB Connector P1 Connector P2 Protective Earth MF Oven Door Steam Oven Door Sensor Sensor Steam Oven Temp MF Oven Temp Con 5 Con 7 Con 10 Con 1 Con 8 Con 4 Sensor Sensor Water Tank Water Low Water High Water Boiler Sensor...
DATA BADGE LOCATION: Cooker back, serial number repeater badge below the oven door opening. COUNTRY OF DESTINATION: AUSTRALIA. Connections Electric 230 / 400 V ~ 50 Hz 3N Dimensions Model NEXUS 110 Induction / Steam Overall height minimum 905 mm maximum 930 mm Overall width 1100 mm Overall depth...
Need help?
Do you have a question about the NEXUS 110 Induction and is the answer not in the manual?
Questions and answers