
Related Manuals for Shoprider Valencia


Summary of Contents for Shoprider Valencia
- Page 1 Shoprider Valencia User Manual Model - GK10 - Please ensure that this user manual is read and understood before using the scooter.
-
Page 2: Table Of Contents
Contents Introduction Maintenance Intended Use Check List Technical Specifications Products Life Expectancy Feature Guide General Cleaning Safety Advice Check List Batteries & Battery Charger Adjustments Tiller Angle Adjustment Batteries Folding the Tiller Assembly Battery Charger Troubleshooting Seat Swivel Adjustment Circuit Breaker Seat Height Adjustment Fuses Arm Adjustment... -
Page 3: Introduction
Congratulations on your purchase of the Shoprider® Valencia scooter. This scooter incorporates the latest innovative designs. The Valencia can be used in confined spaces both indoors and out. Direct drive rear transaxles and electromagnetic brakes give a safe and efficient ride. -
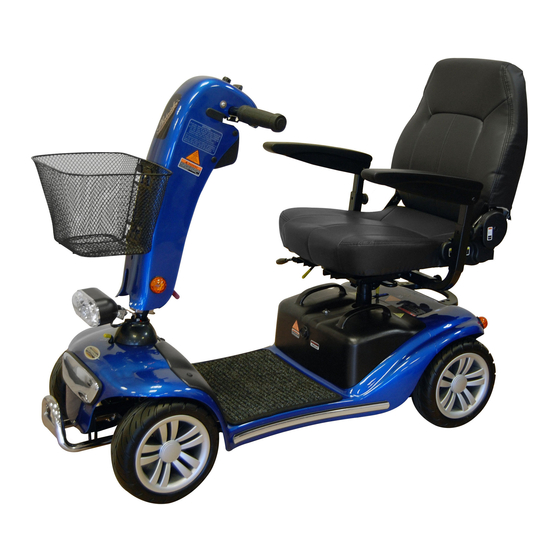
Page 4: Feature Guide
Feature guide ‘Valencia’ Detachable Shopping basket Tiller Controls Detachable battery pack Detachable padded swivel seat with fold down back Rear anti-tip wheels PU puncture proof non-marking wheels Tiller lock Tiller angle adjustment lever... -
Page 5: Safety Advice
Safety advice • Read this manual carefully before using your scooter • Turn the power off when transferring to and from the scooter • Select a slow speed when going down gradients (max 8°) or over uneven ground • Keep your feet on the scooter whilst driving •... -
Page 6: Adjustments
Adjustments Tiller Angle Adjustment At the base of the tiller is a red lever. Push the lever toward the tiller stem to release the locking pin. Select the desired tiller angle and pull the lever outwards. Ensure the locking pin is fully located before using the scooter. Folding the Tiller Assembly (For transport purposes) Release the locking mechanism as above and fold the... -
Page 7: Seat Height Adjustment
Seat Height Adjustment Remove the seat as previously described and remove the battery pack Undo the securing screw with an allen key and use two 13mm spanners and undo the locking bolt and nut. Adjust the seat post up or down to the desired height and relocate the locking bolt through the hole and replace the washer and nut and re-tighten. -
Page 8: Tiller Controls
Tiller Controls Speed Control (1) The speed control enables you to set the maximum speed of the scooter. The tortoise being slow, and the rabbit being the maximum. Note: Always start at a slow speed until accustomed with the characteristics of your scooter. Do not put excessive pressure on the dial. -
Page 9: Brake Release / Free Wheel Operation
Horn (4) The yellow button operates the scooters horn. Note: This should only be used to warn others of your presence and not as a rebuke of any form. On / Off Key Switch (5) Insert the key supplied with the scooter and turn clockwise. The battery gauge needle will move. There may be a slight delay before the thumb levers operate as the controller checks the scooters circuits. -
Page 10: Starting To Drive
Caution: Never leave the scooter unattended whilst in free wheel mode as it will roll away down an incline. ‘Free wheel’ mode should only be used in an emergency to move the scooter due to power failure. Never move the scooter in this mode whilst it is occupied. -
Page 11: Steering
Steering Steering the scooter is light and easy. Ensure you give obstacles a wide clearance to avoid the rear wheels catching. When steering through limited spaces, turn the tiller in the direction that you wish to go and apply power gently. The scooter can turn very tightly with complete stability at slow speeds. Caution: Never turn sharply at high speeds as it can make the scooter unstable. -
Page 12: Surfaces
Do not use the tiller or armrests to support the full weight during transfers. Dismantling for Transportation & Storage Dismantling The Valencia is designed to be quickly and easily disassembled without tools into sections for transportation and storage: • Lift the basket up and off the bracket. -
Page 13: Maintenance
(hose or pressure washer) onto the scooter as this may cause damage to the electronics. We suggest that your scooter should undergo a full service at least once a year by an authorised Shoprider dealer. Check list Please check the following;... -
Page 14: Batteries
Charge the batteries completely (8-12 hours) prior to first use. Batteries The Shoprider Valencia is supplied with a closed battery pack which contains two 34/36 Amp, 12 Volt sealed lead acid batteries. The battery pack is situated under the front of the seat and can be removed by lifting them away from the chassis.*... -
Page 15: Battery Charger
Battery Charger The battery charger is a 4-amp switch type off board. The battery charging port is located on the battery pack. This special feature allows the batteries to be charged independently of the main scooter. Before using our scooter for the first time be sure to fully charge the batteries, this may take up to 12 hours. -
Page 16: Check List
Note: Should your scooter fail to operate after checking these possible problems, consult your local Shoprider dealer immediately. If the scooter is switched on and not operated for a period of time (approx 10 minutes) it may enter ‘sleep’ mode. This is indicated by the spanner flashing on / off continuously. -
Page 17: Storage & General Care
Storage and General Care We recommend that the scooter is always stored in a dry environment such as a garage or shed to protect the chassis and other components from corrosion. Do not leave the scooter outside during rainstorms. If the scooter is wet, wipe with a dry cloth to ensure there is no ingress of water into the internal components of the scooter. - Page 18 Notes...
-
Page 19: Warranty Terms And Conditions
Warranty Terms and Conditions This is to certify that your Shoprider product is warranted for a period of 12 months from the date of original purchase. This warranty is not transferable. Note: Should a defect or operating fault arise within this period the Dealer from where the product was originally purchased should be notified immediately. - Page 20 Distributed by: Invamed.co.uk York Road Bridgend Industrial Estate Bridgend CF31 3TB United Kingdom 01656 674488 sales@invamed.co.uk Shoprider reserve the right to change www.invamed.co.uk specifications without prior notice.
Need help?
Do you have a question about the Valencia and is the answer not in the manual?
Questions and answers