Table of Contents
Advertisement
Advertisement
Table of Contents

Related Manuals for Shoprider Scooter


Summary of Contents for Shoprider Scooter
- Page 1 Owner’s Manual...
- Page 2 With careful reading of this manual and not exceeding the parameters set down, you can ensure that your SHOPRIDER™ scooter will give you years of trouble free service and enjoyment. SHOPRIDER™ scooters are a quality scooter made with an eye to style for the 21st century.
-
Page 3: Table Of Contents
• Basic Driving • Common Obstacles CARE & MAINTENANCE • Dismantling the SHOPRIDER™ • Assembling the SHOPRIDER™ • Loading the SHOPRIDER™ into a car trunk • Wheels & Tyres • Circuit Breaker & Fuse • Lubrication • Articulation adjustment BATTERIES •... -
Page 4: Emi Warning
This is called “immunity level”.The the outside of the vehicle. scooter OFF as soon as it is safe. higher the immunity level, the greater the protection. 3. Long-range transmitters and 4. -
Page 5: Safety Rules
12. Do not ride SHOPRIDER™ over Do not sit on your SHOPRIDER™ deep, soft terrain, (e.g. soft dirt, deep while the scooter is in a vehicle. Always grass, loose gravel). strap down the scooter, then transfer to vehicle seat, fasten safety belt. -
Page 6: Control Features
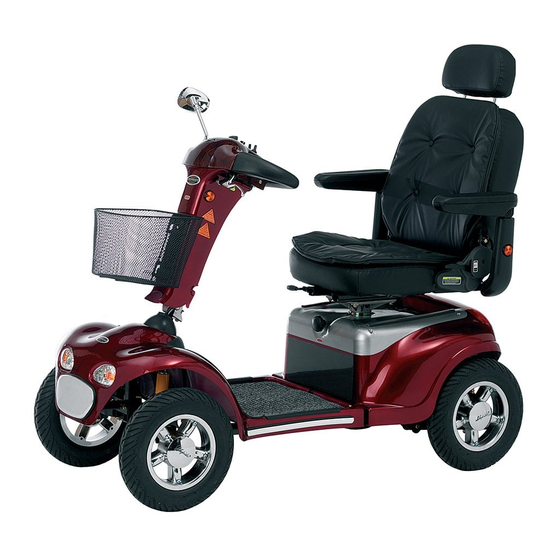
“F” stands for forward, Turn key to horizontal position or the “R” stands for reverse. ON position.The scooter is now fully operational. The amount of pressure applied will con- trol the speed.When the wig wag is All the controls features listed below released, the SHOPRIDER™... - Page 7 Charging Socket (see pg 17) 1. Key switch 4.Turn signals (see pg 9) 3. Speed Adjustment Dial 2. Battery Indicator 2. Battery Indicator 6. Head Light Button 4.Thumb Lever Control 3. Speed Adjustment Dial (wig wag) Hi-Lo Switch 5. Horn 1.
-
Page 8: Seat Controls
All Scooters can be upgraded to this portation. It also has removable covers Located under the arm rest you will find seat. In some Shoprider models, it is so that you may add thicker padding if a knob. By loosening this knob you are standard.This seat will recline back 112°. - Page 9 1. slide lever 6. swivel lock lever 7. seat tighten knob figure 3 figure 4 Seat adjustment lever page 8 figure 5...
-
Page 10: Lights
Turns on headlight and tail lights. Located light or deluxe lighting package on your on tiller below wig wag lever. SHOPRIDER™ scooter (and it was not (ref figure 2) provided as a standard feature), please see your dealer for this option. -
Page 11: Rear Adjustments
On new models the anti-tip wheels are To free wheel the scooter, push down or removable by pulling the pin. up (depending on model) on the lever, whilst pushing the shoprider. -
Page 12: Operating The Shoprider
If you must steer in a tight spot, such as before you back up. Push the left down. If you have a cane or crutch, place make your scooter difficult to move. It is entering a doorway or when turning “Thumb Lever Control”. -
Page 13: Common Obstacles
It is an easy technique. -
Page 14: Care & Maintenance
4. Battery Straps (figure 10) used to separate the front from the rear This strap secures the batteries in place. of the scooter.This pin is also used to Because all the straps are Velcro there hold the anti-tip wheels in place. -
Page 15: Assembling The Shoprider
5. Front wheel(s) and platform assembly. Now take the safety pin and drop in the wheels into the trunk. hole. Now the scooter base is secure. Make sure that when lifting the front Place the SHOPRIDER™ on flat surface section to use the handle (red) or the with at least 5'x lO' of clear floor space. -
Page 16: Wheels & Tyres
ON position. IF THE SCOOTER STILL DOES NOT RUN, mum tyre pressure is 50 psi.This is a Your scooter also has a fuse to protect CONTACT YOUR CLOSEST AUTHORISED maximum tyre pressure and the tyres the electronics of the SHOPRIDER™. -
Page 17: Lubrication
WD40 or similar lubricant. If any other situation or questions arise Note: about your scooter, do not hesitate to The breather hole on the top of the call your dealer. transaxle is NOT a grease nipple. -
Page 18: Batteries
SHOPRIDER™ for more than 3 days. Leave the scooter charging for at least If not using your SHOPRIDER™ for 12 to 16 hours to bring the scooter to figure 14 extended periods of time, make sure the full charge (when the batteries are fully batteries are fully charged.This can be... -
Page 19: Warranty
Shoprider Australia warrants that the frame will Shoprider Australia warrants that the frame will Shoprider Australia will repair or replace, at our be free from defects under normal use, for a be free from defects under normal use, for a... - Page 20 S H O P R I D E R ™ . P R O V I D I N G M O B I L I T Y T O D A Y W I T H T O M O R R O W ’ S T E C H N O L O G Y...
Need help?
Do you have a question about the Scooter and is the answer not in the manual?
Questions and answers