Table of Contents
Advertisement
Advertisement
Table of Contents

Related Manuals for inbody BSM170


Summary of Contents for inbody BSM170
- Page 1 User's Manual...
- Page 2 This manual might have typographical errors, and its content can be changed without a prior notice. InBody Co., Ltd. shall not be liable for any errors, incidental, or consequential damages that occurred by not complying with the content of the User's Manual.
-
Page 3: Table Of Contents
User’s Manual Contents I. Stadiometer Installation A. Product Components B. Operating Environment C. Installation Instructions D. Stadiometer Settings E. Maintenance II. Height Measurement A. Precautionary Measurements B. Measurement Instructions C. Measurement Posture III. Transportation and Storage A. Repacking Instructions B. Transportation and Storage Environment IV. -
Page 4: Stadiometer Installation
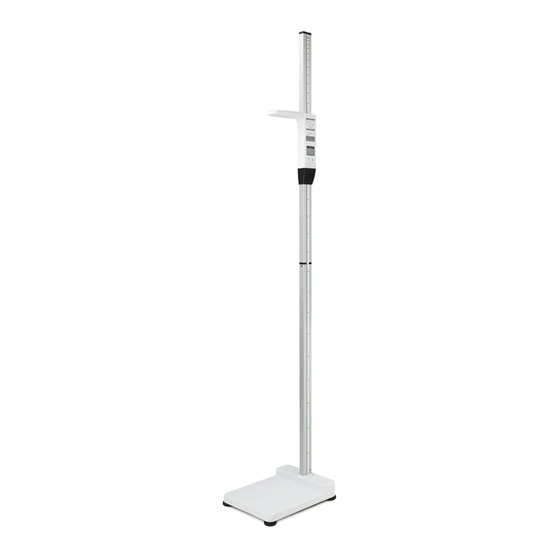
A. Product Components The BSM170/170B contains of the following components. Make sure all of the following components are present. * Please inspect each component of the BSM170/170B for damage prior to installation. Footplate 1 EA ❶ Stand (upper) 1 EA ❷... -
Page 5: Operating Environment
Before installing BSM170/170B, check that the ceiling is at least 2.3 m high. The maximum height of this • equipment is 2.19m. Keep a space of at least 3cm between the ceiling and the top of the BSM170/170B. C. Installation Instructions 1. - Page 6 3. Hold the “Stand (lower)” in place to prevent it from sliding out of the insertion hole of the footplate, tilt the equipment sideways towards the floor. 4. Screw each of the 4 footplate mounting screws into the holes located on the opposite side of the stand insertion hole of the footplate.
- Page 7 6. Once all four screws as fastened tightly, return the “Stand (lower)” and footplate to an upright position. 7. Insert the black end of “Stand (upper)” into the “Stand (lower)” as illustrated below. UTION NOTE DANGER Caution 참 조 주 의 참...
- Page 8 9. Insert the measuring tape into the “Stand (upper)” with the ̒ ↓ ̓ facing down. Refer to the illustration below. After the measurement tape is completed inserted, remove the sticker attached to the end of the measurement tape to affix the tape to the stand. UTION NOTE DANGER...
- Page 9 ➊ BSM170 standby time: 10 seconds. ➋ BSM170B standby time: 2 minutes if it is not connected to the InBody, 10 seconds if it is connected to the InBody. 1) Open the battery cover located on the right side of the LCD screen.
- Page 10 12. After placing the BSM170/170B on a flat surface, if the footplate is not level, use the footplate adjustment screws to adjust until level. * Leveling the equipment is necessary for accurate height measurements. footplate leveling screws 13. When taking measurements with the BSM170/170B, the operator must move the measurement unit up and down manually.
- Page 11 14. Turn on the BSM170/170B. 15. Move the measurement unit up or down until the ‘Move’ text disappears. The equipment will enter the measurement standby mode and the display will change as shown below.
-
Page 12: Stadiometer Settings
D. Stadiometer Settings 1. Requried Settings 1. After turning on the BSM170/170B, press and hold the button and the button simultaneously for at least 3 seconds to enter the Setup menu. 2. In the Setup menu, set the measurement value hold time, beep, screen brightness, units, and offset value. - Page 13 2) Beep: Enable or disable the beep alert. a. Use the button to move to ‘Beep’ and then press the button. b. Use the button to turn on or off the beep alert. * Beep can be set to on or off. Beep setup c.
- Page 14 * To reset the offset value to 0.0, press the button. Offset value setup c. Save changes by pressing the button. 6) After configuring the BSM170/170B, press the button to move to ‘Exit’ and press the button. BSM170/170B is now ready for use.
- Page 15 2. Optional Settings 1. After turning on the BSM170/170B, press and hold the button and the button on the measurement unit simultaneously for at least 3 seconds to enter the Setup menu. 2. In the Setup menu, you can calibrate the equipment or reset factory default settings.
- Page 16 c. Use the button to move to ‘Yes’ and then press the button. Calibration will begin. d. Slowly lower the measurement unit until you reach the bottom of the footplate and press the button. * The measurement unit must be lowered until it is resting against the footplate. e.
- Page 17 Press the button to move to ‘Exit’ and then press the button. BSM170/170B is now ready for use. g. Stand the Test jig provided at the logo on the footplate and lower the measurement unit so that it touches the top of the Test jig as illustrated below.
-
Page 18: Maintenance
Check that the ̒ 88.9cm ̕ is shown on LCD screen of the measurement unit. * If ̒ 88.9cm ̕ is not shown on the LCD screen(error range: ±0.1cm), please contact InBody. 2) Reset: Reset all settings to factory settings. -
Page 19: Height Measurement
Use caution when lowering the measurement unit to not catch your fingers. • Do not run around run around or play around the footplate. This may result in serious injury. • Children and people with limited mobility should be supervised or assisted when attempting to measure on the • BSM170/170B. -
Page 20: Measurement Instructions
LCD, locks the measurement for the set hold time. * Only BSM170B can connect to the InBody via its integrated Bluetooth. Please refer to the InBody User's manual about Bluetooth connection guide. If the BSM170B is connected to an InBody, pressing the button shows the 'send' message on the LCD screen, as illustrated below, and transmits the measured value to the InBody. -
Page 21: Measurement Posture
C. Measurement Posture The examinee must maintain proper posture to have accurate measurement results. Let your arms rest naturally at your side. Allow your backside to gently touch the stand. Put the arms down naturally. Put both the feet together. Do not bend the knees. -
Page 22: Transportation And Storage
4. Place 1 big polyethylene pad over the footplate. 5. Close the packaging box and seal it with tape. B. Transportation and Storage Environment The BSM170/170B should be transported or stored under the following conditions. Temperatures range -10 ~ 70℃... -
Page 23: Frequently Asked Questions
A few more of the common questions and answers are listed below. If you encounter problems while using the BSM170/170B or have questions concerning height measurement, please refer to the possible solutions below. If your problem cannot be resolved from the following table, please contact InBody. -
Page 24: Others
* The BSM170/170B is registered for electromagnetic compatibility in accordance with the Framework Act on Telecommunications and the Radio Waves Act. * The BSM170/170B is designed, manufactured, and inspected according to h the quality assurance system of InBody. InBody complies with the ISO9001 which are international quality management systems. - Page 25 2. Upper section Stand (upper): Upper part of the equipment Stand. ❶ Measurement tape: Used to adjust the footplate to be level for accurate measurements. ❷ Stand (lower): Lower part of the equipment Stand. ❸ ❶ ❷ ❸ 3. Lower section Stand insertion hole: The Stand is inserted here for assembly with the footplate.
-
Page 26: Symbols
B. Symbols Safety Symbol Warning/Caution Other Symbols Manufacturer Direct current 1177 European Conformity Serial number 1177 1177 1177 1177 Authorized representative in the EUROPEAN COMMUNTY Disposal of old Electrical & Electronic Equipment (Application in the European Union and other European countries with separate collection system.) This symbol indicates that this product shall not be treated as household waste. -
Page 27: Specifications
C. Specifications Intended use Hand-operated mechanical stadiometer Measurement item Height Heights measured 350 ~ 2100mm (1 ft. 1.78 in. ~ 6 ft. 10.67 in.) Height measurement ± 1mm (± 0.04 in.) error range Result display Customized LCD Height measurement Manual measurement Measurement unit Select between ‘cm’... - Page 28 ⓒ2015 InBody Co., Ltd. All rights reserved. BM-ENG-E9-C-150114...
Need help?
Do you have a question about the BSM170 and is the answer not in the manual?
Questions and answers