Table of Contents
Advertisement
Quick Links
Advertisement
Table of Contents

Related Manuals for inbody J30


Summary of Contents for inbody J30
- Page 1 User’s Manual...
- Page 2 InBody J30, the explanation of results output, and more. InBody Co., Ltd reserves the right to modify the appearance, specifications, and etc. of the InBody J30 to improve the quality of the product, without prior notice for reasons of performance improvement.
-
Page 3: Table Of Contents
User’s Manual Contents I. InBody J30 Installation A. Product Components B. Operating Environment C. Installation Instructions D. Quick Setup Initial Setup F. Connecting Printer and Blood Pressure Monitor G. Maintenance II. InBody Test A. Precautionary Steps B. Test Instructions C. Test Posture III. -
Page 4: Inbody J30 Installation
I. InBody J30 Installation A. Product Components The InBody J30 consists of the following components. Please make sure all of the following components are present. * Please inspect each component of the InBody J30 for defects prior to installation. InBody J30 ❶... -
Page 5: Operating Environment
Atmospheric pressure 70 ~ 106kPa C. Installation Instructions 1. Open the packing box of the InBody J30 and remove the packing pads. Remove the InBody J30 from the packaging box, then remove the protective plastic wrapping. Polyethylene foam cover Packing pads... - Page 6 Never clean the hand and foot electrodes with liquid spray or detergent directly. The equipment may corrode • and/or malfunction if the liquid or detergent leaks inside. Use the InBody Tissue when cleaning the InBody J30. 3. Tighten the mounting screw completely, and place the joint cover on top of the footplate.
- Page 7 ❺ * The InBody J30 can be used in connection with other equipment such as a blood pressure monitor, data management software called Lookin’Body. For more information, please refer to ‘I. InBody J30 Installation E.Connecting Printer and Blood Pressure Monitor’ in User’s Manual.
- Page 8 InBody J30 first. This is necessary to minimize electrical surges on the InBody J30. Always use the specified adapter provided by InBody as it is a part of the InBody J30. Using other adapters •...
-
Page 9: Quick Setup
D. Quick Setup 1. The InBody J30 automatically starts booting when it is turned on. While booting, it performs a self weight calibration. * While booting (about 5 minutes), make sure there is nothing on top of the footplate. Please do not stand on the footplate, or place objects on the footplate. - Page 10 Number of Copies ❶ This is the number of copies of Results Sheet to print automatically after each measurement. (0, 1, 2) Volume ❷ Set the audio volume. (0 to 10) Weight Offset ❸ Adjust the weight offset value. When it is necessary to correct the extra weight added by clothing, accessories, etc., set a value to adjust the weight measurement.
-
Page 11: Initial Setup
E. Initial Setup Press the ‘SETUP’ button on the screen, which appears when no one is on the footplate. - Use the up or down arrow buttons (▲, ▼) to select a menu, use the right arrow button ( ▶ ) to select a sub-menu of the item, then use the up or down arrow buttons (▲, ▼) to select an item to change. - Press the right arrow button ( ▶ ) to open the screen of the item you wish to change. - Use the up or down arrow buttons (▲, ▼) or number buttons to change the setting. - Page 12 A. Region Set date, time, date format, and units, ethnicity and language which are used in the measurement process. ❶ ❷ ❸ ❹ ❺ ❻ ➐ Set Date ❶ Use the up or down arrow buttons (▲, ▼) to enter the date. Use the left and right arrow buttons ( ◀ , ▶ ) to move between year, month, and day. Set Time ❷...
- Page 13 Use the left and right arrow buttons ( ◀ , ▶ ) switch between X and Y axes. Print alignment setup in the InBody J30 assumes by default that you are using Results Sheets in landscape orientation. Note that Results Sheets in portrait orientation have the X and Y axes reversed. See the illustration below for reference.
- Page 14 • Korean Pediatrics (2007): The Korean Pediatric Society 2007 growth graph is printed. Result Sheet Type ❺ • Printed Paper: Select this option to use the dedicated printed paper provided by InBody Co., Ltd. • Blank Paper: Select this option to use ordinary A4 paper.
- Page 15 • Disable: InBody test is performed without BMI test. • Enable: BMI test is performed. BMI is calculated after taking the weight and height measurements. Set a time value in the Display field to determine how long the BMI results are displayed. After BMI test, you can proceed to InBody test by entering personal information. Height Mode ❷ • Auto: Height measurement starts automatically.
- Page 16 ❷ You can choose whether to use a blood pressure monitor. • Disable: No blood pressure monitor is used. • TM2655/P / BPBIO320: The InBody is connected to a blood pressure monitor provided by InBody Co., Ltd. Internet ❸ You can configure Internet connection settings. When connected to the Internet, the InBody can be connected to the user management PC program Lookin’Body120 without limitations on distance.
- Page 17 F. Others ❶ ❷ ❸ ❹ ❺ ❻ Measure Weight ❶ • Manual: Weight measurement begins when the subject stands on the footplate and the ‘ENTER’ button is pressed. • Auto: Weight measurement begins automatically when the subject stands on the footplate. •...
-
Page 18: Connecting Printer And Blood Pressure Monitor
* You may experience connection issues in connecting the printer to the InBody J30 if the InBody is turned on. 2) Plug the USB cable provided with the printer into the USB HOST port on the rear panel of the InBody J30 and plug the other end of the USB cable into the printer. -
Page 19: Maintenance
Use a lint-free cloth to gently wipe the external surface of the equipment about once every week. Be careful not • to scratch the LCD screen. InBody J30 does not need regular maintenance. If some problems occur while operating the device, get in touch • with the store where you purchased it or A/S manager. -
Page 20: Inbody Test
Children and people with limited mobility should be supervised or assisted when attempting to test on the InBody. • After an individual with any kind of contagious disease or infection tests on the InBody, use an InBody Tissue • to clean the equipment. -
Page 21: Test Instructions
B. Test Instructions 1. Step on the footplate when the screen below is shown. 2. After weighing, the height is measured. Do not move until the head bar comes down and the height is measured. 3. Enter the subject’s ID (personal number), gender, and age as shown below. 4. - Page 22 5. Take the test posture. * For details on good posture, see ‘C. Test Posture’. 6. The InBody test begins. 7. When the test is complete, the results are shown on the screen.
-
Page 23: Test Posture
C. Test Posture The examinee must maintain proper posture to have accurate test results. * The test will proceed when there is good electrical contact. Make sure that the armpits Extend arms straight. don’t touch. If the thighs touch one another, wear a pair of knee-high shorts to keep the thighs separated. -
Page 24: Transportation And Storage
When transporting, have two people keep the InBody J30 parallel to the ground. B. Repacking Instructions Once the InBody J30 is installed, avoid transporting the equipment. If it must be transported, repack it in the following sequence. 1. Turn off the InBody J30. -
Page 25: Frequently Asked Questions (Faq)
* Customer contact information can be found under Settings of the Administrator Menu ‘24. Customer Service Information’. A. Regarding the InBody If a problem arises with the InBody J30, you may first attempt to check the ‘Troubleshooting’ in the Administrator Menu. The InBody J30 can help you diagnose and solve some problems. If your problem cannot be resolved through the ‘Troubleshooting’, please refer to the possible solutions below. Question... - Page 26 ‘Printer’ settings in ‘Chapter 4. Setup’ to adjust the printing alignment. I would like to connect Please refer to ‘E. Connecting Printer and Blood Pressure Monitor’ in • • other equipment to the section ‘I. InBody J30 Installation’ in this User’s Manual. InBody J30.
-
Page 27: Regarding The Inbody Test
• harmful to the body? that is not harmful to the body. The safety of the InBody has been tested and proven. The InBody products have been approved for medical use by the CE and all over the world. Many medical institutions around the world are actively using the InBody. -
Page 28: Others
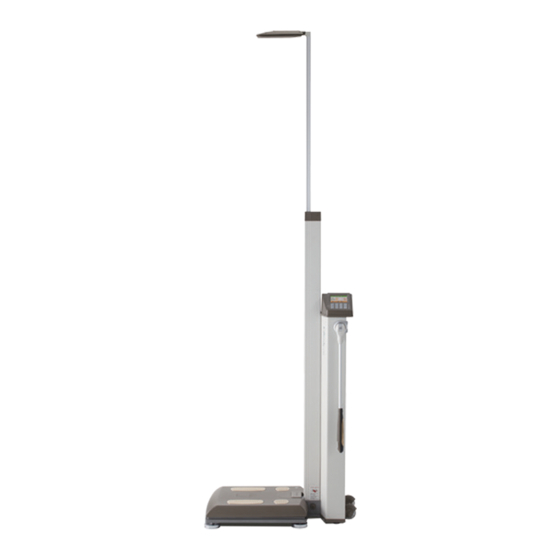
V. Others * The InBody J30 is manufactured according to the quality management procedure of InBody. InBody complies with the ISO9001 and ISO13485 which are international quality management systems. * This equipment satisfies the IEC60601-1 (EN60601-1), an international safety standard for electronic medical equipment. This equipment a lso satisfies the IEC60601-1-2 (EN60601-1-2), an international standard for electromagnetic conformity. A. Exterior and Functions The following are the names and functions of each part of the InBody. - Page 29 Rear sole electrode: The examinee makes contact with this electrode by stepping with the heel of their foot. ❷ Footplate: This is connected to the scale, which measures the examinee’s weight. ❸ Level Indicator: Indicates the current horizontal level of the InBody J30. ❹ Hinge: Joins the upper part and lower part of the equipment together. ❺...
- Page 30 9-pin COM serial port (Female, RS-232C): Used for connecting the InBody J30 to Lookin’Body installed ❶ on a computer. 9-pin COM serial port (Female, RS-232C): Used for connecting the InBody J30 to a blood pressure monitor. ❷ Only compatible with a InBody Blood Pressure Monitor.
-
Page 31: Safety Information
B. Safety Information Indicators 9-pin serial port (Female, RS-232C) LAN port (10T Base) USB port Safety Symbols Dangerous High Voltage Warning, Caution BF Type Equipment Adapter Power On Power Off C. Classification Body Composition Analyzer of Direct Segmental Multi-frequency Bioelectrical Impedance Analysis (DSM-BIA) Method •... - Page 32 Data can be stored on USB storage devices (for viewing in Excel or Lookin’Body). Storage Devices Always use USB storage devices recommended by InBody Co., Ltd. Quick Setup Number of Copies / Volume / Weight offset / Height Measurement Mode...
- Page 33 RS-232C 4EA, USB Slave 1EA, USB Host 2EA, Ethernet (10T) 1EA, External Interface Bluetooth 1EA, Wi-Fi 1EA Compatible Printer Laser/inkjet PCL 3 or above and SPL(Printer recommended by InBody) 396(W) × 667(L) × 1350~2126(H): mm Dimension 15.6(W) × 26.3(L) × 53.1~83.7(H) : inch Weight 23.5kg(51.8lbs)
-
Page 34: Emc Declaration
E. EMC declaration The InBody J30 is intended for use in the electromagnetic environment specified below. The customer or the user of the InBody J30 should assure that it is used in such an environment. Electromagnetic emissions Emissions test Compliance Electromagnetic environment The InBody J30 uses RF energy only for its internal function. RF emissions CISPR 11... - Page 35 AM and FM radio broadcast and TV broadcast cannot be predicted theoretically with accuracy. To assess the electromagnetic environment due to fixed RF transmitters, an electromagnetic site survey should be considered. If the measured field strength in the location in which the InBody J30 is used exceeds the applicable RF compliance level above, the InBody J30 should be observed to verify normal operation. If abnormal performance is observed, additional measures may be necessary, such as re-orienting or relocating the InBody J30. ᵇ Over the frequency range 150 kHz to 80 MHz, field strengths should be less than 3 V/m.
- Page 36 ©2019 InBody Co., Ltd. All rights reserved. BM-ENG-C5-I-190710...
Need help?
Do you have a question about the J30 and is the answer not in the manual?
Questions and answers