
Related Manuals for Clarke CRT40


Summary of Contents for Clarke CRT40
- Page 1 40-Piece Rotary Tool Kit MODEL No: CRT40 Part Nos:6462001 USER INSTRUCTIONS GC06/09...
-
Page 2: Environmental Protection
INTRODUCTION Thank you for purchasing this CLARKE 40-piece Rotary Tool Kit. Please read this manual thoroughly and follow the instructions carefully. In doing so you will ensure the safety of yourself and that of others around you, and you can look forward to the product giving you long and satisfactory service. -
Page 3: Package Contents
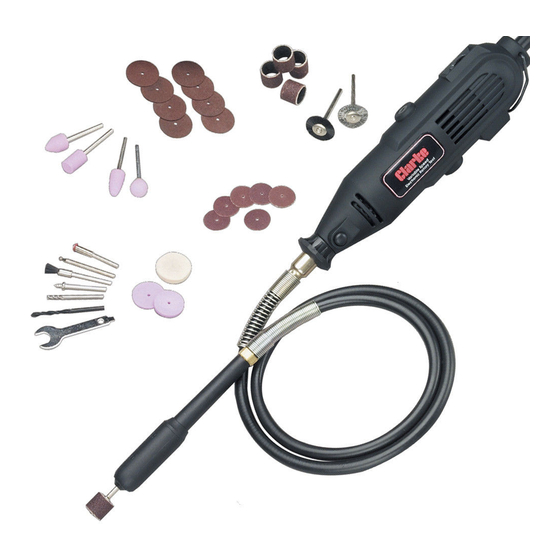
PACKAGE CONTENTS The package contains: Rotary Tool Flexible Drive Tool Stand Complete Chuck spanner Accessories/consumables Case SAFETY PRECAUTIONS • ALWAYS keep the power cable away from the moving parts of the rotary tool. • ALWAYS switch off the tool and allow it to stop fully before putting it down. •... -
Page 4: Electrical Connections
3. Should you wish to replace a detachable fuse carrier, ensure that the correct replacement is used (as indicated by marking or colour code). 4. Replacement fuse covers can be obtained from your local Clarke dealer or most electrical stockists. - Page 5 ASSEMBLY OF COMPONENTS STAND FOR THE ROTARY TOOL Screw the telescopic tube into the bracket and tighten. Clamp the bracket to a workbench or worktop with a maximum thickness at 2-1/8”. Slacken the top tube by turning the black knob anticlockwise (-). Draw the tube out to its maximum height and secure it by turning the knob clockwise (+).
- Page 6 ASSEMBLING POLISHING BOB • Screw the Bob on to the mandrel firmly, but do not overdo it. 5. Assembling Abrasive Bands • Slacken the screw on the end of the mandrel and slide the appropriate abrasive band on to the rubber former, fully. •...
-
Page 7: Operation
OPERATION Assemble the tool as described previously. Holding the tool firmly, and ensuring your fingers are well away from the rotating parts, plug into the mains and switch ON by pressing ‘I’ (A). Adjust the speed according to the job in hand, by turning the adjuster ‘B’, using the tables below for reference. - Page 8 3. Sanding Band & Discs Material Speed Wood Steel Aluminium, Brass Plastic 4. Stainless Steel Brushes & Bristle Brush Material Speed Stone, Shell Aluminium, Brass 5. High Speed Cutter, Diamond Wheel & Drill Material Speed Stone, Shell Steel Aluminium, Brass Plastic 6.
-
Page 9: Maintenance
The tool does not require lubrication. TECHNICAL SPECIFICATION " 8 Please note that the details and specifications contained herein, are correct at the time of going to print. However, CLARKE International reserve the right to change specifications at any time without prior notice. -
Page 10: Parts Diagram
PARTS DIAGRAM ACCESSORIES A 100 piece Accessory Kit (CRT100A) is available from your Clarke dealer. Please quote Part Number 6468025... -
Page 11: Spare Parts And Service Contacts
Plug & Cable ................TMCT4026 SPARE PARTS AND SERVICE CONTACTS For parts & Servicing, please contact your nearest dealer, or CLARKE International, on one of the following numbers. PARTS & SERVICE TEL: 020 8988 7400 PARTS & SERVICE FAX: 020 8558 3622 e-mail as follows: PARTS: Parts@clarkeinternational.com...
Need help?
Do you have a question about the CRT40 and is the answer not in the manual?
Questions and answers