
Related Manuals for Kargo Master 406GM


Summary of Contents for Kargo Master 406GM
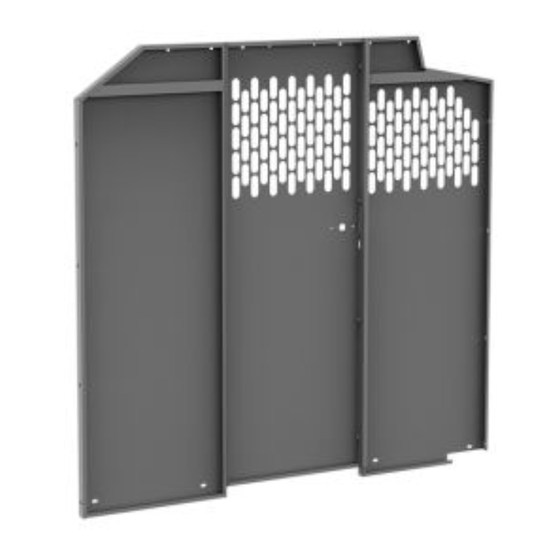
- Page 1 Instruction Guide 406GM (partition shown for reference) Kargo Master Rancho Cordova, CA 95742 800-343-7486 CustomerService@KargoMaster.com 20190904R2 DATE: ______________...
-
Page 2: Table Of Contents
Instructions – 406GM *PLEASE READ ALL INSTRUCTIONS AND WARNINGS PRIOR TO ASSEMBLING, INSTALLING, AND USING THIS PRODUCT* Warning Always check for wires, fuel tanks and lines, brake lines and other important vehicle functionality items prior to drilling and installing all products. -
Page 3: Parts List
Instructions – 406GM Parts For Technical Support Call: 800-343-7486 Monday-Friday 7AM - 4 PM (PST) Page 3... -
Page 4: Hardware List
Instructions – 406GM Hardware For Technical Support Call: 800-343-7486 Monday-Friday 7AM - 4 PM (PST) Page 4... -
Page 5: Step 1 Attach Side Wings
Instructions – 406GM Step 1 – Attach Side Wings • Bolt both wings to the outer edges of partition in the orientation shown using 1/4" x 5/8” flanged hex head bolts and 1/4” flanged nyloc nuts. Note: The panel that has no holes, is the driver side of the partition. -
Page 6: Step 2 Install Upper Mount To Partition
Instructions – 406GM Step 2 – Install Upper Mount to Partition • Place the upper mount against the partition assembly with the wing panels. • Bolt the upper mount to the partition in the orientation shown using 1/4" x 1/2" carriage bolt and 1/4"... - Page 7 Instructions – 406GM • Snug tighten, but allow movement. Views shown below are from the cab side of the van. For Technical Support Call: 800-343-7486 Monday-Friday 7AM - 4 PM (PST) Page 7...
-
Page 8: Step 3 Install Floor Mounts
Instructions – 406GM Step 3 – Install Floor Mounts • Behind both seats, locate the D-Rings in the floor. • Remove both D-Rings. • Align the floor mounts with the previously removed D-Rings. Have the floor mounts oriented to the rear of the van. -
Page 9: Step 4 Install Upper Corner Mounts
Instructions – 406GM Step 4 – Install Upper Corner Mounts • Along the roof of the van, locate the mount locations behind both seats. These are above the slider door. • Evaluate the mounting locations and determine if a threaded emboss is present. - Page 10 Instructions – 406GM • If there is no threaded emboss on the forward most hole location, install using a M6 x 20mm hex head bolt, two M6 flat washers and a M6 nyloc nut in the orientation shown. • If a threaded emboss is present, attach through the front most hole location using a M6 x 20mm hex head bolt, M6 lock washer and M6 flat washer as shown.
-
Page 11: Step 5 Attach Upper Mount To Partition
Instructions – 406GM Step 5 – Attach Upper Mount to Partition • Place the partition assembly into the van. Have the perforated panels of the partition on the passenger side. The bend in the wing panels will be directed towards the B pillar. -
Page 12: Step 6 Attach Partition To Floor Mounts
Instructions – 406GM Step 6 – Attach Partition to Floor Mounts • Locate the four mounting locations at the bottom of the partition. • Align the four mounting holes with the previously installed floor mounts. • Attach the partition assembly to the previously installed floor mounts using 1/4" x 1/2” hex head bolts, 1/4"... - Page 13 Instructions – 406GM Align and square partition. Go back and TIGHTEN all bolts including the bolts in the partition. Installation is now complete. For Technical Support Call: 800-343-7486 Monday-Friday 7AM - 4 PM (PST) Page 13...
Need help?
Do you have a question about the 406GM and is the answer not in the manual?
Questions and answers