Advertisement
Quick Links
Advertisement

Related Manuals for Kargo Master 40601SH


Summary of Contents for Kargo Master 40601SH
- Page 1 Installation Guide 40601SH...
- Page 2 *Must be purchased seperately. Before You Begin Read all instructions prior to assembling or installing any Kargo Master product. Always locate your installation locations prior to performing any work. ENSURE SAFETY WHILE INSTALLING OR DRILLING INTO VEHICLE.
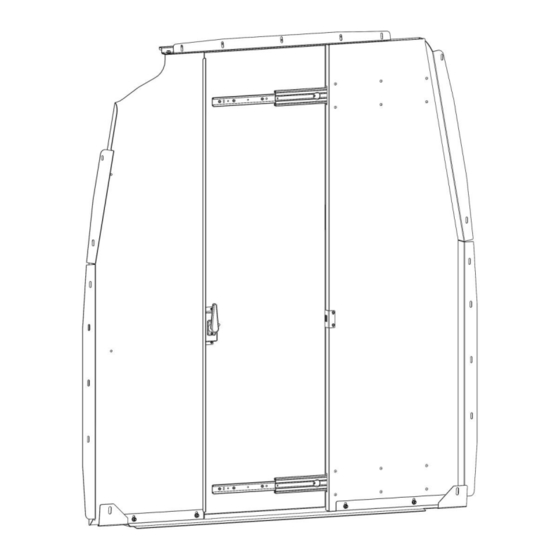
- Page 3 Instructions – 40601SH Parts Page 2...
- Page 4 Instructions – 40601SH Parts (Continued) Hardware Page 3...
- Page 5 Instructions – 40601SH Latch Assembly Parts Page 4...
- Page 6 Instructions – 40601SH Step 1 – Install Door Guide to DS Panel Assembly Using two #10 x 1/2” pan head screws, secure the door guide to the DS panel assembly. DO NOT OVERTIGHTEN. Step 2 – Attach Floor Bracket ...
- Page 7 Instructions – 40601SH Step 3 – Attach Top Panel Using four 5/16” x 3/4” flanged hex head bolts and four 5/16” flanged lock nuts attach top panel to the partition panels. Be sure door guide is inside top panel track.
- Page 8 Instructions – 40601SH Mark onto the B-pillar and roof support the location of all the slots and holes in the top and sides of the partition panels. Ensure this is the location of where you want the partition to be installed.
- Page 9 Instructions – 40601SH Using the 9/16” box wrench, hold the plus nut tool stationary to remove the 1/4” hex head bolt. Sample installation onto floor shown. HOLD Step 5 – Install Partition Using 1/4” x 1-1/4” hex head bolts, 1/4” lock washers, and 1/4”...
- Page 10 Instructions – 40601SH Step 6 – Install Lock Remove #10 screws, #10 internal washer nuts, and latch spacers from latch assembly. Using four #10 x 3/4” pan head screws, #10 internal washer nuts, and latch spacers, install the center case to the door as shown.
- Page 11 Instructions – 40601SH Push the internal handle onto the square shaft and, using a 5/16” hex wrench, fasten the internal handle to the shaft. TIGHTEN. Using two #10 external washer nuts, LOOSELY attach the PS striker plate to the passenger-side door jam.
Need help?
Do you have a question about the 40601SH and is the answer not in the manual?
Questions and answers