Table of Contents
Advertisement
Quick Links
Advertisement
Table of Contents
Troubleshooting

Summary of Contents for Weidmuller PrintJet ADVANCED
- Page 1 PrintJet ADVANCED User Manual...
- Page 2 Foreword Foreword Revisions Version Date Change 01/13 First edition 03/13 First revised edition 06/15 Second revised edition 04/16 Third revised edition 04/17 Fourth revised edition Contact address Weidmüller Interface GmbH & Co. KG Postfach 3030 D - 32720 Detmold Klingenbergstraße 16 D - 32758 Detmold Phone +49 (0) 5231 14-0...
-
Page 3: Table Of Contents
Contents Contents Introduction ......................7 Notational conventions........................8 Warranty and liability ........................9 Copyright ............................9 Guarantee terms ..........................9 Safety information ....................11 General safety information ......................12 General operating information ....................... 13 Safety measures for environment protection ................14 Symbols and information used on the device ................ - Page 4 Contents Positioning the touch panel ......................31 Connecting the power plug ......................32 Methods of connecting the printer ....................34 4.8.1 Connection via the network interface ................. 34 4.8.2 Connection via USB ......................34 Turning the printer on/off ....................... 35 4.10 Choosing the language for the touch panel .................
- Page 5 Contents 5.3.3 Submenus .......................... 99 5.3.4 System Info ........................99 5.3.5 Changing the printer name ....................100 5.3.6 Changing the IP address and subnet mask and activating DHCP ........102 5.3.7 Selecting the language ....................105 5.3.8 Changing the USB port ....................106 5.3.9 Ink level ..........................
- Page 6 Contents List of events ..........................144 Transporting the printer ................... 151 Decommissioning the printer ...................... 152 Packing the printer ........................152 Disposing of the printer ........................ 153 Annex ......................... 155 Technical data ..........................156 Ordering data ..........................157 Declaration of conformity ......................158 List of figures ..........................
-
Page 7: Introduction
Introduction Introduction Notational conventions........................8 Warranty and liability ........................9 Copyright ............................9 Guarantee terms ..........................9 1449820000/1.4/04.17... -
Page 8: Notational Conventions
Introduction This user manual provides all the information you CAUTION need for trouble-free operation of the PrintJet ADVANCED (hereafter called printer or device). This warning sign indicates a low risk situation which, if not avoided, could This user manual must be read, understood, and result in minor or moderate injury. -
Page 9: Warranty And Liability
Introduction • Deployment of untrained personnel Symbols used in the manual • Structural alterations to the printer (modifications In this user manual, particular hazards are identified by the following symbols: or other alterations to the printer are prohibited.) Non-compliance will result in the printer's EC Hot surface warning Declaration of Conformity no longer being valid) This symbol warns of a burn hazard... -
Page 11: Safety Information
Safety information Safety information General safety information ......................12 General operating information ....................... 13 Safety measures for environment protection ................14 Symbols and information used on the device ................14 Intended use ............................ 15 Residual risks when using the device ..................15 2.6.1 Hazards due to electricity .................... -
Page 12: General Safety Information
• The power cable or plug are worn or damaged. • Liquid has penetrated the PrintJet ADVANCED. • The PrintJet ADVANCED has fallen down or the enclosure has been damaged. • The performance of the PrintJet ADVANCED is not up to the required standard, e.g. -
Page 13: General Operating Information
Safety information General operating • Never touch the ink supply outlet of the ink cartridge or the area around it. information • Do not shake ink cartridges, as this may cause • When selecting the installation site for the printer, ink to leak. -
Page 14: Safety Measures For Environment Protection
Safety information • Install ink cartridges in the printer immediately Symbols and information after removing them from the packaging. The used on the device print quality can be impaired if an ink cartridge is left unpacked for any length of time before use. The following information and symbols are attached •... -
Page 15: Intended Use
Safety information Intended use Structural modifications to the device Construction and acceptance are based on the This printer is only intended for use in applications German Product Safety Act (ProdSG). Never modify as described in the user manual. Any other form of the printer. -
Page 16: Hazards Due To Electricity
Safety information 2.6.1 Hazards due to electricity • Keep moisture away from live parts as it can cause short-circuits. Pay particular attention to this when cleaning the printer. DANGER • Have extension and device cables with plugs and sockets tested by an Electrical hazard warning electrical specialist, or by a trained person using suitable inspection... -
Page 17: Hazards Due To Hot Surfaces
Safety information Obligations of the plant 2.6.2 Hazards due to hot surfaces operator The device is used in an office environment in the CAUTION commercial sector. The device operator is therefore Burn hazard due to hot surfaces subject to the legal requirements concerning occupational health and safety. -
Page 18: Personnel Requirements
Safety information Personnel requirements 2.9.3 Responsibilities The responsibilities of personnel for installation, commissioning, operating, maintenance, and 2.9.1 Qualifications required by cleaning must be clearly defined. personnel Personnel require the following qualifications for the various activities: WARNING Skilled personnel Injury hazard due to inadequate Skilled personnel are able to do their work and qualifications recognize/avoid potential hazards on their own as a... -
Page 19: Printer Description
Printer description Printer description Printer ............................... 21 3.1.1 Overview ..........................21 3.1.2 Connectors ......................... 23 3.1.3 Rating plate ........................23 MultiCards and MetalliCards ......................24 1449820000/1.4/04.17... - Page 20 PrintJet ADVANCED uses a brilliant permanently- Finally, the MultiCard/MetalliCard is fed out of the readable printing process to print MultiCard- PrintJet ADVANCED onto the output rail and can be formatted markers for switching devices, machines, removed. terminal blocks, cables, wires, and valves. A secure The MultiCard/MetalliCard can be used immediately.
-
Page 21: Printer
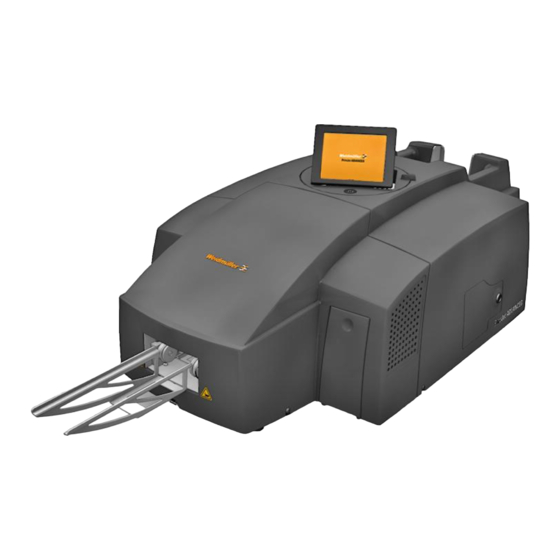
Printer description Printer 3.1.1 Overview Figure 1 Front view of the printer A Touch panel B Service cover C Ink tank lid D Output rail 1449820000/1.4/04.17... - Page 22 Printer description Figure 2 Rear view of the printer A Filter cover B Connectors C MultiCard/MetalliCard input D Stack input (loader) E Interface USB master for connecting a USB stick F Cleaning fluid 1449820000/1.4/04.17...
-
Page 23: Connectors
Printer description 3.1.3 Rating plate Figure 5 Rating plate Figure 3 Open ink tank lid The rating plate contains information on the mains voltage, article number, serial number, and MAC address (address of the network card). A Ink cartridges B Wastepad C Ink tank lid (open) 3.1.2 Connectors... -
Page 24: Multicards And Metallicards
MultiCards made from plastic and MetalliCards made from aluminum or stainless steel can be printed with the PrintJet ADVANCED printer. The marking system, consisting of the PrintJet ADVANCED printer and the M-Print® PRO software, has been designed by Weidmüller for MultiCards or MetalliCards. - Page 25 Printer description MultiCards can be halved. To receive a half MultiCard, bend the complete MultiCard in the middle and break in half. Complete and half MultiCards should not be mixed in a stack. It is, however, possible to process different MultiCard types in a stack, e.g. DEK 5/5 and SM 27/27. Description of the MultiCard Figure 7 Description of the MultiCard...
-
Page 27: Setup
Setup Setup Unpacking ............................28 Scope of supply ..........................28 Installing the printer ........................28 Removing the transport restraints ....................30 Fitting the output rail ........................31 Positioning the touch panel ......................31 Connecting the power plug ......................32 Methods of connecting the printer ....................34 4.8.1 Connection via the network interface ................. -
Page 28: Unpacking
Setup Unpacking Scope of supply When you have taken the PrintJet ADVANCED and CAUTION all accessories out of the packaging, make sure you Crush hazard during transport have all the following items: • Power cable Because of its weight the printer must always be carried by two people. - Page 29 Setup 1 Pay attention to the information given above. NOTE 2 Place the printer on a surface that extends • The printer must be placed on a flat, beyond the base area of the printer on all sides. stable surface. The printer will not 3 Leave enough space in front of the output rail to operate properly if it is tilted or at an allow the printer to output...
-
Page 30: Removing The Transport Restraints
Setup Figure 8 Operating and maintenance spaces A 250 mm D 250 mm B 200 mm output rail E 100 mm C 100 mm Weight: approx. 37.2 kg Removing the transport 1 Remove the transport restraints from the touch panel. restraints 2 Remove the transport restraint from the ink tank lid. -
Page 31: Fitting The Output Rail
Setup Fitting the output rail Figure 11 Touch panel lowered Figure 10 Fitting the output rail Fit the output rail, letting it snap into place. Positioning the touch panel The touch panel can be raised up to three rest positions. A 'click' sound indicates that the touch panel is engaged in one of the rest positions. -
Page 32: Connecting The Power Plug
Setup Connecting the power plug DANGER Electrical hazard warning • The supply voltage must match the voltage given on the printer’s rating plate. • Only connect the device to a properly grounded and fused socket. • Do not use a socket already being used by devices that are turned on and off at regular intervals, such as photocopiers or fans. - Page 33 Setup DANGER Warning of electrical hazard if the power cable is damaged A damaged power cable can • cause a fatal electric shock and • lead to a fire. • Do not let the power cable get damaged and leave it in its original state.
-
Page 34: Methods Of Connecting The Printer
Setup Methods of connecting the printer The PrintJet ADVANCED can be connected to the PC via the USB cable or to the local network via the network cable. The installation methods are largely identical. Where they differ, the methods are described separately. -
Page 35: Turning The Printer On/Off
Setup Turning the printer on/off Turn on the printer by briefly holding down the on/off switch. NOTE Do not switch off the printer! The printer automatically goes into standby mode. The operating parameters are only retained while the printer is turned on. -
Page 36: Choosing The Language For The Touch Panel
Setup 4.10 Choosing the language for the touch panel When you start up the printer for the first time, a language choice is displayed on the touch panel. Touch panel – language choice Figure 18 1 Choose the required language by touching the corresponding button. Touch this button to scroll forward to the next page and additional options. - Page 37 Setup Touch panel – main menu Figure 19 2 Choose the [System Info] button on the touch panel’s main menu. Touch panel – System Info Figure 20 3 Select the [LANGUAGE] button in the System Info window. 1449820000/1.4/04.17...
- Page 38 Setup Touch panel – language selection Figure 21 4 Select the desired language and touch the [SAVE] button to confirm your choice. 1449820000/1.4/04.17...
-
Page 39: Installing The Standard Version Of The M-Print® Pro Software
Setup 4.11 Installing the standard version of the M-Print® PRO software The marking system has been designed for the following operating systems: Microsoft Windows® 7 (32- bit/64-bit versions), Windows® Vista and Windows® XP. Important information Installation should be carried out by a specialist. Administrator rights are required for this process. - Page 40 Setup Figure 23 M-PRINT® PRO Installation - Start menu 4 Touch the [SOFTWARE] button. Figure 24 M-PRINT® PRO Installation - software 5 Touch M-PRINT® PRO. 1449820000/1.4/04.17...
- Page 41 Setup Figure 25 M-PRINT® PRO Installation - Language selection 6 Touch the desired language. The installation process starts automatically and the setup wizard appears. M-Print® PRO – setup wizard Figure 26 7 Click the [Next] button. 1449820000/1.4/04.17...
- Page 42 Setup M-Print® PRO – accepting the license terms Figure 27 8 Accept the terms in the license agreement and press the [Next] button. 9 Choose the setup type in the next window: M-Print® PRO – choosing the setup type Figure 28 Typical The M-Print®...
- Page 43 Setup Custom The M-Print® PRO program is installed; add-on modules can be selected/deselected. Complete The M-Print® PRO program and all add-on modules are installed automatically. Network The M-Print® PRO program is installed on a shared drive on the network and can be used by multiple users. 10 Press the [Typical] button.
- Page 44 Setup M-Print® PRO – status of the installation process Figure 30 The installation status is shown by the progress bar. M-Print® PRO – finishing the installation process Figure 31 12 When installation has been completed, press the [Finish] button. 1449820000/1.4/04.17...
-
Page 45: Connection Via Network Cable
Setup 4.12 Connection via network cable Figure 32 PrintJet ADVANCED Explorer 1 To add the PrintJet ADVANCED, click the [Add…] button. The following dialog box appears: Figure 33 Choosing printer connection 2 Click on the [Network] button here. 1449820000/1.4/04.17... - Page 46 Setup The following dialog box appears: Figure 34 Adding the printer 3 When you click on the button [Browse network...], the search process is started. Figure 35 Browsing network 1449820000/1.4/04.17...
- Page 47 4 Use the [Add selected printers] button to add the printer. The following dialog box appears: Figure 37 PrintJet ADVANCED Explorer 5 If you want to change the printer name, click the [Properties...] button. This changed printer name is then displayed in M-Print® PRO.
- Page 48 Setup Figure 38 Changing the printer name 6 Enter the printer name required for M-Print® PRO, for example PrintJet ADVANCED. 7 Confirm your inputs with [OK]. Figure 39 Changed printer name The changed name PrintJet ADVANCED is displayed in the Explorer.
- Page 49 Setup You can remove the highlighted printer from the list with the [Delete] button. You can add this printer again at any time. You exit the dialog box with the [Close] button. You can check whether the printer highlighted in the list is connected and accessible with the [Test] button. If so, the following dialog box appears: Dialog box –...
-
Page 50: Connection Via Usb Cable
When you have installed the M-Print® PRO application software, connect the USB cable to the printer. The printer control software is installed automatically. Connection –USB cable Figure 43 C USB cable D USB port Figure 44 PrintJet ADVANCED Explorer 1 To add the PrintJet ADVANCED, click the [Add…] button. 1449820000/1.4/04.17... - Page 51 Setup The following dialog box appears: Figure 45 Choosing printer connection 2 Click the [USB] button. The printer search starts. Figure 46 Printer search The search result is displayed in the following dialog box: Figure 47 Printer - search result If no printer was found, you may start a new search process via the button [Search again].
- Page 52 Setup Figure 48 PrintJet ADVANCED Explorer 3 If you want to change the printer name, click the [Properties...] button. This changed printer name is then displayed in M-Print® PRO. Figure 49 Changing the printer name 4 Enter the printer name required for M-Print® PRO, for example PJA Workplace 1 (USB1).
- Page 53 Setup If so, the following dialog box appears: Dialog box – connection test successful Figure 51 You see the following message if the printer cannot be found because, for example, it is turned off: Dialog box – printer not found Figure 52 6 Next you have to activate the M-Print®...
-
Page 54: Installing The Network Version Of The M-Print® Pro Software
Setup 4.14 Installing the network version of the M-Print® PRO software Important information Installation should be carried out by a specialist. Administrator rights are required for this process. 4.14.1 Description The network version of M-Print® PRO is used when multiple users need to work with the software in a network. -
Page 55: 4.14.2 Tasks To Be Done On The Central Computer/Server
Setup Important information The network version can only be installed when the PrintJet ADVANCED is connected to the network via the network cable. It is not possible to install the network version via the USB port. 4.14.2 Tasks to be done on the central computer/server 1 Insert the DVD in the server/central computer. - Page 56 Setup Figure 55 M-PRINT® PRO Installation - Start menu 4 Touch the [SOFTWARE] button. Figure 56 M-PRINT® PRO Installation - software 5 Touch M-PRINT® PRO. 1449820000/1.4/04.17...
- Page 57 Setup Figure 57 M-PRINT® PRO Installation - Language selection 6 Touch the desired language. The installation process starts automatically and the setup wizard appears. M-Print® PRO – setup wizard Figure 58 7 Click the [Next] button. 1449820000/1.4/04.17...
- Page 58 Setup M-Print® PRO – accepting the license terms Figure 59 8 Accept the terms in the license agreement and press the [Next] button. 9 Choose the setup type in the next window: M-Print® PRO – choosing the setup type Figure 60 10 Press the [Network] button.
- Page 59 Setup Network installation – choosing the target directory Figure 61 You can check how much storage space is free on the available drives with the [Disk Usage] button. 11 Click the [Browse…] button. 12 Select the target directory, for example C:\software\. Important information The users of the client computers must be able to access the target directory.
- Page 60 Setup Network installation – choosing directories Figure 62 14 For individual components such as the catalog you can use the […] button to choose other directories (for example the catalog in C:\data\catalog). Important information The target directories must be on a local drive of the server (network drives and UNC paths such as \\ServerName\ShareName\Path are not allowed).
- Page 61 Setup Figure 63 Starting network installation 16 Click the [Install] button. Microsoft Windows® User Account Control (UAC) might appear. 17 If so, confirm here that changes are allowed to be made to Windows. After your confirmation, the target directories are created and the files are copied to or created in them. 1449820000/1.4/04.17...
- Page 62 Setup M-Print® PRO – status of the network installation Figure 64 The progress is indicated by a bar. Figure 65 Finishing network installation 18 When installation has been completed, press the [Finish] button. 1449820000/1.4/04.17...
- Page 63 Setup The following dialog box appears: Figure 66 PrintJet ADVANCED Explorer 19 To add the PrintJet ADVANCED, click the [Add…] button. The following dialog box appears: Figure 67 Adding the printer When you click on the button [Browse network...], the search process is started.
- Page 64 Setup Figure 68 Browsing network If a printer was found, the following dialog box appears: Figure 69 Search result - Browsing network Use the [Add selected printers] button to add the printer. You can also add the printer via its serial number or its network name or its IP address. Important information If you specified [Activate DHCP] under SYSTEM INFO on the touch panel, you must add the printer via its network name.
- Page 65 21 Enter the serial number or the network name or the IP address. If you click on the question mark, you will receive more information. 22 Click the respective [Add...] button. The entered printer is displayed in the PrintJet ADVANCED Explorer. Figure 71 Changing the printer name 23 If you want to change the printer name, click the [Properties...] button.
- Page 66 Entering the printer name 24 Enter the printer name required for M-Print® PRO, for example PJA (production). 25 Confirm your inputs with [OK]. The changed name is displayed in the PrintJet ADVANCED Explorer. Figure 73 PrintJet ADVANCED Explorer You can remove the highlighted printer from the list with the [Delete] button. You can add this printer again at any time.
- Page 67 Setup You see the following message if the printer cannot be found because, for example, it is turned off or there is a network problem: Dialog box – printer not found Figure 75 26 Next you have to activate the M-Print® PRO software (see “4.15 Activating M-Print® PRO”). Sharing folders M-Print®...
- Page 68 Setup The meaning of the folders is as follows: Folder Contents Write rights required This folder contains executable files. data Standard directory in which users should store their M- Print® PRO files. images This folder contains M-Print® PRO images. This folder is accessed when users choose images in M-Print®...
-
Page 69: 4.14.3 Tasks To Be Done On The Clients
Setup 4.14.3 Tasks to be done on the clients No further setup is required on the clients. By default users must launch the “start.exe” file from the ‛bin’ folder. The actual storage location of the “start.exe” file depends on what was specified during setup (directories). The dialog provides the necessary functions: Network installation –... - Page 70 Setup Install EPLAN Electric P8 Addon This function is not required for the PrintJet ADVANCED. Close You close the start screen with the [Close] button. To set the correct print position for a MultiCard and to compensate for physical changes to it, you must make some settings via the M-Print®...
-
Page 71: Activating M-Print® Pro
Setup 4.15 Activating M-Print® PRO The first time you start M-Print® PRO the software must be activated. 1 Start M-Print® PRO via the program icon on the desktop or via Start → Programs → Weidmüller → M- Print® PRO. Figure 79 M-Print®... - Page 72 Setup M-Print® PRO – key type Figure 81 3 Choose the license key type and click the [Next] button. M-Print® PRO – registration Figure 82 4 Enter the 11-digit license key shown on the case of the DVD that came with the printer. 1449820000/1.4/04.17...
-
Page 73: Setting Up And Adjusting A Multicard For The Printer
Setup If you also register the software via the internet, you will receive information about software updates and a description of new functions. 5 To do this, click the [Register] button and follow the instructions that are shown. 6 If you do not want registration, click the [Next] button. M-Print®... -
Page 74: Running A Print Test
Setup 4.17 Running a print test When you have turned on the printer, run a print test. Follow these steps: Touch panel – main menu Figure 84 1 Touch the [TEMPLATES] button on the touch panel’s main menu. 2 Choose a template that corresponds to the supplied MultiCard. 1449820000/1.4/04.17... - Page 75 Setup Touch panel – templates Figure 85 3 Insert the MultiCard. 4 Touch the [PRINT] button to run the print test. 1449820000/1.4/04.17...
-
Page 77: Operation
Operation Operation General operation ..........................78 5.1.1 Important information ......................78 5.1.2 Inserting MultiCards/MetalliCards ..................79 5.1.3 Processing a single MultiCard/MetalliCard ................ 80 5.1.4 Processing a stack of MultiCards ..................80 Software settings ..........................81 5.2.1 Starting M-Print® PRO ...................... 81 5.2.2 Mapping and calibrating the printer ................... -
Page 78: General Operation
Operation General operation • If the printer is turned off or is not used, this can lead to blockage of the ink nozzles after some time. 5.1.1 Important information • Print some MultiCards/MetalliCards every week. This is the only way to preserve print quality. •... -
Page 79: Inserting Multicards/Metallicards
Operation 5.1.2 Inserting MultiCards/MetalliCards Direction of insertion for MultiCards Figure 87 Opening the inlay 1 Open the inlay’s lock (A) and raise the bar. Figure 86 Direction of insertion for MultiCards MultiCards can be inserted directly without any prior handling. The end with the solid margin must be fed into the printer. -
Page 80: Processing A Single Multicard/Metallicard
Operation 5.1.4 Processing a stack of Direction of insertion for MetalliCards MultiCards Important information • Only MultiCards are allowed to be inserted in stacks (not MetalliCards). • You can insert a stack of up to 30 MultiCards in the loader. •... -
Page 81: Software Settings
Operation Software settings The following settings must be made via the M-Print® PRO software. To determine some settings, it is necessary to print a MultiCard. The printed MultiCard can be cleaned with cold water and used again. Important information The MultiCard is not cured in this process. The ink can be wiped off easily. -
Page 82: Mapping And Calibrating The Printer
Operation 5.2.2 Mapping and calibrating the printer A printer must be assigned for each MultiCard type, e.g. DEK 5/5. Calibration must be carried out once for the printer, as this is a printer-specific zero point. Assigning a printer Figure 93 Selecting a MultiCard 1 Choose e.g. - Page 83 Operation Figure 94 Selecting the printer 5 Select the PrintJet ADVANCED printer that has been added. 6 Press the [Map] button. Figure 95 Mapping the printer 7 In the dialog box that follows choose ‛As Printer’ and confirm this with the [OK] button.
- Page 84 8 In this dialog box choose whether you want to assign all variants of the DEK 5/5 MultiCard to this printer. If you press the [Yes] button, all versions of the MultiCard type DEK 5/5 are assigned to the PrintJet ADVANCED and are always output on this printer unless this setting is changed. Printer calibration...
- Page 85 Operation Figure 98 Coordinate plane 10 Insert, for example, a DEK 5/5 MC-10 NEUTRAL WS MultiCard in the printer (also see section “5.1.2 Inserting MultiCards/MetalliCards”). 11 Click the [Print Coordinate Plane] button. 12 Measure the X and Y values as shown below and enter them in the corresponding fields. Figure 99 Measuring and entering values The values that you enter automatically correct the side margins.
- Page 86 Operation 13 Repeat the steps until the coordinate plane is in the following position on the printed MultiCard. Figure 100 Position of the coordinate plane 14 Check this by printing a coordinate plane with the corrected values. 15 Save the settings by clicking the [Save] button. 16 Next set the printer correction (see the following section).
-
Page 87: Setting The Printer Correction
Operation 5.2.3 Setting the printer correction The printer correction must only be set once. It does not depend on the MultiCard type. 1 From the menu bar choose Tools → Printer Settings → Set Printer Correction... 2 Insert, for example, a DEK 5/5 MC-10 NEUTRAL WS MultiCard in the printer (also see section “5.1.2 Inserting MultiCards/MetalliCards”). - Page 88 Operation Figure 102 Setting the printer correction 6 Enter the measured values in the ‛Actual Width (X)’ and ‛Actual height (Y)’ fields. In the example above the measured values are 227.5 x 46. The printer must output the rectangle 0.22% larger in order to reach the required output size.
-
Page 89: Setting Material-Dependent Slip
Operation 5.2.4 Setting material-dependent slip The material-dependent slip correction must take place for every MultiCard version, as it must be set material dependently. 1 From the menu bar choose Tools → Printer Settings → Set Material-Dependent Slip... 2 Insert, for example, a DEK 5/5 MC-10 NEUTRAL WS MultiCard in the printer (also see section “5.1.2 Inserting MultiCards/MetalliCards”). - Page 90 Operation Material-dependent slip – entering the measured values Figure 104 6 If the measured values differ from the specified size, enter these measured values in the ‛Actual Width (X)’ and ‛Actual height (Y)’ fields. In the example above the measured values are 227 x 46. The printer must output the rectangle 0.44 % larger in order to reach the required output size.
-
Page 91: Adjusting Multicards
Operation 5.2.5 Adjusting MultiCards MultiCards may not be their normal size, for example as a result of the ambient temperature. It is generally the width that is affected by such a change. You can adjust MultiCards to compensate for these physical changes. - Page 92 Operation Enter the required values in the ‛Offset (a)’ and ‛Offset (b)’ fields to adjust the offset. Figure 106 Adjusting the offset 5 Insert, for example, a DEK 5/5 MC-10 NEUTRAL WS MultiCard in the printer (also see section “5.1.2 Inserting MultiCards/MetalliCards”).
- Page 93 Operation Example of an incorrect zero point in the X direction (offset a) Figure 108 Adjusting the zero point in the X direction In this example the three squares and the row of dots were printed 1 mm too far to the left. To adjust this, it is necessary to change the value for ‛Offset (a)’...
- Page 94 Operation Example of an incorrect width X (adjusting the centering for all markers) Figure 110 Adjusting the centering in the X direction From marker to marker, printing is increasingly shifting from the center to the right. To adjust this, it is necessary to subtract the measured value (1 mm in this example) from the actual value for ‛Width (X)’...
-
Page 95: Printing Multicards/Metallicards
Operation If printing is increasingly shifting, from marker to marker, from the center downward, it is necessary to add the measured value to the current value for 'Height (Y)' in the 'Adjust Marker Type' window (see Figure 105 Adjusting the marker type). Important information If MultiCards are adjusted at just one computer, these settings must be made available to the other computers. -
Page 96: Touch Panel
Operation Touch panel The touch panel enables you to look up information about the printer such as the current ink level in the cartridges, view and delete print jobs and carry out maintenance. You can also set the required language for the touch panel and print out sample templates. -
Page 97: Menu Structure Of The Touch Panel
Select USB Deactivate subnet mask language port printer name IP address DHCP SYSTEM INFO (Page 2) Ink fill level Protocol Information Information about Select color Overview of events PrintJet ADVANCED Information of ink Message and proposed solution Message information 1449820000/1.4/04.17... -
Page 98: Main Menu
Operation 5.3.2 Main menu Touch panel – main menu Figure 112 The printer status is shown in the bottom line. In the example above the printer is ‛Ready’. Pressing one of the four buttons – [TEMPLATES], [PRINT JOBS], [TOOLS] and [SYSTEM INFO] – takes you to the corresponding submenu. -
Page 99: Submenus
Operation 5.3.3 Submenus Other buttons are available in the submenus: Touching this arrow button displays the next page. Touching this arrow button displays the previous page. Touching this button takes you back to the main menu. The currently selected menu, for example System Info, is shown at the top of the touch panel. -
Page 100: Changing The Printer Name
Operation Touch panel – System Info 2 Figure 114 The following sections provide more information about the individual menu items. 5.3.5 Changing the printer name The preset printer name is always the serial number. You can assign a self-explanatory name to the printer to be able to identify it better. - Page 101 Operation 2 Enter the desired printer name via the on-screen keys and touch the [SAVE] button to confirm it. You can delete the entire entry with the [X] key. You enter a space character with the [Space] key. You can switch to numeric keys with the [123] key. Touch panel –...
-
Page 102: Changing The Ip Address And Subnet Mask And Activating Dhcp
Operation 5.3.6 Changing the IP address and subnet mask and activating DHCP Important information Installation should be carried out by a specialist. Administrator rights are required for this process. You can assign the IP address either statically by entering the IP address and subnet mask or dynamically by activating the Dynamic Host Configuration Protocol (DHCP). - Page 103 Operation Subnet mask 3 Change the network parameters and touch the [SAVE] button to confirm the changes. You can delete the entire entry with the [X] key. The following window appears: Touch panel – System Info 1 – IP address/subnet mask/DHCP Figure 118 1449820000/1.4/04.17...
- Page 104 Operation Activating DHCP 1 Touch the [SYSTEM INFO] button on the main menu. 2 In the first System Info window, touch the [IP ADDRESS] button. The following window appears: Touch panel – System Info 1 – IP address/subnet mask/DHCP Figure 119 3 Touch the checkbox [DHCP].
-
Page 105: Selecting The Language
Operation 5.3.7 Selecting the language 1 In the first System Info window, touch the [LANGUAGE] button. The following window appears: Touch panel – language Figure 120 2 Choose the required language by touching the corresponding button. Touch this button to scroll forward to the next page and additional options. Touch this button to scroll back to the previous page. -
Page 106: Changing The Usb Port
Operation 5.3.8 Changing the USB port Whenever a printer is installed via a USB port, USB – 001 is assigned to it. If you connect a second printer to the PC, USB – 001 is automatically assigned to this printer, too. A different USB port must therefore be assigned manually to the second printer, e.g. -
Page 107: Ink Level
Operation 5.3.9 Ink level Use the [INK LEVEL] button to display information about the ink cartridge. 1 In the second System Info window, touch the [INK LEVEL] button. The following window appears: Touch panel – System Info – ink level Figure 122 2 If you enter the respective color, a window opens with further information about the selected ink cartridge. -
Page 108: 5.3.10 Protocol
Operation 5.3.10 Protocol Use the [PROTOCOL] button to display an overview of printer events. 1 In the second System Info window, touch the [PROTOCOL] button. The following window appears: Touch panel – System Info – protocol Figure 124 2 If you touch the [DETAILS] button, detailed information about the message and, if necessary, a proposed solution are displayed. -
Page 109: 5.3.11 Information
1 In the second System Info window, touch the [INFORMATION] button. The following window appears: Touch panel – System Info – information Figure 126 Information about the PrintJet ADVANCED is displayed here, e.g. which firmware version is currently in use or how many MultiCards/MetalliCards have been printed. 1449820000/1.4/04.17... -
Page 110: 5.3.12 Tools
Operation 5.3.12 Tools If you touch the [TOOLS] button on the main menu, you can carry out the following maintenance tasks. Touch panel – Tools Figure 127 You will find a description of the individual maintenance tasks in chapter “6 Cleaning and maintenance”. 1449820000/1.4/04.17... -
Page 111: 5.3.13 Print Jobs
Operation 5.3.13 Print jobs If you touch the [PRINT JOBS] button on the main menu, all print jobs that are still in the printer queue are displayed. Here you can also delete print jobs if, for example, the wrong file was sent to the printer. Touch panel –... -
Page 112: 5.3.14 Templates
Operation 5.3.14 Templates 1 Touch the [TEMPLATES] button on the touch panel’s main menu. Touch panel – templates Figure 129 Under [TEMPLATES] you will find sample templates, e.g. for printing tests. 2 Touch the template that you want to print. 3 Insert the corresponding MultiCard in the printer. -
Page 113: 5.3.15 Printing The Templates From The Usb Stick
Operation 5.3.15 Printing the templates from the USB stick You can store print data on a USB stick and output it on the PrintJet ADVANCED. 1 Touch the [TEMPLATES] button on the touch panel’s main menu. Touch panel – templates Figure 130 Connection –... - Page 114 Operation Touch panel – templates Figure 132 The print files on the USB stick are displayed. You create print files in M-Print® PRO by choosing ‛PJA File Output’ as the printer (for details, see the M- Print® PRO user manual. 4 Touch the [PRINT] button to execute the print job.
-
Page 115: Cleaning And Maintenance
Cleaning and maintenance Cleaning and maintenance Tools menu ............................ 116 6.1.1 Printhead cleaning ......................117 6.1.2 Printhead flushing ......................118 6.1.3 Executing a sensor check ....................120 6.1.4 Executing a nozzle check ....................122 Replacing ink cartridges ......................124 Replacing the wastepad ....................... 130 Replacing the dust filter ....................... -
Page 116: Tools Menu
Cleaning and maintenance Tools menu Touch panel – main menu Figure 133 1 Touch the [TOOLS] button in the main menu. The following screen is then displayed: Touch panel – tools menu Figure 134 1449820000/1.4/04.17... -
Page 117: Printhead Cleaning
Cleaning and maintenance 6.1.1 Printhead cleaning Carry out printhead cleaning if the print quality deteriorates. Print quality correct Print quality insufficient 1 Touch the [TOOLS] button in the main menu. 2 Touch the [HEAD CLEANING] button in the Tools menu. The following window appears: Touch panel –... -
Page 118: Printhead Flushing
Cleaning and maintenance Printhead cleaning takes approx. 2 minutes. The following message is displayed on the touch panel during printhead cleaning: Touch panel – printhead cleaning duration Figure 136 4 Print out a MultiCard. If the printing result is still not satisfactory, execute printhead flushing. 6.1.2 Printhead flushing If you have carried out printhead cleaning and the printing result is still not satisfactory, execute printhead... - Page 119 Cleaning and maintenance The following window appears: Touch panel – printhead flushing Figure 137 Touch the [NO] button if printhead flushing should not be executed: 3 Touch the [YES] button if printhead flushing should be executed: Printhead flushing takes approx. 5 minutes. The following message is displayed at the touch panel: Touch panel –...
-
Page 120: Executing A Sensor Check
Cleaning and maintenance 6.1.3 Executing a sensor check In a sensor check, all sensors in the printer are checked to make sure they are functioning. If a sensor is soiled, for example, it cannot detect when a MultiCard/MetalliCard passes through. 1 Insert a MultiCard in the printer. - Page 121 Cleaning and maintenance Touch panel – sensor check in progress Figure 140 A status page is subsequently displayed which presents the sensors and shows whether they are correct or not. Contact a service technician in case of an error. 1449820000/1.4/04.17...
-
Page 122: Executing A Nozzle Check
Cleaning and maintenance 6.1.4 Executing a nozzle check If the print quality is not OK, there might be a blocked or dried out nozzle. To see if this is the case, execute a nozzle check. 1 Touch the [TOOLS] button in the main menu. 2 Touch the [NOZZLE CHECK] button in the Tools menu. - Page 123 Cleaning and maintenance Touch panel – inserting a MultiCard for the nozzle check Figure 142 Touch the [CANCEL] button to cancel the process. 5 Insert the selected MultiCard into the loader. 6 Touch the [PRINT] button. The following screen is displayed during the nozzle check: Touch panel –...
-
Page 124: Replacing Ink Cartridges
Cleaning and maintenance Replacing ink cartridges • Never use out-of-date ink cartridges. When the use-by date of the ink approaches Replace the ink cartridges when they are empty or (printed on the packaging), a message is their expiration date has been reached. displayed at the touch panel. - Page 125 Cleaning and maintenance The ink filling level can be displayed at the touch panel; if necessary, replace the ink cartridges. 1 Select the [SYSTEM INFO] button in the main menu. 2 Change to the second page of the System info 3 Touch the [INK LEVEL] button.
- Page 126 Cleaning and maintenance If the expiration date of an ink cartridge has been reached, a message is automatically displayed on the touch panel. Touch panel – ink cartridge out-of-date Figure 145 Important components can become blocked and the printer may be damaged if you touch the [Yes] button and continue to print with the out-of-date ink cartridge.
- Page 127 Cleaning and maintenance The following information is displayed after touching the [INFORMATION] button: Touch Panel – note: ink expired Figure 146 1449820000/1.4/04.17...
- Page 128 Cleaning and maintenance Information on inserting ink cartridges Important information The ink cartridges are electronically and If you open the ink tank lid, the printer mechanically coded, ensuring they can only be stops. inserted correctly. Figure 147 Opening the ink tank lid 1 Open the ink tank lid by pressing the finger recess (A).
- Page 129 Cleaning and maintenance Figure 150 Positions of the ink cartridges Figure 151 Inserting an ink cartridge A Black ink cartridge (K) 4 Insert the ink cartridge into the printer. The ink cartridge is properly inserted when it snaps into B Cyan ink cartridge (C) place.
-
Page 130: Replacing The Wastepad
Cleaning and maintenance Replacing the wastepad Replace the wastepad if a touch panel message displays that it is full. Proceed as follows for more information: 1 Touch the [SYSTEM INFO] button on the main menu. 2 Change to the second page of the System Info. 3 Touch the [PROTOCOL] button. - Page 131 Cleaning and maintenance Touch panel – System Info – protocol Figure 153 Use the [NOTES] button to display information. Important information Do not open the wastepad. The complete tray must be replaced. Dispose of the wastepad through an authorized dealer or at a suitable hazardous materials disposal center.
-
Page 132: Replacing The Dust Filter
Cleaning and maintenance Replacing the dust filter Replace the dust filter if it is soiled. Figure 155 Unlock the wastepad 2 Press the interlock (B) downwards and ... Figure 157 Removing the filter cover 1 Remove the filter cover (A) by, e.g., inserting a slotted screwdriver into the recess and carefully removing the filter cover. -
Page 133: Cleaning The Printer Enclosure
Cleaning and maintenance Cleaning the printer NOTE enclosure Do not use volatile chemicals such as benzene, thinning fluid or insecticide on the printer. The use of such chemicals DANGER can result in damage to the printer including cracks or color changes. Electrical hazard warning When cleaning the printer, ensure that no moisture enters it. -
Page 134: Updating The Printer Software
4 Start the M-Print® PRO program. 5 In M-Print® PRO, choose the menu item 'Extras' and then 'Options'. 6 In the 'Options' window, choose the entry 'PrintJet ADVANCED' and then 'Administration'. M-Print® PRO – updating the printer software Figure 159 7 Select the update file, in the example above it is the 'update.zip' file. -
Page 135: Replacing The Cleaning Unit
Cleaning and maintenance Replacing the cleaning unit If the print quality is no longer good enough, you should try cleaning the printhead (see sections “6.1.1 Printhead cleaning” and “6.1.2 Printhead flushing”). The cleaning unit has to be replaced if the print quality has still not improved. For this, we offer the following service set: PJ ADV SERVICE SET CU, part number 2511750000... - Page 136 Cleaning and maintenance Before you can remove the cleaning unit, you have to put the printhead in the unlocking position (see the figure below). Figure 166 Detaching the hose 7 Detach the hose (A) from the mechanical connector (B). Figure 164 Cleaning unit unlocked NOTE Turn the printhead just 90°...
-
Page 137: Cleaning The Printheads By Hand
Cleaning and maintenance Figure 168 Removing the cleaning unit Figure 170 Cleaning printhead B 9 Pull out the cleaning unit carefully. 11 Clean printhead A with one the second cloth provided. 6.8.3 Cleaning the printheads by hand 6.8.4 Installing the cleaning unit Important information The service set contains two cloths to clean the two printheads. -
Page 138: Closing The Service Cover
Cleaning and maintenance Figure 172 Fastening the cleaning unit Figure 174 Reconnecting the connectors 13 Fasten the cleaning unit with the screws (A) and 15 Reconnect the connectors (A) and (B). (B). 6.8.5 Closing the service cover Figure 173 Fastening the hose Figure 175 Closing the service cover 14 Reattach the hose (A) to the mechanical... -
Page 139: Replacing The Cleaning Fluid Bottle
Cleaning and maintenance Figure 176 Locking the service cover Figure 178 Unscrewing the bottle out of the top 17 Insert a flat-blade screwdriver in the lock (A) and 2 Unscrew the empty bottle (A) out of the top. lock the service cover (B). 18 Reconnect the printer to the grid (see section “4.7 Connecting the power plug”). - Page 140 Cleaning and maintenance Figure 180 Reattaching the hood 4 Reattach the hood (A) over the cleaning fluid bottle (B). 1449820000/1.4/04.17...
-
Page 141: Troubleshooting
Troubleshooting Troubleshooting General information ........................142 General troubleshooting ......................142 List of events ..........................144 1449820000/1.4/04.17... -
Page 142: General Information
Troubleshooting General information Is the printed image unclear or doubled? In this case, contact the Weidmüller Customer Service department. A message on the touch panel indicates a printer fault or when an ink cartridge needs to be replaced. Is there a problem with the printer's location? Touch the [SYSTEMINFO] button in the main menu 1 Make sure that the printer is located on a flat of the touch panel for more detailed information... - Page 143 Troubleshooting The printouts are dirty or spotted Opening the ink tank lid during the print process Check the following if the printed marker areas are dirty or spotted: Printing is canceled if the ink tank lid is opened during the printing process. If you open the lid before the heating unit has •...
-
Page 144: List Of Events
Troubleshooting List of events Code Event Measure Information 30019 Internal ink Please contact Unlike the ink collecting If the internal ink collector collector unit is your Weidmüller tray that can be replaced unit is full, the printer nearly full. representative to easily by the user, the stops the operation in ensure the... - Page 145 Troubleshooting Code Event Measure Information The MAGENTA The ink cartridge If the ink cartridge is 10074 ink cartridge (M) is nearly used up. empty, the printer stops is nearly empty. Make sure that a the operation in order to new ink cartridge prevent print system is available.
- Page 146 Troubleshooting Code Event Measure Information The expiry date Replace the Weidmüller urgently 40012 for BLACK (K) BLACK ink recommends that you do has passed. cartridge (K). not continue to print with Each ink cartridge has an The order number inks that have expired, as expiry date.
- Page 147 Troubleshooting Code Event Measure Information Faulty BLACK ink Restart the Only use original PrintJet 40002 cartridge (K). printer. ADVANCED ink Replace the cartridges. BLACK ink Please contact your cartridge (K). Weidmüller representative The order number if the error persists. is 1338690000. Printer faults and damage caused by the use of 40003...
- Page 148 Troubleshooting Code Event Measure Information Faulty BLACK ink Restart the Only use original PrintJet 40172 cartridge (K). printer. ADVANCED ink Replace the cartridges. BLACK ink Please contact your cartridge (K). Weidmüller representative The order number if the error persists. is 1338690000. Printer faults and damage caused by the use of 40173...
- Page 149 Troubleshooting Code Event Measure Information The ink collecting Insert the ink If the message is 40159 tray was not collecting tray displayed again, please inserted correctly. correctly and contact your Weidmüller make sure that it representative. is fully engaged. Restart the printer if necessary.
- Page 150 Troubleshooting Code Event Measure Information Restart the The marker was not 60005 Transport timeout printer. transported within the Carry out a defined time. sensor test. If the message is displayed again, please contact your Weidmüller representative. 60006 Internal error Restart the If the message is printer.
-
Page 151: Transporting The Printer
Transporting the printer Transporting the printer Decommissioning the printer ...................... 152 Packing the printer ........................152 Disposing of the printer ........................ 153 1449820000/1.4/04.17... -
Page 152: Decommissioning The Printer
Transporting the printer Decommissioning the Packing the printer printer Important information Only use the original packaging when transporting or dispatching the printer over long distances (e.g. relocating). Only then can the best protection be guaranteed for the printer during transport. If you no longer have the original packaging, you can order a packaging kit from Weidmüller under the order... -
Page 153: Disposing Of The Printer
Transporting the printer Disposing of the printer Weidmüller will then professionally recycle and dispose of your printer in accordance with the current laws and regulations. Proceed as follows to dispose of the printer: 1 Decommission the printer (see section Weidmüller will take care of all recycling and waste disposal measures. -
Page 155: Annex
Annex Annex Technical data ..........................156 Ordering data ..........................157 Declaration of conformity ......................158 List of figures ..........................159 List of tables ..........................164 1449820000/1.4/04.17... -
Page 156: Technical Data
57.8 kg (127.43 lb) with packaging 37.2 kg (82.01 lb) without packaging Color system 1 x black 1 x cyan, 1 x magenta, 1 x yellow Ink system: • Scope of supply: PrintJet ADVANCED • Power cable • USB cable •... -
Page 157: Ordering Data
Annex Ordering data Name Article number PrintJet ADVANCED 230 V 1324380000 PrintJet ADVANCED 110 V 1338700000 PJ ADV TNTK INK K Black ink cartridge 1338690000 PJ ADV TNTK INK C Cyan ink cartridge 1338680000 PJ ADV TNTK INK M Magenta ink cartridge... -
Page 158: Declaration Of Conformity
Annex Declaration of conformity PrintJet Advanced printers comply with the fundamental principles for the health and safety of machinery as stipulated by the following EU directives: • 2014/35/EU (Low Voltage Directive) • 2014/30/EU (Electromagnetic Compatibility - EMC) The Declaration of Conformity can be found in the online catalogue at: www.weidmueller.com... -
Page 159: List Of Figures
Figure 29 M-Print® PRO – status of the installation process Figure 30 M-Print® PRO – finishing the installation process Figure 31 Figure 32 PrintJet ADVANCED Explorer Figure 33 Choosing printer connection Figure 34 Adding the printer Figure 35 Browsing network... - Page 160 Annex Dialog box – printer not found Figure 42 Connection –USB cable Figure 43 Figure 44 PrintJet ADVANCED Explorer Figure 45 Choosing printer connection Figure 46 Printer search Figure 47 Printer - search result Figure 48 PrintJet ADVANCED Explorer Figure 49...
- Page 161 Annex Figure 87 Opening the inlay Figure 88 Inserting a MetalliCard in the inlay Figure 89 Direction of insertion for MetalliCards Figure 90 Inserting a single MetalliCard inlay Figure 91 Inserting a stack of MultiCards Figure 92 M-Print® PRO program icon on the desktop Figure 93 Selecting a MultiCard Figure 94...
- Page 162 Annex Touch panel – templates Figure 132 Touch panel – main menu Figure 133 Touch panel – tools menu Figure 134 Touch panel – printhead cleaning Figure 135 Touch panel – printhead cleaning duration Figure 136 Touch panel – printhead flushing Figure 137 Touch panel –...
- Page 163 Annex Figure 177 Removing the hood Figure 178 Unscrewing the bottle out of the top Figure 179 Screwing the bottle into the top Figure 180 Reattaching the hood Figure 181 Switching off the printer 1449820000/1.4/04.17...
-
Page 164: List Of Tables
Annex List of tables Table Page Table 1 Folder structure and meaning Table 2 Technical data Table 3 Ordering data 1449820000/1.4/04.17... - Page 166 www.weidmueller.com Egypt Canada Slovakia Weidmüller is the leading manufacturer of Argentina Kazakhstan Slovenia components for electrical connectivity. The Azerbaijan Qatar Spain Weidmüller product range includes terminal blocks, Australia Columbia South Africa PCB plug-in connectors, protected component Bahrain Croatia South Korea assemblies, industrial Ethernet components as well Belgium Kuwait...
Need help?
Do you have a question about the PrintJet ADVANCED and is the answer not in the manual?
Questions and answers