Table of Contents
Advertisement
Quick Links
Assembly Instructions
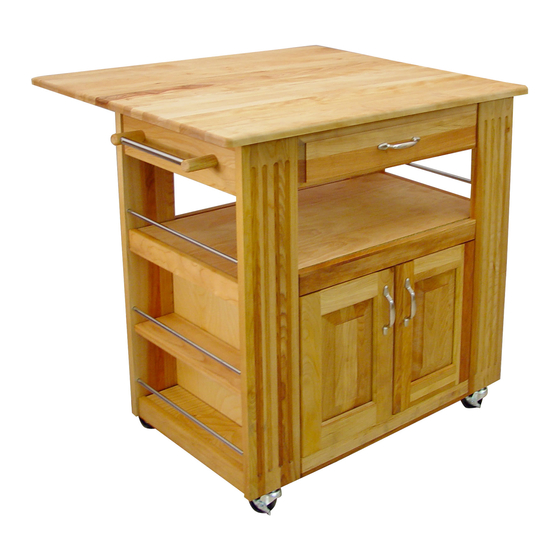
Model 15445
Heart Of The Kitchen Island with Drop Leaf
A. If you need help with assembly, please give us a call at (607) 652-7321 Mon.-Fri. 8am - 4:30 pm EST
and someone will help you. We also have an assembly video on our website www.catskilllcraftsmen.com
B. Assembly uses the Bastion System; a simple yet rugged compression fastening system. We have a
video illustrating the proper way to install this system online at www.catskillcraftsmen.com, click on the
instructions tab at the top.
C. TOOLS NEEDED: Medium-sized flat blade screwdriver, a medium-sized and small Phillips screwdriver
and a hammer. A power screwdriver with flat/phillips heads will speed assembly on most applications
except drawer glides and magnets/plates.
D. This unit is made of solid North American hardwood and has a factory applied oil finish. See the enclosed
booklet for care instructions.
E. Directions (left/right, front/back) are given as facing the front of an assembled unit.
Advertisement
Chapters
Table of Contents

Subscribe to Our Youtube Channel
Related Manuals for CATSKILL 15445


Summary of Contents for CATSKILL 15445
- Page 1 Assembly Instructions Model 15445 Heart Of The Kitchen Island with Drop Leaf A. If you need help with assembly, please give us a call at (607) 652-7321 Mon.-Fri. 8am - 4:30 pm EST and someone will help you. We also have an assembly video on our website www.catskilllcraftsmen.com B.
- Page 2 Drop Leaf (1) 34” x 11” x 3/4” Table Top (1) 34” x 16.5“ x 3/4” Side Panel (2) 16 5/8” x 14 5/10” x 7/10” Bottom & Middle Shelf (2) 28 7/16” x 14 1/4” x 7/16” Back Panel (1) 20 7/16”...
- Page 3 (Drawer back) Bastion Set Screw (18) 1 1/4” Phillips Flat Head #8 Screw (4) Bastion Post (18) (Drop Leaf Hinges) 5/8” Phillips Flat Head #8 Screw (20) Bastion Barrel Nut (18) 3/16” Flat Washer (2) (Brace ends) (Under Door Pins) 3/4”...
-
Page 4: Drawer
TIPS ON HOW THE BASTION FASTENING SYSTEM WORKS 1. The Bastion fastening system consists of a steel post (threaded on one end with a hole through the shaft on the other end); a Barrel Nut (cylindrical barrel-shaped with Illustration Bas. 1 threaded open end &... -
Page 5: Right
The slot in the cam fits over the post. Turn with Phillips screwdriver until Illustration 1B seated. Don’t over-torque!! See Illustration 1C. See our video online at www.catskill- craftsmen.com E. Attach the drawer handle with one 7/8” Truss head machine screws. -
Page 6: Bottom Side
STEP 2 Attach Posts to Legs A. There are 2 Right Legs and 2 Left Legs. Diagonal legs are the same ( Example: Right Front/Left Back). For identification purposes look at illustration 2 which shows the inside view of a pair of legs. - Page 7 STEP 4 Assemble Cabinet Sides – (We recommend using a second person to help with alignment) A. Lay a Right Back/Left Front Leg on its back and attach the Top Side Brace to the upper left corner using the bastion posts and steel pins. Also attach the Middle Side Brace and Bottom Side brace in like manner.
- Page 8 STEP 5 Back Assembly A. Lay the left side unit as in illustration 5 and attach the top Back Brace using the bastion post/pins. Now fit the Back Panel between the Bottom Back Brace and Middle Back Brace using 3/4” steel pins, and then Inside View attach it to the side unit using bastion posts, pins, barrel nuts and set screws.
- Page 9 STEP 7 Main Assembly A. Attach the right cabinet glide to the glide support brace on the right side unit using the same holes as in step 5B. B. Take the right side assembly and attach it to the main unit using the bastion system. NOTE: There are 3 posts in the back legs, only 2 in the front legs (top holes not used on front legs) Not Used Not Used...
-
Page 10: Towel Bar
STEP 8 Bottom Assembly A. With unit still on its side place bottom shelf into the bottom of the cart as in illustration 8. Secure by tapping 1” pins (6), 2 in each bottom side brace and 1 each for the front/back bottom braces. -
Page 11: Drop
STEP 10 Top Assembly A. Upright unit and attach an “L” Bracket to the top inside of each leg using 5/8“ #7 Phillips head screws. The screws go through the round hole in the “L” Bracket. B. Attach the drop leaf supports and hinges to the Table Top and Drop Leaf using 5/8” #8 screws. Brace and glide removed in illustration 10A to show placement of “L”... - Page 12 STEP 11 (This step can also be accomplished without the unit upright) Top Assembly A. Invert cabinet onto top and secure cabinet to the top using 5/8” #7 screws through the “L”brackets on the legs, or place cart top on top of cabinet as in illustration 11. B Insert/tap 1”...
-
Page 13: Truss Head Machine
STEP 12 Magnet Block Assembly A. Attach the magnet plates (may be stuck to magnet!) with 1/2” Phillips flat head #4 screws to the inside top of both doors. The countersunk hole in the plate faces out/bumps go toward wood. See illustration 12B. - Page 14 Catskill Craftsmen’s factory. For Please send me______# of bottle(s) of the one eight ounce (8 fl. oz.) bottle, which Catskill Craftsmen Butcher Block Oil at $7.95 is sufficient for two applications, simply per bottle. My check or money order is send $7.95 along with the completed...
Need help?
Do you have a question about the 15445 and is the answer not in the manual?
Questions and answers