Advertisement
Quick Links
C R A F T S M E N ,
A. Assembly uses the Bastion System; a simple, yet rugged compression
fastening system.
B. This unit is made of solid North American hardwood and has a factory
applied oil finish. See the enclosed booklet for care instructions.
C. Directions (left/right, front/back) are given as if facing the front of an
assembled unit.
Assembly Instructions
Model 2005
Model 2005
I N C .
Advertisement

Subscribe to Our Youtube Channel
Related Manuals for CATSKILL 2005


Summary of Contents for CATSKILL 2005
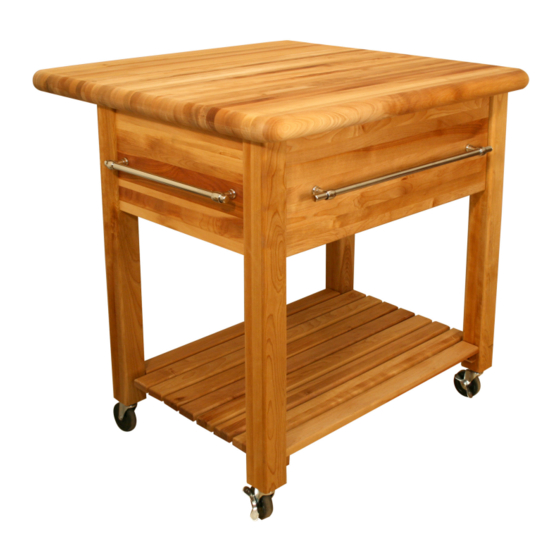
- Page 1 C R A F T S M E N , I N C . Assembly Instructions Model 2005 A. Assembly uses the Bastion System; a simple, yet rugged compression fastening system. B. This unit is made of solid North American hardwood and has a factory applied oil finish.
-
Page 2: Cabinet Parts
CABINET PARTS Drawer Front (1) P/N DF-2005 28” x 10” x 3/4” Drawer Back (1) P/N DBK-2005 27 1/8” x 8” x 3/4” Drawer Side Left (1) Drop Leaf (1) Table Top (1) P/N DS-2005L 18” x 8” x 3/4”... - Page 3 5/8” Phillips Flat Head #8 Screw (26) 16” Chrome Tube (2) 7/16” Pan Head #6 Screw (8) 24” Chrome Tube (1) 3/4” Long 3/16” DIA. Steel Pin (8) Wheel Insert-2005 (4) Bastion Post (16) PN: BPost1429 Bastion Barrel Nut (16) PN: BNut1429 Bastion Set Screw (16) 3”...
- Page 4 TIPS ON HOW THE BASTION FASTENING SYSTEM WORKS 1. The Bastion fastening system consists of a steel post (threaded on one end with a hole through the shaft on the other end); a Barrel Nut (cylindrical barrel-shaped with threaded Illustration Bas. 1 open end &...
- Page 5 STEP 1 Table top stick holes ASSEMBLE SIDE PANELS not used Towel bar holes A. Each side panel consists of two (2) legs, one (1) top in front legs Nut access holes side brace and one (1) Glide Support Brace. When assembled, diagonal legs will be the same (i.e.
- Page 6 7/16” #6 pan head screws. About 1 1/4” of this glide will overlap the front leg. See illustration 2B. You may have to slide part 2 in and out to expose pilot holes. This end of the glide overlaps front leg 1 1/4” &...
- Page 7 STEP 3 ATTACH TOP BACK BRACE You may find it easiest to attach the Top Back Brace and shelves by inverting the island.The Top Back Brace is located 1 1/4” down on the legs. This allows clearance for hinges and the drop leaf supports. Attach the Top Back Brace to the left and right side panels with bastions.
- Page 8 STEP 5 ATTACH LEGS TO TABLE TOP With Top still inverted, secure top to leg assembly with 1 1/4” #8 screws through Table Top Sticks. Three screws per stick. Illustration 5 STEP 6 ATTACH CASTERS & BOTTOM SHELF With unit still upside down, tap caster sockets into holes in leg ends until seated, then tap in casters. Hit on metal part of caster to seat.
- Page 9 STEP 7 See illustration 7A and 7B. Screw Brass Towel Bar Posts into the Top Side Braces and the Drawer Front using 1 1/4” #8 Screws. Slide Standoffs over Posts. Attach Pipe Holders by sliding Supports over Posts and secure with tiny Set Screws using Allen Wrench provided.
-
Page 10: Step 8 Drawer Assembly
STEP 8 DRAWER ASSEMBLY Attach Drawer Back to Drawer Sides using 1-1/4” Phillips Flat Head #8 screws. Then insert Drawer Bottom into slots (Best side up). Put bastion posts into Drawer Front & secure to Drawer Sides using barrel nuts & set screws. Attach the Glide inserts to the drawer sides so that the front of the glide insert touches the drawer front, using 7/16”... - Page 11 CITY ______________________________________ STATE _________________________ ZIP _______ Catskill Craftsmen, Inc. Please make checks payable to: Catskill Craftsmen Inc. 15 West End Ave. 15 West End Ave. Stamford, NY 12167-1296 Stamford, NY 12167-1296 C R A F T S M E N ,...
Need help?
Do you have a question about the 2005 and is the answer not in the manual?
Questions and answers