ClearOne COLLABORATE LIVE 600 User Manual
Hide thumbs
Also See for COLLABORATE LIVE 600:
- Quick start manual (10 pages) ,
- Quick start manual (8 pages)

Related Manuals for ClearOne COLLABORATE LIVE 600


Summary of Contents for ClearOne COLLABORATE LIVE 600
- Page 1 ® COLLABORATE LIVE UIDE 1 | C O L L A B O R A T E L I V E : U s e r G u i d e...
- Page 2 1.6 – Feb 2020 DOC-0156-001 R © 2020 ClearOne Inc. - All rights reserved. No part of this document may be reproduced in any form or by any means without written permission from ClearOne. Printed in the United States of America. ClearOne reserves specific privileges.
-
Page 3: Table Of Contents
TABLE OF CONTENTS Chapter 1: Introduction ......................6 IN THIS CHAPTER ..............................6 COLLABORATE® LIVE 600 OVERVIEW ......................... 6 MAIN FEATURES ..............................7 COMPARISON TABLE .............................. 8 FEATURE HIGHLIGHTS ............................9 Chapter 2: Getting Started ....................... 10 IN THIS CHAPTER ..............................10 USING THE REMOTE CONTROL .......................... - Page 4 ENDING CALLS ............................... 40 MUTING THE VIDEO .............................. 41 SWITCHING CALL VIEW MODES .......................... 42 USING PICTURE-IN-PICTURE (PIP) MODES ....................... 42 CALL STATE INDICATIONS ........................... 43 VIEWING CALL STATUS ............................44 USING CALL TONES .............................. 45 RECORDING AND STREAMING ..........................46 DATA SHARING ..............................
- Page 5 Chapter 8: Collaborate Space ....................79 IN THIS CHAPTER ..............................79 STARTING / JOINING A SPACE MEETING ......................79 PRESENTATION ..............................81 END MEETING ................................ 81 Chapter 9: Web Access and Management ................82 IN THIS CHAPTER ..............................82 ACCESSING COLLABORATE® LIVE VIA BROWSER ..................82 VIEWING A STREAMING SESSION ........................
-
Page 6: Chapter 1: Introduction
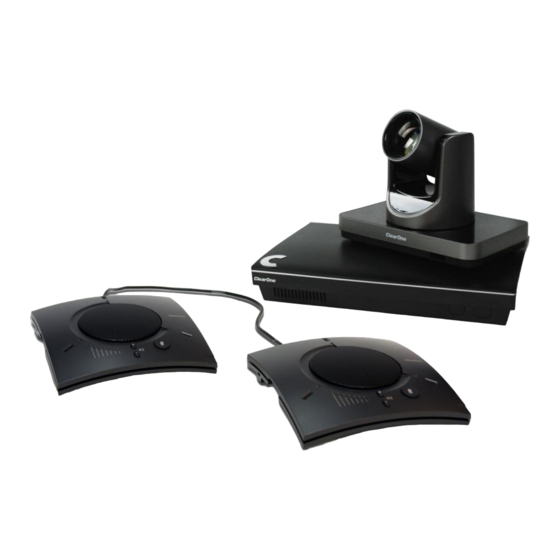
Various accessories, such as a one Unit 200 PTZ camera, ClearOne two CHATAttach 150 Speakerphone and ClearOne DataPoint HD – can be installed and integrated as part of the COLLABORATE® Live system. Shortly, The Main Key features of COLLABORATE® Live contains, COLLABORATE® Space web conferencing, Skype®... -
Page 7: Main Features
COLLABORATE Live 600 codec appliance UNITE 200 PTZ Camera CHATAttach 150 speakerphone solution Power supplies, cables and accessories COLLABORATE Space application (90 days) Two-year support and maintenance with warranty Note: For more information about the COLLABORATE® Live 600 physical installation, including the connection of cables and devices to COLLABORATE®... -
Page 8: Comparison Table
√ Audio CONVERGE Pro 2 CONVERGE Pro 2 48V mixer and 48V mixer and Audio CHAT 150C CHAT 150C CHATAttach 150 ClearOne BMA CT Ceiling Device Speakerphone Speakerphone Speakerphone Beamforming Mic Tile Beamforming Array 2 Mic Array C O L L A B O R A T E L I V E : U s e r G u i d e... -
Page 9: Feature Highlights
Note: The display resolution must be set to 1920x1080 when the received resolution is 1080. Otherwise you may encounter video issues. FEATURE HIGHLIGHTS New features incorporated in COLLABORATE® Live 600, 900 and 1000 include: User interface as intuitive and simple as familiar mobile or tablet devices. ... -
Page 10: Chapter 2: Getting Started
Chapter 2: Getting Started IN THIS CHAPTER Once the COLLABORATE® Live unit is installed, connected and turned on, it is ready for use. This chapter describes the following basic operations: Using the Remote Control Using the On-Screen Menu ... - Page 11 LPHANUMERIC EYPAD The remote control includes an alphanumeric keypad with buttons from 0 to 9. In the Dot button you can find the following signs: '.'',', '*', '#', '^', '@', '$', ':', '=', '-', '_', '!' etc. In addition, Clear button to erase entered characters. In different windows, you can toggle between numbers and letters, depending on the field.
-
Page 12: Navigation Arrows And Additional Buttons
NAVIGATION ARROWS AND ADDITIONAL BUTTONS Using the Navigation arrows of the OK button, you can navigate the GUI menus/options in four directional movements: Up, Down, Left and Right. Navigation Arrows In addition to the Navigation arrows, the following buttons are available around it: ... -
Page 13: System Icons
Navigate the COLLABORATE® Live menu using the remote control. To expand menu options, Press the down arrow on the Navigation arrows. To access a category/option, select the category / Option. Press Back on the remote control to go back to the home menu. SYSTEM ICONS The following icons indicate the different behaviors of the system. -
Page 14: Displaying System Information
Icon Image Meaning Gatekeeper Registration Gatekeeper Registration Failed MCU Voice-Switch Layout Multicast Streaming Recording Recoding paused Far End Recording Encrypted Call Audio Only Call SIP Registration SIP Registration Failed DISPLAYING SYSTEM INFORMATION Whenever the COLLABORATE® Live unit is turned on, you can view the system status details. -
Page 15: Collaborate Setup
When COLLABORATE® Live is in the idle state, the Status window displays the following information: System ID – System ID as defined in the system settings (see Preference Settings) System Model – COLLABORATE® Live model Software Version – Software version of the COLLABORATE® Live application. ... - Page 16 Name – System name used to identify the system when using DNS dialing. Best Practice will be a name that represents the actual location of the system. Select Next C O L L A B O R A T E L I V E : U s e r G u i d e...
- Page 17 Language Name: Use left and right arrows to select a language for the system’s User Interface and select the desired language. Click Next. (A system restart is required after changing the system language.) Date, Time & Time Zone: By default, Date, Time & Time Zone values will be set automatically.
- Page 18 Click Save. If the date & time are disabled, then the details cannot be updated. Time: This feature allows you to adjust the System’s Time. This time will be used for scheduling meetings, clock and more. Click Save. 4. Network: C O L L A B O R A T E L I V E : U s e r G u i d e...
- Page 19 IP Addresses: Obtain Automatically – Select the Toggle button to obtain an IP Address from a DHCP server automatically. IP Address – Set the IP Address for this system. If using a DHCP server, the address obtained from the DHCP server is displayed. IP address can be edited and saved. ...
- Page 20 DNS Addresses: Obtain Automatically – Select the Toggle button to obtain your DNS server Address from a DHCP server automatically. If you do not choose to obtain the DNS address from a DHCP server, please fill in the following fields: ...
- Page 21 Enter your organization proxy server address. For any assistance use your organization’s network manager. Click Next. 6. Activation You will need an authenticated login and password to connect to COLLABORATE© Space. These credentials can be created in different ways: If you would like to create a new Collaborate Space trial account, complete the Activation information, and then click “Sign Up”...
-
Page 22: Chapter 3: Configuration Basics
Chapter 3: Configuration Basics IN THIS CHAPTER This chapter explains the basic configuration options and includes the following sections: Configuring the Audio Configuring the Camera Controlling the Camera Configuring the Display LAN settings Firewall Settings ... - Page 23 The audio of the COLLABORATE® Live 600 system must be optimized for the outputs used and the room in which it is used. For best audio performance, ClearOne recommends using Balanced Audio or Line output to a mixer or amplifier. HDMI audio to a monitor is also supported, but monitor speakers are usually lower quality.
-
Page 24: Configuring The Camera
CONFIGURING THE CAMERA Before you begin videoconferencing, you need to make sure that the cameras connected to the COLLABORATE® Live 600 are properly configured. Cameras are configured via the Camera Settings window. To access the camera settings: Press OK on the remote control. The main menu appears. Using the remote control’s Navigation arrows, select Settings >... -
Page 25: Configuring The Display
CONFIGURING THE DISPLAY The display settings determine the method by which video is displayed on the screen. Adjust the display settings depending on the room you are using for videoconferencing and on your distance from the screen. Note: The term “screen” refers to any type of monitor you are using (LED, LCD, and so on). To access the display settings: 1. -
Page 26: Lan Settings
LAN SETTINGS In the IP Settings window, you can configure TCP/IP networking parameters for Collaborate To edit system settings: 1. Select Network. The IP Settings window appears. 2. In the Network Settings window, set the following options and parameters Obtain Address from DHCP Server – Select the checkbox to obtain an IP Address from a DHCP server ... -
Page 27: Firewall Settings
FIREWALL SETTINGS The Firewall Network Settings contain your system's identification configuration on the local network. NAT helps protect a LAN from exposure to unwanted traffic by providing one single external address to remote users. NAT uses a system of local and external addresses to hide a LAN's users from other networks. -
Page 28: General Settings
GENERAL SETTINGS The general settings define general system properties. To configure general settings: Select Settings>General: In the General Settings window, set the following options and parameters. System Name – Set the system title that will represent the unit during a session. Note: this will be automatically overwritten if you register to our Space service. -
Page 29: Calls Settings
CALLS SETTINGS In the Calls Settings window, you can define miscellaneous technical settings that affect how video collaboration calls are performed by default. To configure call settings Select Settings>Calls. The Call Settings window appears. In the Call Settings window, set the following options and parameters 29 | C O L L A B O R A T E L I V E : U s e r G u i d e... -
Page 30: Presentation Settings
Auto Answer – Enables auto answering of incoming calls. Do Not Disturb – Select to turn on auto reject of all incoming calls. Auto Mute Microphone During Incoming Call – Enables auto muting the microphone for incoming calls. ... -
Page 31: Mcu Settings
MCU SETTINGS The embedded MCU (optional feature) enables connecting up to 9 endpoints simultaneously from various locations. This MCU capability includes the host system and an additional 8 endpoints. Note: Before using this functionality, please verify the licensing capabilities of your system. Press ‘Status’... -
Page 32: Recording Settings
RECORDING SETTINGS You can define the local directory in which recordings should be saved. To configure the recording settings: Select Settings>Recording. The Recording Settings window appears. In the Recording Settings window the following properties can be configured: Recording Path – Select to set the path of the recording directory. This option is useful when changing the recording location to a USB flash drive or to a remote computer that in the same work group. -
Page 33: Record To Nas Drive (Network Hard Drive)
Split Recording – Long recordings can be automatically split into smaller files by enabling this option recorded remaining time below Remaining Time – The remaining recording time is calculated according to the available storage memory and the current settings for recording quality. Note: Changing the recording quality also changes the Streaming quality. - Page 34 In the Streaming Settings window, the following properties can be configured: Streaming Mode - Choose between unicast and multicast. Streaming Port – Enter the streaming port number. The default port is 12100 for WMV video format and 554 for MP4 video format. Note: Port number of MP4 streaming cannot be modified.
-
Page 35: Multicast Settings
Multicast sessions can be viewed by all ClearOne endpoints and the Apple QuickTime viewer. The Multicast Settings window allows you to define how multicast sessions are initiated by COLLABORATE®... -
Page 36: Software Updates
Multicast Name – The identifying name of the multicast. Time to Live – The number of router hops allowed. Announcement Rate – SDP announcement rate in seconds. Refresh Video Rate – The video image refresh rate in multicast streams; an interval of 5 seconds is set by default. - Page 37 37 | C O L L A B O R A T E L I V E : U s e r G u i d e...
-
Page 38: Chapter 4: Video Collaboration
Chapter 4: Video Collaboration IN THIS CHAPTER This chapter explains the video collaboration basics and options using COLLABORATE® Live, and includes the following sections: Starting Calls Auto-Answering Calls Ending Calls Muting the Video Switching Image Modes ... - Page 39 In the Type a Number/Name field, type the IP Address to which you want to call. Alternatively, instead of an IP Address, you can also use an Alias, E.164 number, or a DNS Address (if such are defined on your network). ...
-
Page 40: Auto-Answering Calls
When the call is answered on the far end, the system switches to the Call mode. AUTO-ANSWERING CALLS The auto-answer option is found in the Settings>Calls menu. When the auto-answer option is not selected and an incoming call is received, a message is displayed on the screen. -
Page 41: Muting The Video
MUTING THE VIDEO Muting video during a videoconference is a preference which is selected via the remote control. When you press Mute Video ( ) during a call, the remote side sees the Mute Video BMP image, which indicates that your video source has been mute. 41 | C O L L A B O R A T E L I V E : U s e r G u i d e... -
Page 42: Switching Call View Modes
SWITCHING CALL VIEW MODES Depending on the type of screen and video interface you are using (HDMI/Display Port); a call may be displayed in single, dual or presentation mode. INGLE Single mode presents a single screen showing the output of the local video camera in the Picture-In-Picture (PIP) screen area (see Using Picture-In-Picture (PIP) Modes) and the output of the remote video camera on the main screen area. -
Page 43: Call State Indications
Note: When data is shared, the remote video and the data are displayed side by side on the screen (This option is unavailable while sharing via Collaborate Share option). CALL STATE INDICATIONS Various call states are represented by icons on the screen when videoconferencing is taking place. -
Page 44: Viewing Call Status
GUI Icon Indication Successful COLLABORATE Central registration Unsuccessful gatekeeper registration Successful gatekeeper registration Currently multicasting MCU VS layout mode Currently recording Currently streaming Currently on Audio session. SIP registration. SIP Registration failed. VIEWING CALL STATUS During a videoconference call, you can view and check the technical details of the call. To view the call status details: During the video collaboration call, click the Status button on the remote to view the Call... -
Page 45: Using Call Tones
The following information is displayed in the Call Status box for both incoming and outgoing communication: Video Format – Video codec used to display video in this call Video Resolution – Video resolution used in this call Video Bandwidth – Bandwidth used by the video in this call ... -
Page 46: Recording And Streaming
RECORDING AND STREAMING The recording and playback functionality allow you to record while the system is in idle mode, or in a point-to-point or multipoint (MCU based) call, and view them at a later time. You can share the recorded file during a videoconference with the parties connected, through the recording sharing option. - Page 47 PAUSE RECORDING You can pause and resume recording at any point during a call or idle session. Pause / Resume: Select Recording>Pause Recording. The recording icon will be changed ( Press on the pause button on the remote control To resume recording select Recording >...
- Page 48 Note: When recording in idle mode (not during a videoconference), you can stop the recording by pressing the End Call button on the remote control. A confirmation message appears and requires you to select Yes. VIEW RECORDING You can view recordings in either of the following ways: ...
- Page 49 Note: Refer to Web Access and Management for information on recording and streaming via the Internet. You can start streaming in Idle mode. In order to stream video and shared data check ‘Record and Stream Data’ in Recording settings. Press on the streaming button on the remote control STOP STREAMING You can stop the streaming when it is no longer needed.
-
Page 50: Data Sharing
To watch MP4 streaming on your computer open VLC player. In Media>Open URL from clipboard enter to following: rtsp://IP_ADDRESS:PORT where IP_ADDRESS is the unit IP and the port is the streaming port (Default value is 554). Note: In order to watch MP4 streaming, a VLC player should be installed on your computer DATA SHARING Data Sharing can be accessed via the menu or via Data on the remote control. - Page 51 CONNECTING TO A PC Laptop computers can be connected to the COLLABORATE® Live 600 by connecting the laptop to HDMI input. When you select HDMI as data source, the screen switches to display the data on the screen. 51 | C O L L A B O R A T E L I V E : U s e r G u i d e...
- Page 52 CONNECTING A USB FLASH DRIVE You can view and share files that are stored on a portable USB flash drive. To view and share files from a USB flash drive: Insert a USB flash drive to one of the COLLABORATE® Live 600 USB ports. The message "USB device inserted"...
- Page 53 Select the file you want and then press OK on the remote control. The following files are supported: *.jpg, *.jpeg, *.gif, *.png, *.tiff, *.tif, *.bmp, *.wmf, *.mpg, *.mpeg, *.wmv, *.mp4, *.avi, *.pdf, *.pps, *.ppt, *.doc, *.rtf, *.xls, *.xlsx, *.pptx, *.ppsx and *.docx.
- Page 54 SHARING WIRELESS You can view and share your PC desktop or any open application via network using the Collaborate® Share feature. To define wireless settings, follow the Presentation settings. To view and share wirelessly: Download the Collaborate® Share application from the web interface Ensure that the computer you are going to use is connected to the network or that your computer can connect to the company’s network or to an external Wi-Fi network.
- Page 55 Collaborate Live Share CONTROLLERS While wireless is shared, you can manage your sharing from “Collaborate Share” controllers. Button Image Button Name Description Pause Pause the current share Play Resume sharing Full view Switch the COLLABORATE® Share to full view Compact view Switch the COLLABORATE®...
- Page 56 DATA SHARING IN IDLE MODE It is possible to share data while the system is idle. Connect PC \ Camera to HDMI or USB drive or Wireless sharing, and share the desired data. You can press the ‘PIP’ button on the remote control in order to see your data and your main camera side-by-side.
-
Page 57: Using Multicasting
COLLABORATE® Live allows numerous passive viewers to view the session. This is typically used at lectures, or any session that passive viewers can benefit from. Multicast sessions can be viewed by all ClearOne endpoints, the free ClearOne multicast viewer, and the Apple QuickTime viewer. - Page 58 STARTING/STOPPING A MULTICAST CALL To stop or start a multicast: You can start multicasting on idle mode. 1. Press OK on the remote control. The main menu appears. 2. Select Live Streaming> Start (or Stop) Multicast. Note: You can start multicasting on Idle mode. In order to multicast video and shared data select ‘Video and Presentation’...
-
Page 59: Chapter 5: Quick Dialing Methods
Chapter 5: Quick Dialing Methods IN THIS CHAPTER This chapter describes the different quick dialing methods that are available in COLLABORATE® Live 600, and includes the following sections: Using the Contacts Using the Recent Calls Using Online Directories ... -
Page 60: Using The Recent Calls
EDITING ENTRIES IN THE CONTACTS You can edit frequently used numbers already in the Contacts list and save them for repeated use. To edit a contact’s details in the Contacts list: In the Contacts list, select the entry you want to edit and then press OK on the remote control With the menu on the right you can Add To Favorites, Edit or Remove the contact. -
Page 61: Using Collaborate Space Contacts
ACCESSING A DIRECTORY VIA THE REMOTE CONTROL To access the Contacts via the remote control: 1. On the remote control, press the Contacts button. The Contacts opens. 2. Select the Directory tab, and on the number to dial press Dial. ACCESSING THE DIRECTORY VIA THE CONTACTS To access the Directory via the Contacts: 1. -
Page 62: Chapter 6:Skype For Business
Chapter 6: Skype for Business IN THIS CHAPTER This chapter covers Skype for Business calling, and includes the following sections: Starting Skype for Business calls Starting Skype for Business Multi Conference Calls Presentation sharing Display Layouts ... -
Page 63: Starting Skype For Business Multi Conference Calls
STARTING SKYPE FOR BUSINESS MULTI CONFERENCE CALLS If you need to add more people to your conference call, you can select their names from your Contacts list: 1. Make sure your contacts are available by checking their present status first. Select contact from the list, and then click Dial. - Page 64 PRESENTATION SHARING HDMI Input Wireless Presentation USB DISPLAY LAYOUTS Dual Displays: One display showing the presentation, the second display showing the far-end video: C O L L A B O R A T E L I V E : U s e r G u i d e...
- Page 65 Dual Displays: One display showing the near-end video, the second display showing the far- end video Voice Switched Mode: Displays the party that is talking in a point-to-point, or multi-party calls. JOIN SCHEDULED SKYPE FOR BUSINESS MEETINGS A meeting Reminder will pop up for scheduled Skype for Business meetings. 65 | C O L L A B O R A T E L I V E : U s e r G u i d e...
-
Page 66: Using Skype For Business Contacts
USING SKYPE FOR BUSINESS CONTACTS When your system is registered to a Skype for Business server (See Skype for Business settings), all users that are registered to this server will appear in the combined Contacts list. To access the Contacts via the remote control: 1. -
Page 67: Chapter 7: Advanced Settings
Chapter 7: Advanced Settings IN THIS CHAPTER This chapter covers the advanced settings for COLLABORATE® Live, and includes the following sections: Display Settings Network Settings Serial Port Directory Properties H.323 Protocol Settings SIP Protocol Settings ... -
Page 68: Directory Properties
Directory. Note: Directory settings are available only in COLLABORATE® Live systems that are not managed by a ClearOne COLLABORATE Central. To configure the Directory settings: Select Settings>Advanced>Directory. The Directory Settings window appears. C O L L A B O R A T E L I V E : U s e r G u i d e... - Page 69 In the Directory Settings window, set the following options and parameters Enable Directory Registration – When selected, this checkbox activates the rest of the fields in this window and enables the Directory connection registration. Server Type – Select the Directory server type. If you are not sure which type to select, consult with your system administrator.
-
Page 70: H.323 Protocol Settings
Note: For more information about ClearOne’s COLLABORATE Central server, its installation and configuration, refer to the COLLABORATE Central User Guide. - Page 71 H.460 - This selection should be selected manually for network connections over Firewall/NAT only when the connection type is known. Tunnelling Port -This selection should be selected manually for ClearOne Proprietary Tunnelling. The default tunnelling port is configured by the System Administrator (see NetPoint/ COLLABORATE Central Administration Configuration Manager).
-
Page 72: Sip Protocol Settings
Note: The COLLABORATE Central >Invite option is available on the menu only when COLLABORATE Central mode is active. 2. Type in the participant COLLABORATE Central alias/IP number, and select Invite. The call is connected SIP PROTOCOL SETTINGS SIP is a common communication signaling protocol for VoIP. To configure SIP settings: Select Settings >... -
Page 73: Security Settings
To access Collaborate Space Settings: Select Settings>Advanced>Space. The Space window appears. In the Space window, set the following options and parameters: Server Address - Enter the IP Address of the Collaborate Space server. Email – Enter the Email used to log into the Collaborate Space server. ... -
Page 74: Admin Settings
2. In the Security Settings window, set the following options and parameters Web Server – Select this option to allow Web access to the COLLABORATE® Live 600 unit via a browser. If you enter a password, Web users will be required to enter the same password when they access the unit. - Page 75 2. In the Admin Settings window, set the following options and parameters. Block Incoming SIP Calls – Enable to auto reject only incoming SIP calls. Enable adaptive bandwidth Adjustment – Enables videoconferences to proceed at reduced bandwidth if the network is congested. Deselecting this option maintains a constant quality to the session, but it may cause network problems.
-
Page 76: Proxy Settings
Press Restore Defaults to reset system into factory settings. PROXY SETTINGS To configure Proxy Settings: Select Settings>Advanced>Proxy. The Proxy Settings window appears. Proxy Address – Proxy server IP Proxy Port – The port required for the proxy server (proxy mode). ... -
Page 77: Skype For Business Settings
In the Exchange window, set the following options and parameters: Auto Discover Exchange URL - Enabling this option would integrating the outlook automatically. Email - Enter the email address you use to sign in to your organization’s network. ... - Page 78 In the Skype for Business window, set the following options and parameters: Sign in Address - Enter the sign in address for your Skype for Business server. User Name – Enter the user name used to log into the Skype for Business server. ...
-
Page 79: Chapter 8: Collaborate Space
Chapter 8: Collaborate Space IN THIS CHAPTER COLLABORATE© Space is a cloud video collaboration application that connects hundreds of users joining from any device, anytime, and anywhere using messaging, calling, and meetings. STARTING / JOINING A SPACE MEETING You can start or join a Collaborate Space meeting: Note: Before joining / starting a space meeting, you must enter a valid server and user details under Settings >... - Page 80 4. Select Online / Away contact and press Dial. Space call will be appearing as below. Add people – Add participants to the meeting / call Layout - Choose streaming layout: a. Vertical – Stream video in top and bottom mode. b.
-
Page 81: Presentation
PRESENTATION Collaborate Share – Wirelessly share your PC desktop or any open application. HDMI – Depending on your camera source, if available, share second HDMI input. Snapshots – Share saved snapshots of your Whiteboard presentations. END MEETING ... -
Page 82: Chapter 9: Web Access And Management
Chapter 9: Web Access and Management IN THIS CHAPTER This chapter explains how to access COLLABORATE® Live via a browser and use the Web- based GUI for viewing sessions/files, and configuring the unit from a remote location or via the LAN. -
Page 83: Viewing A Streaming Session
If a password was set for Web access (see Administration Settings): in the Password field, enter your password for accessing the management options, and then click Login. If the password is authenticated, the management options page appears. VIEWING A STREAMING SESSION You can view in your browser any stream that has started on COLLABORATE®... -
Page 84: Viewing A Multicast Video Collaboration
VIEWING A MULTICAST VIDEO COLLABORATION You can view in your browser an ongoing multicast video collaboration that has started via the COLLABORATE® Live unit. The multicast video collaboration is viewed in the browser using an embedded Apple QuickTime plug-in Note: Viewing a multicast video collaboration does not require you to enter your password and you do not have to log in. -
Page 85: Viewing The Recording Archive
Copy and paste the license key (a long text-based string) that you received from ClearOne into the License Key text box, and then click Apply. Once the license key is applied, you can view which features/functionalities are available: Presentation – Indicates whether the laptop sharing and USB sharing functionality are enabled or disabled. - Page 86 To view the list of recordings: After logging in, click Recordings. The Recording Archive page appears. Click on recording name in order to play it. Click on the Download link on the right, to download the recording file. 3. Choose which recordings you would like to view by using the following filtering options: ...
-
Page 87: Sending Running Text In A Call
The currently available disk space size, labeled Free Space, is displayed above the list. To delete a recording: Select the checkbox on the row of the recording’s entry, and then click Delete. You can select more than one recording. Note: Click Select All to select the checkboxes of all recordings that are currently displayed. -
Page 88: Viewing Call Status With The Web-Based Gui
Note: To stop the display of the running text message on the far end, click Stop. VIEWING CALL STATUS WITH THE WEB-BASED GUI During a call, you can view and check the technical details of the call with the Web-based GUI. -
Page 89: Performing System Upgrade
To upgrade the COLLABORATE® Live software: 1. After logging in, click Maintenance>System Upgrade. The System Upgrade box appears. 2. Click Browse and then select the ClearOne-provided file that contains the newer software version. 3. Click Upgrade. The system upgrade is performed and then the system reboots. -
Page 90: Performing System Restore From Backup File
1. After logging in, click Maintenance>System Recovery 2. The system will reboot and a Backup/Restore screen will appear 3. Select the Backup option. The Backup screen will appear. 4. Using the remote control to enter letters and numbers, enter the Backup name and click on the Create button to create the backup file of the configuration. - Page 91 Note: All information on the system including user information, Contacts entries, IP settings and all other user defined information will be deleted. After restoring the system to its factory defaults, it may be necessary to perform a system upgrade. 1. The system will reboot and Recovery menu will appear. 2.
-
Page 92: Performing System Restore From Ftp
Once the restore process is completed, press OK and shutdown the system by pressing for a few seconds on the power button; then press the power button again in order to turn on the system. Copy the stored License Key to the system (Configuration>Option>License) PERFORMING SYSTEM RESTORE FROM FTP Whenever necessary, you can discard all manually entered configuration settings and restore using settings delivered via... -
Page 93: Access To System Recovery With Usb Device
Select the FTP Updates button. The FTP Updates screen will appear. Enter the FTP server details including FTP Address, User Name and Password, and click the Connect button. Select the file from the listing, and then click on the Download button. Once the download is completed, press on the Back button. -
Page 94: Chapter 10:Telnet Commands
Chapter 10:Telnet Commands The Telnet commands allow you to communicate with a remote computer that is using the Telnet protocol. You can run telnet without parameters in order to enter the telnet context, indicated by the Telnet prompt (telnet>). From the Telnet prompt, use the following commands to manage a computer running Telnet Client. -
Page 95: Descriptions Of The Telnet Api (Collaborate® Live)
DESCRIPTIONS OF THE TELNET API (COLLABORATE® LIVE) Description Arguments Example — accept Accept incoming call accept callinfo Request call information details SessionID: Valid session ID number callinfo 1 use sessions command to get ID — camerahome Return PTZ camera to default camerahome position —... - Page 96 camerastop Stop camera movement Direction: camerastop sz spt – stop pan tilt camerastop sz remote sz – stop zoom farend: local, remote change_camera Set current camera by index (call Index:1-9 change_camera 1 cameralist for list of available devices) changewirelesslayout Change wireless layout while Parameter: changewirelesslayout wireless is being...
- Page 97 dialspacecontact Dial Collaborate Space contacts Contact ID dialspacecontact 14 video Use listspacecontacts command for Calltype: audio, video a numbered contact list donotdisturb Start or stop do not disturb mode. Parameter: donotdisturb enable enable disable dtmf Send DTMF tone to remote endpoint ParticipantID: any valid participant dtmf 23 identified...
- Page 98 — help Displays all telnet commands and help notifications. — listcontacts Lists H.323 and SIP contacts listcontacts — listsfbcontacts Lists Skype for Business contacts listsfbcontacts — listspacecontacts Lists Collaborate Space contacts listspacecontacts multicast Start or stop media activity. Parameter: multicast start start multicast stop stop...
- Page 99 12 Mute Mic 13 Display 14 Settings 15 Mute Video 16 Mute Speaker 17 Enter 18 Go Right 19 Go Left 20 Go Up 21 Go Down 22 Cancel 23 Dial 24 Hang Up 25 Zoom In 26 Zoom Out 27 Volume Up 28 Volume Down 29 Num 1...
- Page 100 39 Dot ( . ^ , @ # ) 40 Clear / # DTMF — restart restarts the unit. restart rssmessage Send RSS message to all usage: rssmessage <text> <speed> rssmessage message participants <count> <start> 200 1 true text - speed - count - start - true,false...
- Page 101 sharewireless Start wireless sharing when there is Parameter: sharewireless start at least 1 sender connected to the unit. start Stop — shutdown Shutdown the system shutdown Note: the unit can only be powered back up by pressing the power button on the unit. streaming Start or stop media activity.
-
Page 102: Chapter 11: Specifications
Chapter 11: Specifications The following are the COLLABORATE® Live specifications. Video Specifications Transmission Speed SIP / H.323: 96 Kbps - 6Mbps H.261, H.263, H.263+/++, H.264 Video Standards QCIF (176 x 144 pixels) QVGA (320 x 240 pixels) ... - Page 103 Data Sharing Methods Laptop plug in HD DataPoint USB storage key Documents: PPT, PPS, XLS, XLSX, Data Specifications DOC,DOCX,PDF Video clips (AVI, MPEG, WMV, MP4 etc.) Graphic files (BMP, GIF, TIF, etc.) Sharing of file, or the HDMI input ...
- Page 104 Search and filter packet ordering Packet duplication AES is NIST validation Firewall traversal using NetPoint Security H.460 protocol and ClearOne Tunneling proprietary protocol NAT – Network Address Translation Supports restricted access to users via admin ...
-
Page 105: Chapter 12: Network Requirements
Chapter 12: Network Requirements IN THIS CHAPTER In order to videoconference via the network, some network settings must be set by your network manager. SYSTEM PLACED IN THE DMZ: 1. A reserved static IP address 2. Subnet Mask 3. Default Gateway address 4. - Page 106 WAN and behind other firewalls (NetPoint server address can be provided by ClearOne representative). Use the Settings>Advanced>H.323 menu to configure a connection to a NetPoint server, enter the required details in the following fields: Server address (NetPoint IP address) and user name.
Need help?
Do you have a question about the COLLABORATE LIVE 600 and is the answer not in the manual?
Questions and answers