Table of Contents
Advertisement
Quick Links
Advertisement
Table of Contents

Related Manuals for ClearOne COLLABORATE Live 600


Summary of Contents for ClearOne COLLABORATE Live 600
- Page 1 COLLABORATE Live 600 ® Quick-Start Guide...
-
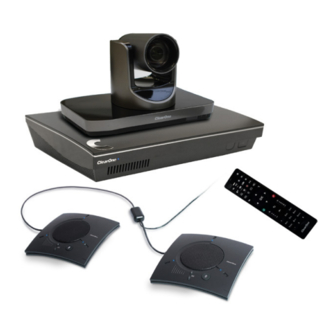
Page 2: Components Included
COLLABORATE LIVE 600 COMPONENTS INCLUDED COLLABORATE Live 600 COLLABORATE Live 600 codec with power supply and COLLABORATE Remote control with dongle 910-2100-003 UNITE 200 PTZ camera, power supply, HDMI cable and RS232 Serial Control cable Note: The remote control inside the camera box... -
Page 3: Making The Connections
QUICK-START GUIDE MAKING THE CONNECTIONS Connect the , the UNITE 200 camera, Ethernet, and CHATAttach 150 monitor(s) to the COLLABORATE Live 600 codec as shown. 1080p or 720p Digital Display UNITE 200 Camera Video Camera Serial Control USB Connection Ethernet Connection... - Page 4 COLLABORATE LIVE 600 CONNECTING THE REMOTE CONTROL DONGLE The Remote Control includes a dongle that plugs into the FRONT USB port on the codec.
-
Page 5: Audio Output Options
QUICK-START GUIDE AUDIO OUTPUT OPTIONS There are three audio output options, accessed from the back of the COLLABORATE Live 600, for connecting the audio. Balanced Audio output to an amplifier that is connected to speakers Line output to powered speakers... -
Page 6: Configuring Display Settings
COLLABORATE LIVE 600 CONFIGURING DISPLAY SETTINGS After all peripherals are connected to the unit, turn the unit on. Once COLLABORATE Live is loaded – you will see your local camera video on your screen. Using the remote control, navigate to the display settings: Settings >... -
Page 7: Configuring Audio Settings
QUICK-START GUIDE CONFIGURING AUDIO SETTINGS The COLLABORATE Live 600 audio input is CHAT 150 and audio output is set to the Balanced Audio Output. Verify this in COLLABORATE Settings > Audio & Video Note: It is recommended to use the CHATAttach 150. -
Page 8: Configuring Network Settings
CONFIGURING NETWORK SETTINGS Using your remote control, navigate into the network settings: Settings > Advanced > Network The COLLABORATE Live 600 obtains its IP automatically by default from the DHCP server. Set “Obtain Address From DHCP” to “Disabled” to manually configure... -
Page 9: Clearone Contacts
TechSupport Tel: 801.975.7200 Tel: 801.974.3760 TollFree: 800.945.7730 e-mail: collaborate.support@clearone.com Fax: 801.303.5711 International Website Tel: +1.801.975.7200 www.clearone.com e-mail: global@clearone.com © 2019 ClearOne, Inc. All rights reserved. Information in this document is subject to change without notice. QSG-0072-001 Revision 1.0 February 2019...
Need help?
Do you have a question about the COLLABORATE Live 600 and is the answer not in the manual?
Questions and answers