Table of Contents
Advertisement
INSTRUCTION MANUAL
In-line Turbidimeter
Document No.: 10118E
DualScat Ex
SIGRIST
with SIREL SMD/Ex
SIGRIST-PHOTOMETER AG
Hofurlistrasse 1
CH-6373 Ennetbürgen
Switzerland
Version: 5
Phone:
+41 41 624 54 54
Fax:
+41 41 624 54 55
E-Mail:
info@photometer.com
Internet:
www.photometer.com
Valid from: SN 450101
Advertisement
Table of Contents

Related Manuals for SIGRIST DualScat Ex


Summary of Contents for SIGRIST DualScat Ex
- Page 1 INSTRUCTION MANUAL DualScat Ex SIGRIST In-line Turbidimeter with SIREL SMD/Ex SIGRIST-PHOTOMETER AG Phone: +41 41 624 54 54 Hofurlistrasse 1 Fax: +41 41 624 54 55 CH-6373 Ennetbürgen E-Mail: info@photometer.com Switzerland Internet: www.photometer.com Document No.: 10118E Version: 5 Valid from: SN 450101...
- Page 2 © SIGRIST-PHOTOMETER AG, Subject to change without notice 9/2016...
-
Page 3: Table Of Contents
Instruction Manual DualScat Ex Contents Equipment Description ..............1 General view of measuring station Scope of supply and accessories Equipment purpose and conformity Identification of the product Technical data Safety Rules ................... 8 Symbols used Rules for ensuring safe operation Installation/Start-up ................. - Page 4 Instruction Manual DualScat Ex Packing/Transport ................. 44 Disposal ..................45 10 Spares ..................46 11 Appendix ..................48 12 Index................... 50 10118E/5...
- Page 5 Instruction Manual DualScat Ex Foreword This Instruction Manual describes the basic functions employed in operating the DualScat Ex. It is addressed to all persons responsible for operation of the instrument. Operate the instrument only after familiarizing yourself with the content of the Instruction Manual.
- Page 6 Instruction Manual DualScat Ex 10118E/5...
-
Page 7: Equipment Description
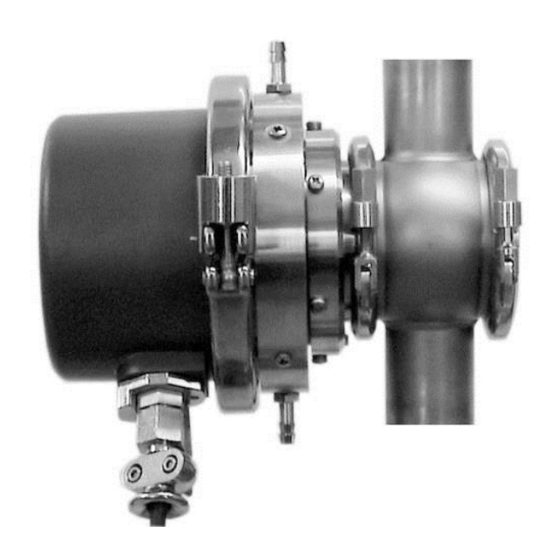
Example with SIREL SMD Connecting cable Product pipe EX enclosure Photometer Cooling connection (optional) Figure 1: General view DualScat Ex with SIREL SMD . Scope of supply and accessories Standard scope Units Name Versions/Remarks of supply: Photometer Dual-angle 90°/25°, single-angle 90°, single-angle 25°... -
Page 8: Equipment Purpose And Conformity
Instruction Manual DualScat Ex Required Art. No. Name Versions/Remarks Accessories: 119125 Blanking glass coated with Lock ring inclusive. Check chemical PVD-chrome, with EPDM compatibility of the blanking glass O-Ring with medium. 118786 Blanking plate, sand blast- Lock ring inclusive. Check chemical... - Page 9 Instruction Manual DualScat Ex The photometer complies with the following standards for electrical equipment and for explosive atmospheres: EN 60079-0:2012+A11:2013 General requirements IEC 60079-0:2011 General requirements EN 60079-1:2014 Instrument protection with pressure-proof encapsulation “d” IEC 60079-1:2014 Flameproof enclosure EN 60079-26:2015...
-
Page 10: Identification Of The Product
Figure 2: Labels for the serial number and the electrical connection data on the SIREL SMD. X: Rating plate of the manufac- turer SIREL Ex Instruction Manual Figure 3: Position of the SIGRIST rating plate on the SIREL Ex 10118E/5... - Page 11 Instruction Manual DualScat Ex Figure 4: Photometer rating plate. The photometer rating plate provides the following information: Pos Name Manufacturer Instrument type Serial number Conformity data Ex protection type Temperature classes Ambient tempera- ture Certificates Warning Figure 5: Information on identification plate You can also consult the photometer’s serial number in the menu...
-
Page 12: Technical Data
Instruction Manual DualScat Ex Technical data Turbidity Measuring principle 90°/25° scattered light measurement at 650 nm measurement Measuring span 0 .. 2'000 NTU 90° (optional 25°) 90° 25° Reproducibility 0 .. 8 ±1% full scale ±1% full scale 8 .. 400 ±2% full scale... - Page 13 Instruction Manual DualScat Ex SIREL SMD Service voltage 100 .. 240 V, 47 .. 63 Hz or 18 .. 30 VDC, 25 W Dimensions 200 mm x 157 mm x 96 mm See Section 0 for detailed dimension drawing Weight about 1.5 kg...
-
Page 14: Safety Rules
Instruction Manual DualScat Ex 2 Safety Rules Symbols used Symbols appearing in this documentation and on the equipment refer to the following safety measures or precautions: DANGER (BLACK ON YELLOW) Warning about a general source of danger. This symbol marks areas or manipulations that call for the observation of special safety rules. -
Page 15: Installation/Start-Up
Instruction Manual DualScat Ex 3 Installation/Start-up Installation 3.1.1 Photometer The photometer can be installed using a standard in-line housing either in hori- zontal or vertical product pipes. Figure 6: Installation in vertical product pipes. Figure 7: Installation in horizontal product pipes. -
Page 16: Installation Of The Sirel Smd Control Unit
Instruction Manual DualScat Ex Important information for photometer installation: Scratches on the blanking glass can lead to incorrect measurements: Ensure that no scratches occur on the blackened outer face and uncolored inner face when installing and removing the blanking glass. Always handle the blanking glass with care. -
Page 17: Installation Of The Sirel Ex Control Unit
Instruction Manual DualScat Ex 3.1.3 Installation of the SIREL Ex control unit Please consult manufacturer documentation 11044DEF when installing the SIREL Ex. A detailed dimension drawing of the SIREL Ex is in Section 0. Refer to the table in Section 3.1.2 for distance dependency on cable cross- section. -
Page 18: Opening The Sirel Ex Housing
Instruction Manual DualScat Ex 3.2.3 Opening the SIREL Ex housing You must interrupt the service voltage (explosion hazard) before opening the SIREL Ex housing. Action Remarks Interrupt the service voltage to the Section 3.2.4 SIREL Ex. Place a square wrench on the square... - Page 19 Instruction Manual DualScat Ex Figure 10: Position of SIREL Ex terminals Figure 11: Terminal block for SIREL SMD 100..240 VAC. Make up the electrical connections in the following order: 10118E/5...
- Page 20 Instruction Manual DualScat Ex Terminals Used for Remarks 20 .. 23 Connection to photometer SIREL SMD: Connect Connection wires to the terminal block according to color coding. SIREL Ex: Connect wires according to numbering. 4 - 5 - 6 Relay output 1 The relay outputs are freely configurable.
-
Page 21: Initial Start-Up
Instruction Manual DualScat Ex Initial start-up For the initial start-up, work through the following table. If you run into trou- ble, consult Section 6. Action Remarks Check to make sure the photometer Sections 3.1 and 3.2. Initial start-up and control unit are properly in- stalled and connected. -
Page 22: Operation
Instruction Manual DualScat Ex 4 Operation Operating elements and display SIREL SMD Reading* Unit* Measuring angle* Current measuring range* Enter key Up arrow key Right arrow key Left arrow key *Second line used for dual-angle Down arrow key instruments only Figure 12: Operating elements and display. -
Page 23: Control Components And Display Of The Sirel Ex
Instruction Manual DualScat Ex Control components and display of the SIREL Ex The operator prompting of the SIREL Ex is identical to that of the SIREL SMD. Only the integrated keyboard and the housing differentiate the SIREL Ex from the SIREL SMD. -
Page 24: Normal Operation
Instruction Manual DualScat Ex Normal operation Whenever the instrument is switched on, it is in normal operation. The current reading/measuring range are displayed continuously (or two readings in the case of a dual-angle instrument). In addition, displays like these examples may appear: The display... -
Page 25: Setting The National Language
Instruction Manual DualScat Ex Relays in the service Relay function State Remarks mode: AL (alarm) passive no alarm LI (limit) deactivated no limit exceeded SE (service) instrument in service mode CH (check) deactivated activated only when sensor check is initiat-... -
Page 26: Setting The Measuring Range
Instruction Manual DualScat Ex Setting the measuring range On the dual-angle instrument, the measuring ranges for the 90° and 25° measurements can be set separately. If "Automatic" is set, the photometer switches automatically to the optimum measuring range for the momentary measurement. -
Page 27: Setting The Relay Functions
Automatic 0 .. 2000 NTU Table 3: Measuring ranges If you need different measuring ranges, have a SIGRIST service technician adapt these and enter new ranges in "user-specific" column. Setting the relay functions The control unit has two relay outputs ( Section 3.2), the functions of which are freely configurable. - Page 28 Instruction Manual DualScat Ex Action Display (Example) Remarks Assign functions: limit 1 exceeded Relay 1 >LI al se ch in< / function alarm (fault oc- on/off curred) / change instrument in ser- function vice mode sensor check run- ning relay inverted...
-
Page 29: Setting The Limits
Instruction Manual DualScat Ex Setting the limits Note: In order to use the limits, it is necessary to configure the relay outputs accordingly. Section 4.7 Up to two limits, with upper and r e a d in g lower thresholds, can be pro- grammed. -
Page 30: Setting The Access Code
steps 6 to 16. + (simultaneous) 90° 2.23 NTU 5 Instrument in normal oper- ation. Setting the access code You can set your own access code to protect your DualScat Ex settings against unauthorized manipulation. Action Display (Example) Remarks ... -
Page 31: Additional Possibilities
This documentation describes only those options that are required for initial start-up and normal operation of the instrument. Many other parameters are available to enable you to adapt the DualScat Ex perfectly to your specific duty requirements. Just to mention a couple: You can alter the behavior of the reading outputs, or you can test the instrument in the manual mode. -
Page 32: Servicing
Instruction Manual DualScat Ex 5 Servicing Service schedule Recommended servicing work: When What Purpose Once a User Check the dry Absolutely essential for main- year or as chamber taining detection accuracy and needed Section 5.2 protecting the electronics. Once a... - Page 33 Instruction Manual DualScat Ex Action Disconnect the power supply to the control Replace desiccant unit. Allows instrument to cool Wait 10 minutes before continuing. to a safe temperature level and residual charges to dissipate. Unscrew socket head screw A by about ½...
-
Page 34: Replacement Of Desiccant In The Sensor Head
Restore the power supply to the control unit and restart the instrument in normal operation. If you find you have to replace the desiccant frequently, have a SIGRIST ser- vice technician check whether the Ex enclosure is still tight. Replacement of desiccant in the sensor head Never open the photometer when cold product is flowing through the pipes. - Page 35 Instruction Manual DualScat Ex Action Remove the two screws from the desiccant holder. Replace the desiccant disk. Be sure to insert dust protector (A) first! Remove the moisture indicator by unscrew- ing the two screws (A), then install the new indicator.
-
Page 36: Cleaning The Sensor Head
Be sure to retighten the hex-head screw (step 10)! If you find you have to replace the desiccant frequently, have a SIGRIST ser- vice technician check whether the Ex enclosure is still tight. Cleaning the sensor head Any fouling of the sensor head will be largely compensated by DualScat Ex. -
Page 37: Replacing The O-Ring 60 X 3 On The Sensor Head Or Replacing The Blanking Glass / Blanking Plate
Instruction Manual DualScat Ex Replacing the O-ring 60 x 3 on the sensor head or replacing the blanking glass / blanking plate Action Make sure the product pipe is empty. Disconnect the power supply to the SIREL control unit. Make sure the product pipe remains... -
Page 38: Recalibrating The Photometer
Recalibration can be carried out in either of two ways: Recalibrate using a checking unit supplied by SIGRIST with a built-in solid reference. This is the method we recommend. Section 5.6.1 Recalibrate with formazine. -
Page 39: Preparations For Recalibration With The Checking Unit
Instruction Manual DualScat Ex 5.6.1 Preparations for recalibration with the checking unit Make sure to use the proper SIGRIST checking unit: the serial number printed on the calibration unit must match with the instrument serial number! Funnel Level indicator Outlet nozzle... - Page 40 Instruction Manual DualScat Ex Action Insert the photometer into the checking unit and clamp it firmly in place. Turn the entire assembly to the horizontal position and place the filling funnel on top ( Figure 16). Switch on the power supply to the control unit and let the instrument warm up for at least 3 minutes.
-
Page 41: Preparations For Recalibrating With Formazine
You can use an empty standard in-line housing ( Figure 17), the lower open- ing of which is closed off with an end plate, or the SIGRIST checking unit with removed solid reference (two screws must be removed in this case). -
Page 42: Recalibration Procedure
Instruction Manual DualScat Ex Action Reconnect the power supply to the control unit and let the instrument warm up for at least 3 minutes. Flush out the test setup two or three times with the calibration suspension. Fill calibration suspension carefully into the test setup until it is completely full. - Page 43 Instruction Manual DualScat Ex Action Display (Example) Remarks > Val.Adjust 90< For single-angle instru- 34.5 NTU ment, proceed to Point 12. > Val.Adjust 25< 0.00 NTU Enter nominal value: Val.Adjust 25 Now enter the nominal > ▓.00 NTU <...
-
Page 44: Troubleshooting
Instruction Manual DualScat Ex 6 Troubleshooting Pinpointing causes of trouble Work through the following table step by step to narrow down the possible causes of a malfunction. If the listed corrective steps fail to produce the de- sired results, please consult Customer Service. Section 6.4... -
Page 45: Fault Messages
Service technician lost. Sealing The moisture monitor - Desiccant in sensor head is in the DualScat Ex has moist Section 5.3 responded. - Desiccant in Ex enclosure is moist Section 5.2 - Moisture indicator defective ... -
Page 46: Carrying Out A Sensor Check
Instruction Manual DualScat Ex Message Means Possible causes Current (1/2) The reading output (1 - Open connection terminals at or 2 in the case of the the reading output dual-angle instrument) Section 3.2 is malfunctioning. - Open current loop of the read-... -
Page 47: Customer Service Information
Service of SIGRIST-PHOTOMETER AG in Switzerland will be happy to give you address. You will also find a current list of all SIGRIST country representatives on the Internet at www.photometer.com. Whenever you contact a SIGRIST service organization or Customer Service in Switzerland, please be sure to have the following information at hand: The serial number of the control unit. - Page 48 Instruction Manual DualScat Ex Item Option Value Fault messages System faults Recalibration Recal.1 Recal.2 Recal.3 Recal.4 Recal.5 Recal.6 LED temperature LED temp Max. temperature in Max temp the Ex enclosure Calibration factors Moni/meas 90 Moni/meas 25 Moisture level Moisture level Adjustment values Val.Adjust 90...
-
Page 49: Taking Out Of Service/Storage
Instruction Manual DualScat Ex 7 Taking Out of Service/Storage The objective of this procedure is proper preparation of the photometer for storage and retention of its normal condition during the storage period. You must interrupt the service voltage (explosion hazard) before opening the SIREL Ex housing. -
Page 50: Packing/Transport
Instruction Manual DualScat Ex 8 Packing/Transport Wherever possible, use the original packing materials for packing the photome- ter and its peripheral components. If these materials are no longer available, observe the following points: Prior to packing, close off the control unit's openings with self-adhesive ... -
Page 51: Disposal
Instruction Manual DualScat Ex 9 Disposal This product falls in Category 9 "Monitoring and Control Instruments" of Euro- pean Directive RL 2002/95/EC (RoHS). Disposal of the photometer and its peripheral devices must be carried out in accordance with the regional legal provisions! The photometer and control unit do not possess any sources of radiation that might pollute the environment. -
Page 52: Spares
Remarks tightly packed, 2 years 111391 Desiccant bag, 30g shelf life tightly packed, 2 years 113162 Desiccant set sensor head DualScat Ex shelf life 116268 Control unit SIREL SMD 100..240 VAC observe service voltage 116547 Control unit SIREL SMD 24VDC... - Page 53 Instruction Manual DualScat Ex 10118E/5...
-
Page 54: Appendix
Instruction Manual DualScat Ex 11 Appendix 10118E/5... - Page 55 Instruction Manual DualScat Ex 10118E/5...
-
Page 56: Index
Instruction Manual DualScat Ex 12 Index access code, setting ....24 initial start-up ......15 accessories ......2 in-line housing ......9 article numbers ....... 46 inspection windows ....10 installation ....... 9 instrument number ....4 CE ........... 3 Internet ......... - Page 57 Instruction Manual DualScat Ex safety ........3, 8 technical data ......6 scope of supply ......1 temperature, fault ....40 sealing, fault ......39 terminal block ......13 sensor check ......40 tightness ......28, 30 sensor head, cleaning ....30 transport, means .....
- Page 58 SIGRIST-PHOTOMETER AG Tel.+41 41 624 54 54 Hofurlistrasse 1 Fax+41 41 624 54 55 CH-6373 Ennetbürgen info@photometer.com Switzerland www.photometer.com...
Need help?
Do you have a question about the DualScat Ex and is the answer not in the manual?
Questions and answers