
Related Manuals for StarTech.com VS440HDMI


Summary of Contents for StarTech.com VS440HDMI
- Page 1 4x4 HDMI Matrix Video Switch Splitter | RS232 Actual product may vary from photos User Manual SKU#: VS440HDMI For the latest information and specifications visit www.startech.com/VS440HDMI Manual Revision: 04/06/2020...
-
Page 2: Compliance Statements
This manual may make reference to trademarks, registered trademarks, and other protected names and/or symbols of third-party companies not related in any way to StarTech.com. Where they occur these references are for illustrative purposes only and do not represent an endorsement of a product or service by StarTech.com, or an endorsement of the product(s) to which this manual... -
Page 3: Safety Statements
• 電源が入っている状態の製品または電線の終端処理を行わないでくださ い。 • ケーブル (電源ケーブルと充電ケーブルを含む) は、 適切な配置と引き回し を行い、 電気障害やつまづきの危険性など、 安全上のリスクを回避するよう にしてください。 Misure di sicurezza • I terminiali dei fili elettrici non devono essere realizzate con il prodotto e/o le linee elettriche sotto tensione. • I cavi (inclusi i cavi di alimentazione e di ricarica) devono essere posizionati e stesi in modo da evitare pericoli di inciampo, rischi di scosse elettriche o pericoli per la sicurezza. Säkerhetsåtgärder • Montering av kabelavslutningar får inte göras när produkten och/eller elledningarna är strömförda. • Kablar (inklusive elkablar och laddningskablar) ska dras och placeras på så sätt att risk för snubblingsolyckor och andra olyckor kan undvikas. To view manuals, videos, drivers, downloads, technical drawings, and more visit www.startech.com/support... -
Page 4: Table Of Contents
AV Matrix Software ........................... 11 Mapping the Output Ports to an Input Port ..................13 Disconnecting/Disabling Video Output.................... 15 Saving/Loading Stored Profiles ......................15 Troubleshooting ..................16 Specifications ..................17 To view manuals, videos, drivers, downloads, technical drawings, and more visit www.startech.com/support... -
Page 5: Product Diagram
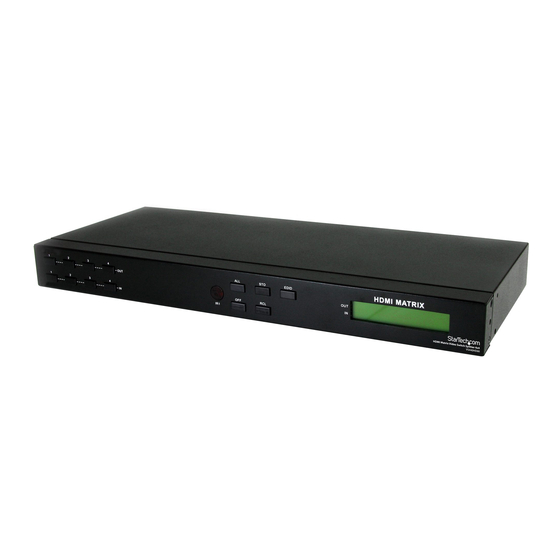
Product Diagram Front View Output Port Buttons Input Port Buttons IR Receiver Function Buttons LCD Display To view manuals, videos, drivers, downloads, technical drawings, and more visit www.startech.com/support... -
Page 6: Rear View
Rear View RS232 DB9 Port DC Power Port IR Extender Port HDMI Input Ports HDMI Output Ports To view manuals, videos, drivers, downloads, technical drawings, and more visit www.startech.com/support... -
Page 7: Product Information
PVR/DVR, etc) HDMI Display Device(s) (e.g. monitor, projector, HDTV, etc) • System Microsoft Windows 2000/XP/Vista/7 (32/64-bit), 32MB RAM, ® ® • 10MB storage space, CD-ROM drive, RS232 serial port To view manuals, videos, drivers, downloads, technical drawings, and more visit www.startech.com/support... -
Page 8: Installation
Matrix Switch and the other end to an HDMI port on the HDMI Video Source Device(s). Connecting Video Source Devices Select the appropriate regional Power Cord and connect it to the Universal Power Adapter. To view manuals, videos, drivers, downloads, technical drawings, and more visit www.startech.com/support... - Page 9 HDMI Video Source Devices connected to the Input Ports (2). If a 0 appears this means that there is no HDMI Video Source Device connected to that Input Port. To view manuals, videos, drivers, downloads, technical drawings, and more visit www.startech.com/support...
-
Page 10: Connecting The Ir Extender (Optional)
Connect a DB9 RS232 Cable to the RS232 DB9 Port on the • Matrix Switch and the other end to the RS232 port on the Host Computer. Connecting a RS232 Control To view manuals, videos, drivers, downloads, technical drawings, and more visit www.startech.com/support... -
Page 11: Function Buttons
Note: To prevent display issues, connect the HDMI Display Device with the lowest video resolution to Output Port 1. OFF: Turns off the selected Output port. No video will be sent to • the selected display(s). To view manuals, videos, drivers, downloads, technical drawings, and more visit www.startech.com/support... -
Page 12: Software Installation
Once the software is installed and the matrix switch is properly connected to the host computer, launch the AV Matrix software to bring up the main control panel. To view manuals, videos, drivers, downloads, technical drawings, and more visit www.startech.com/support... - Page 13 Matrix Switch. Up to 4 different custom profiles can be saved for each matrix switch connected. Note: The front panel controls can only store 1 relationship profile. To view manuals, videos, drivers, downloads, technical drawings, and more visit www.startech.com/support...
-
Page 14: Mapping The Output Ports To An Input Port
Click on the appropriate location on the grid to map an Output Port to an Input Port. For example, to map Output 01 with Input 03, select column 03 on row 01. To view manuals, videos, drivers, downloads, technical drawings, and more visit www.startech.com/support... - Page 15 Note: If the Input/Output port relationships are changed using the front panel controls, the software will need to be refreshed using the Scan button. To view manuals, videos, drivers, downloads, technical drawings, and more visit www.startech.com/support...
-
Page 16: Disconnecting/Disabling Video Output
To save the current configuration, select the desired profile • number from the drop down list and press the Save button. To load the currently selected profile, click the Load button. • To view manuals, videos, drivers, downloads, technical drawings, and more visit www.startech.com/support... -
Page 17: Troubleshooting
Disconnect all cables and power and let sit for several • minutes before attempting to use again. Otherwise, contact technical support for further assistance. • To view manuals, videos, drivers, downloads, technical drawings, and more visit www.startech.com/support... -
Page 18: Specifications
Maximum Cable Length 10m / 32.8ft Audio Support EDID Support Rack Mountable 12VDC, 1500mA, center Power Adapter positive Enclosure Material Metal Operating Temperature 0°C ~ 70°C (32°F ~ 158°F) To view manuals, videos, drivers, downloads, technical drawings, and more visit www.startech.com/support... - Page 19 Storage Temperature -20°C ~ 85°C (-4°F ~ 185°F) Humidity 0% ~ 95% RH 440.0mm x 185.0mm x Dimensions 42.0mm Weight 2350g Compatible Operating Windows 2000/XP/Vista/7 Systems (Software) (32/64-bit) To view manuals, videos, drivers, downloads, technical drawings, and more visit www.startech.com/support...
- Page 20 Limitation of Liability In no event shall the liability of StarTech.com Ltd. and StarTech.com USA LLP (or their officers, directors, employees or agents) for any damages (whether direct or indirect, special, punitive, incidental, consequential, or otherwise), loss of profits, loss of business, or any pecuniary loss, arising out of or related to the use of the product exceed the actual price paid for the product.
- Page 21 StarTech.com is an ISO 9001 Registered manufacturer of connectivity and technology parts. StarTech.com was founded in 1985 and has operations in the United States, Canada, the United Kingdom and Taiwan servicing a worldwide market.
Need help?
Do you have a question about the VS440HDMI and is the answer not in the manual?
Questions and answers