
Subscribe to Our Youtube Channel
Related Manuals for Weinmann LIFE-BASE Series


Summary of Contents for Weinmann LIFE-BASE Series
- Page 1 LIFE-BASE portable systems LIFE-BASE Mini II, LIFE-BASE III, LIFE-BASE 3 NG Instructions for use...
-
Page 2: Table Of Contents
Contents 1. Overview ....... . . 3 2. Description ....... . 5 2.1 Intended use . -
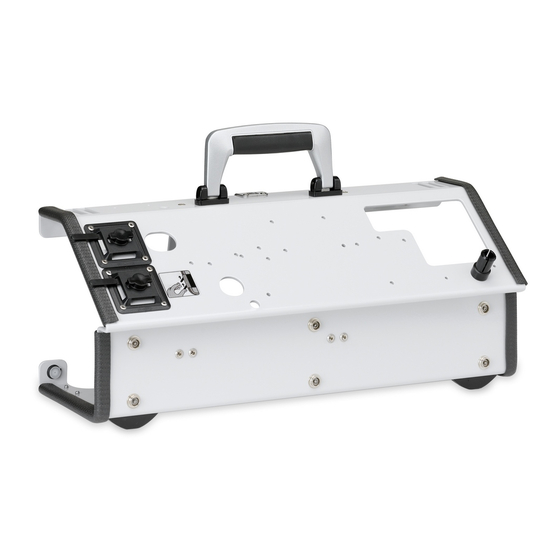
Page 3: Overview
1. Overview LIFE-BASE Mini II, example of typical range of equipment 13 MEDUMAT 16 Handle 14 Lug for carrying strap 12 Module CapnoVol 4 Patient hose 3 Patient valve 1 Frame 11 Accessories bag LIFE-BASE III with bag / LIFE-BASE III, examples: 4 Patient hose 3 Patient valve 13 MEDUMAT... - Page 4 LIFE-BASE 3 NG with bag, example of equipment for MEDUCORE Standard: 1 Carrying strap 2 Handle 13 Hanger 3 Accessories bag 12 MEDUCORE Standard (Ventilation) 11 SpO connector 4 MEDUMAT Standard 2 10 ECG connector 9 Accessories bag 5 Oxygen bottle (Defibrillation) 6 Protective bag 8 Frame...
-
Page 5: Description
2. Description 2.1 Intended use LIFE-BASE Mini II, LIFE-BASE III LIFE-BASE Mini II, LIFE-BASE III and LIFE-BASE III with bag portable systems are designed to accommodate the MEDUMAT ventilator and/or additional modules for oxygen inhalation or aspiration of secretion plus the necessary accessories like an oxygen bottle, a pressure reducer, an aspirate bottle and a capnome- ter or pulsoximeter. -
Page 6: Function
2.2 Function • All the relevant equipment is securely mounted on the portable system. This facilitates transport and use. • Snap closures make it possible to change the oxygen bottle extremely quickly. • In conjunction with a wall mounting the porta- ble system can be installed as a fixture in a rescue vehicle (note "9.2 Accessories and replacement parts"... -
Page 7: Safety Precautions
5). • It is advisable for you to have servicing and re- pairs carried out only by the manufacturers, WEINMANN Emergency, or by qualified techni- cians. • If third-party items are used, functional failures may occur and fitness for use may be restricted. - Page 8 Oxygen Spontaneous explosive reactions can occur if high- pressure oxygen comes into contact with flammable substances (fat, oil, alcohol etc.). • All screw connections and other components must be kept absolutely free of oil and grease. • Avoid ingress of fluids. •...
-
Page 9: Installation
4. Installation 4.1 Wall mounting LIFE-BASE Mini II: BASE STATION Mini II (not shown) WM 8160 BASE STATION 1 NG (not shown) WM 67070 BASE STATION Mini II with charger interface WM 8164 LIFE-BASE III with bag: BASE STATION 3 NG (not shown) WM 8190 BASE STATION 3 NG with WM 8164... -
Page 10: Accessories Bag
4.2 Accessories bag LIFE-BASE Mini II The accessories bag can only be adapted to Accessories bag is designed to hold aspiration LIFE-BASE Mini II. catheters and other small items. 1. Fasten accessories bag to the portable system with the press-studs. 2. -
Page 11: Removing Life-Base Iii/3 Ng Out Of The Protective Bag
4.3 Removing LIFE-BASE III/3 NG out of the protective bag 1. Fully open the magnetic closure/hook and loop fastener of the protective bag. 2. Put down the portable system. 3. Draw the bag over the portable system. 4. Remove the portable system from the protective bag. - Page 12 6. Take out the oxygen bottle. Connecting up new bottle 1. First open the valve of the new oxygen bottle and close it again quickly. This will blow out any particulate matter. In doing so, it is essential to hold the cylinder so that the connector never points at you or anoth- er person, otherwise rapidly-dispersing particles of dust could get into the eye and lead to dam-...
- Page 13 The belts have a fine adjustment with which they can be adapted to suit any size of bottle: 1. Open the clamp. 2. Turn the clamp until the right length for the bottle is reached. 3. Close the clamp again. Installation...
-
Page 14: Using The Portable System
5. Using the portable system 5.1 Wall mounting Hanging up the portable system 1. To hang up the portable system on the wall mounting place the slit at the bottom of the portable system in the hinge on the mounting. 2. -
Page 15: Hanging The Portable System On A Stretcher Or A Hospital Bed
5.2 Hanging the portable system on a stretcher or a hospital bed You can hang the portable system on a stretcher, a hospital bed or a standard hospital rail. The diameter of the tubing must not exceed 35 mm. LIFE-BASE III and LIFE-BASE 3 NG Note When hanging up LIFE-BASE III and LIFE-BASE 3 NG, you must first extend the hanger. -
Page 16: Omnivac Secretion Aspiration
5.3 OMNIVAC secretion aspiration If the portable system cannot be placed near enough to the patient, it may be necessary to take the aspi- rate bottle out of its holder and use the connecting tube. Note Always keep the aspirate bottle in an upright posi- tion. -
Page 17: After Use
Uneven surface The portable system should stand on an even sur- face. If no even surface is available, it should be laid on its back. Note IF LIFE-BASE III or LIFE-BASE III with bag is laid on its back, you must swivel out the holder for the 250 ml aspirate bottle until the aspirate bottle is in a vertical position. - Page 18 LIFE-BASE 3 NG with bag 1. Store the patient hose as shown in the adjacent illustration. Using the portable system...
-
Page 19: Hygienic Preparation
6. Hygienic preparation The portable system must be cleaned and disinfect- ed after each use. Always perform a functional check on completion of cleaning and disinfection (note "7. Functional checks" on page 21). Portable system First remove all the equipment from the portable sys- tem. - Page 20 Additional items of equipment These should be cleaned, disinfected and, where necessary, sterilised in accordance with the instructions in the directions for use supplied with them. Hygienic preparation...
-
Page 21: Functional Checks
7. Functional checks You must carry out functional checks on the carrying platform prior to each use, after each dismantling and reassembly and at the very least every six months. Any defects revealed by the checks should be re- paired and the portable system should not be used until these repairs have been completed. - Page 22 2. Next check the removal function. Insert the fin- gers of one hand through the handle and lift the catch. – The catch should lift easily. – The portable system should be removable from the mounting without difficulty. Ventilator and modules Read the directions for use supplied with the ventila- tor and the modules and follow the instructions for functional checks.
- Page 23 Repairing leaks Always keep a stock of 1. Prepare a soap/water solution using washers for the connec- non-perfumed soap. tions available. 2. Wet all the screw and hose connections with the solution. Bubbles will form at the site of the leak. 3.
-
Page 24: Servicing
(note "6. Hygienic preparation" on page 19). 3. If necessary, send components and accessories to WEINMANN Emergency or to technicians ex- pressly so authorized by WEINMANN Emergency. Notice If you send in obviously contaminated parts, these will be disposed of by WEINMANN Emergency or by Servicing... -
Page 25: Disposal
WEINMANN Emergency at your expense. 8.2 Disposal Portable systems and wall mountings without a charging interface: • LIFE-BASE Mini II • LIFE-BASE III • LIFE-BASE 3 NG • BASE STATION Mini II • BASE STATION 3 NG... -
Page 26: Supply Schedule
26). 9.2 Accessories and replacement parts You can order accessory and replacement parts sep- arately if necessary. A current list of accessory and replacement parts can be found on the Internet at www.weinmann-emergency.com or through your specialist dealer. Supply schedule... -
Page 27: Technical Data
12–28 V DC The right to make design modifications is reserved. 11. Warranty WEINMANN Emergency gives the customer a limited manufacturer warranty on new original WEINMANN Emergency products and any replacement part fitted by WEINMANN Emergency in accordance with the... -
Page 28: Declaration Of Conformity
Product Warranty period WEINMANN Emergency devices including accessories (except masks) for 2 years oxygen medicine and emergency medicine Masks including accessories, rechargeable batteries, batteries (unless quoted 6 months differently in the technical documentation), sensors, tube systems Disposable products None 12. Declaration of conformity WEINMANN Emergency Medical Technology GmbH + Co. - Page 32 Manufacturer Center for Production, Logistics, Service WEINMANN Emergency WEINMANN Emergency Medical Technology GmbH + Co. KG Medical Technology GmbH + Co. KG Frohbösestraße 12 Siebenstücken 14 22525 Hamburg 24558 Henstedt-Ulzburg GERMANY GERMANY T: +49 40 88 18 96-120 E: customerservice@weinmann-emt.de...
Need help?
Do you have a question about the LIFE-BASE Series and is the answer not in the manual?
Questions and answers