
Subscribe to Our Youtube Channel
Related Manuals for Vanco HD4KEX30


Summary of Contents for Vanco HD4KEX30
- Page 1 HDMI® 4K Extender Vanco Part Number: HD4KEX30 Technical Support www.vanco1.com • techsupport@vanco1.com • 800-626-6445...
-
Page 2: Dear Customer
DEAR CUSTOMER Thank you for purchasing this product. For optimum performance and safety, please read these instructions carefully before connecting, operating or adjusting this product. Please keep this manual for future reference. This product is 100% inspected and tested in the United States to verify HDMI performance parameters. - Page 3 FEATURES The Vanco HD4KEX30 HDMI 4K Extender, extends 4K@60Hz and HDR up to 98ft/30m over a single Cat5e/6 cable. Also able to pass 4K@30Hz and 1080p@60Hz up to 164ft/50m. No EDID or EQ adjustments are necessary as the units automatically adjust for compatibility and gain.
-
Page 4: Specifications
PACKAGE CONTENTS Before attempting to use this unit, please check the packaging and make sure the following items are contained in the shipping carton: • HD4KEX30 (TX & RX) • IR Transmitter (IR TX) • IR Receiver (IR RX) • Mounting Accessories •... -
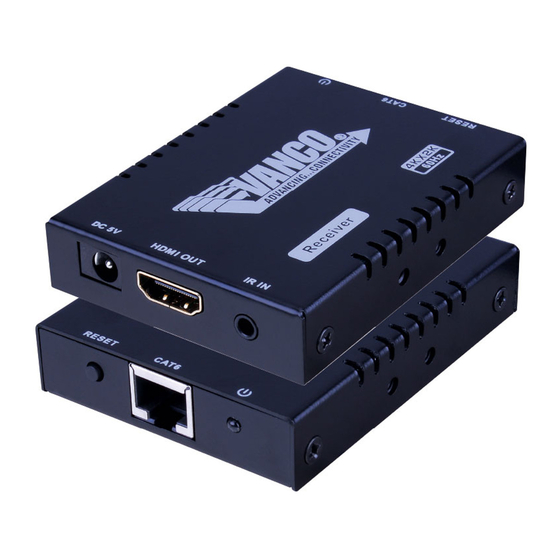
Page 5: Panel Descriptions
PANEL DESCRIPTIONS TRANSMITTER: 1. Reset Button: Press to reboot unit (instead of unplugging power supply) 2. Cat5e/6 Output: Connect a single Cat5e/6 cable to connect to Receiver unit (home run cable recommended) 3. Power LED Indicator 4. 5V Power Supply Connection: Connect included Power Supply (Connecting an incorrect power supply may result in failure of the unit) 5. - Page 6 RECEIVER: Reset Button: Press to reboot unit (instead of unplugging power supply) Cat5e/6 Input: Connect a single Cat5e/6 cable to connect to Transmitter unit (home run cable recommended) Power LED Indicator 5V Power Supply Connection: Connect included Power Supply (Connecting an incorrect power supply may result in failure of the unit) HDMI Output: Connect the display to this output IR In: Connect the included IR RX (Receiver) for IR Source control, see IR section for installation and...
-
Page 7: Connect And Operate
UTP output of the Transmitting unit, and the other end to the UTP input of the Receiving unit 4. OPTIONAL: When using IR control, connect the IR Transmitter (IR TX) to the IR OUT port on the transmitting unit (HD4KEX30-TX); connect the IR Receiver (IR RX) to the IR IN port on the receiving unit (HD4KEX30-RX) 5. -
Page 8: Ir Pass Through
IR TRANSMITTER (TX) To control the source: Plug IR Blaster into IR OUT port of transmitter unit (HD4KEX30- TX); place blaster in front of the IR eye of the source Note: Placement of the IR Blaster is important and can result in the IR system not work- ing if improperly placed. - Page 9 IR RECEIVER (RX) To control the source: Plug IR Receiver into IR IN port of receiver unit (HD4KEX30-RX); place receiver at or near display. Note: Due to possible differences in 3rd party IR cables, please use the IR cables that came with the product...
-
Page 10: Troubleshooting
4. If you are still encountering issues, attempt the “hot-plug” concept. With all of the HDMI cables disconnected, turn on the source and plug in the HDMI cable into it’s output, then power up the Vanco unit and plug the HDMI cable into it’s input, finally turn on the display and plug the HDMI cable from the receiver into it. -
Page 11: Limited Warranty
If repairs are needed during the warranty period the purchaser will be required to provide a sales receipt/sales invoice or other acceptable proof of purchase to the seller of this equipment. The seller will then contact Vanco regarding warranty repair or replacement. - Page 12 Vanco® International 506 Kingsland Drive Batavia, Illinois 60510 call: 800.626.6445 fax: 630.879.9189 visit: www.vanco1.com...
Need help?
Do you have a question about the HD4KEX30 and is the answer not in the manual?
Questions and answers