Table of Contents
Advertisement
Quick Links
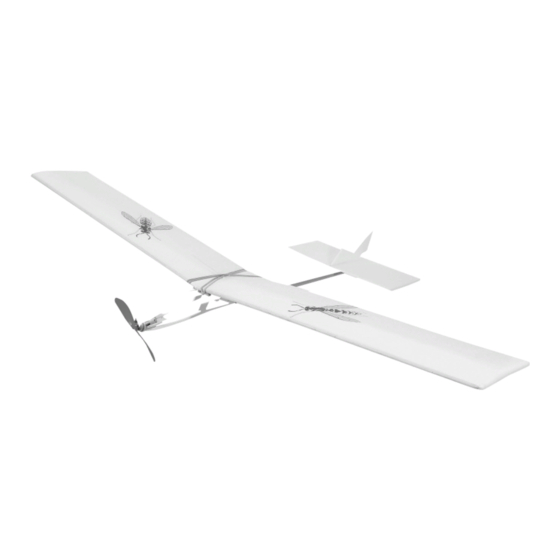
O P I T E C " W a s p "
Technical data:
Wingspan :
Length:
Weight:
Wing loading:
Building time as a group project ca. 10 hours.
Suitable for children 10 years old and above.
E100995#1
1 0 0 . 9 9 5
Please Note
The OPITEC range of projects is not intended as play
toys for young children.They are teaching aids for young
people learning the skills of Craft, Design and Technolo-
gy.These projects should only be undertaken and tested
with the guidance of a fully qualified adult.
The finished projects are not suitable to give to children
under 3 years old. Some parts can be swallowed. Dan-
ger of suffocation!
1000 mm
570 mm
135 g
10,8 g/dm2
1
Advertisement
Table of Contents

Subscribe to Our Youtube Channel
Related Manuals for Opitec Wasp


Summary of Contents for Opitec Wasp
- Page 1 Building time as a group project ca. 10 hours. Suitable for children 10 years old and above. Please Note The OPITEC range of projects is not intended as play toys for young children.They are teaching aids for young people learning the skills of Craft, Design and Technolo- gy.These projects should only be undertaken and tested...
-
Page 2: Product Information
1. Product information: Article: Simple motor-glider with electro drive. Use: Free flight , for no wind or light wind conditions 2. Material information: 2.1 Material: Pine, Balsa wood, Beech wood Working: Must be sawn, shaped and sanded Joining: Glue Finish: Stain or varnish 2.2 Material: Hard foam... -
Page 3: Planning Overview
5. Planning overview 5.1 Producing the parts and constructing the fuselage 5.2 Producing and constructing the tail fin and tailplane 5.3 Finishing the fuselage 5.4 Assembling the wings and tail 5.5 Finishing and trimming 5.1 Producing the parts and constructing the fuselage Trace off the parts of the fuelage (1) motor mount (2) and boom tube holder, (3) on to the plywood sheet (See page 7) Cut them out with a fretsaw ( Fine blade) and sand to finish with glasspaper... -
Page 4: Finishing The Fuselage
Use a block and glasspaper to sand and shape the edges of the tail fin and tailplane (With the exception of the edges where the T fin and T plane will be glued in place) To do this lay the parts on a table top and only sand the appropriate parts Glue the tail fin, at 90 degrees, in the middle of the tailplane , in flight direction (Use a set square to check for a right angle ) Use PVA white glue and hold in place with pins until dry Finally glue the tailplane/ fin together on to the fuselage tube so that it stands 50mm over the end (See page... -
Page 5: Finishing The Model
To keep the weight as light as possible we suggest using as little decoration as possible. For colour use a water based ( No solvent ) felt tip pen. Especially the wings should be kept light Cut out and colour the wasp logos glue one on each wing half E100995#1... -
Page 6: Battery Pack
The pre- wired switch is fixed with an all purpose glue. Once the propeller has been added (18) the Wasp model is ready to fly. The battery pack is loaded via a transformer (Article 208338). Loading time at 300mA is about 30minutes. To load simply connect the transformer to the battery pack. - Page 7 Plan / patterns Scale 1:1 If you find this model plea- se contact: Name:_________________ Address:_______________ _______________________ Tel:____________________ E100995#1...
- Page 8 E100995#1...
- Page 9 E102056#1...
Need help?
Do you have a question about the Wasp and is the answer not in the manual?
Questions and answers