Advertisement
Quick Links
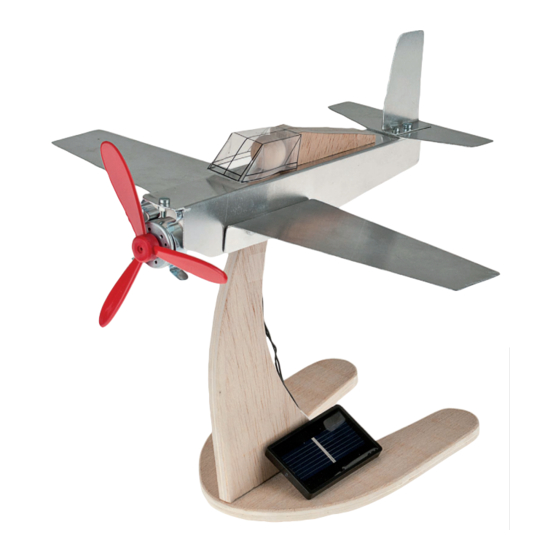
PARTS LIST
Aluminium sheet
PLywood
Wooden ball
Wooden ball
Vacuum forming plastic
Spring clip
Solarmotor RF 300
Propellor
Screw
Screw
Machine screw
Machine screw
Nuts
Washers
Solar cell 0,5 V, 200mA
Cable
E114066#2
114.066
M e t a l A e r o p l a n e
w i t h S o l a r D r i v e
1
1
1
1
1
1
1
1
2
1
2
3
5
5
1
1
Necessary tools:
Pencil & ruler
Fretsaw
with wood and metal working blades
File
Drill 3,5/4/5 dia
Vice with soft jaws
Metal folder
Screwdriver
Spanner
Countersink
Scissors
Edding pen
Please Note
The OPITEC range of projects are not intended as toys for
young children.
They are primarily designed as a teaching aid for Design
Technology and to encourage children in practical skills.They
should not be attempted without the supervision of a qualified
adult . The are NOT suitable for children under
3 years old, they contain small parts that can be swallowed
Description
200x200x0,8 Aeroplane
260x120x8 Stand
ø 12 Pilot head
ø 25 Stand
125x125x0,3 Cockpit
Motorhalterung
Motor
Propeller
20x3 Fixing
40x4 Fixing
35x3 Fixing
8x3 Fixing
M3 Fixing
7/3,2 Fixing
Power source
500 Wiring
1
2
3
4
5
6
7
8
9
10
11
12
13
14
15
16
1
Advertisement

Subscribe to Our Youtube Channel
Related Manuals for Opitec 114.066


Summary of Contents for Opitec 114.066
- Page 1 Countersink Scissors Edding pen Please Note The OPITEC range of projects are not intended as toys for young children. They are primarily designed as a teaching aid for Design Technology and to encourage children in practical skills.They should not be attempted without the supervision of a qualified adult .
- Page 2 Instructions Step 1: Cut out the patterns (Page 5/7) for the aeroplane and glue them together along the broken line. Transfer (see diagram) the plans on to the aluminium sheet (1) Drill all the marked holesand cut out the parts with metal shears or afretsaw with a metal working blade Clean up all the parts with file and remove any burr straight edges...
- Page 3 Instructions Step 6: Step 7: Schritt 8: The tailpane (Part e) and the tail fin The wooden parts (i/h) are glued The wooden ball (3) once all the parts (Part d) are fitted using two screws together as shown on page 5/7 as (i/h) are on the body (a) is fitted with an (12) and 2 nuts (13) on the back of the marked, use an all purpose glue!
- Page 4 Instructions Step 13: Cut off two ca. 200mm long pieces of cab- le (16) remove insualation from the ends. Connect one piece to the red wire from the motor with the red cable of the motor and the other end to the pus pole on solar cell (15) The other wire cionnectsfrom the black cable of the motor to the other connection on the cell (15) .
- Page 5 Instructions Pattern Aluminium sheet E 1:1 E114066#2...
- Page 6 E114066#1...
- Page 7 Instructions Pattern Aluminium sheet E1:1 E114066#2...
- Page 8 E114066#1...
- Page 9 Pattern for stand E 1:1 ø3 E114066#2...
Need help?
Do you have a question about the 114.066 and is the answer not in the manual?
Questions and answers
I need a building manual for this please