Advertisement
Parts list
2 Plywood sheets ( Of pre-cut parts)
2 Corrugated card pieces ( Of pre-cut parts )
1 Plastic foil
9 Dowels 4mm dia x 75mm
1 Nail
1 Glasspaper
1 Glue
E101706#1
1 0 1 . 7 0 6
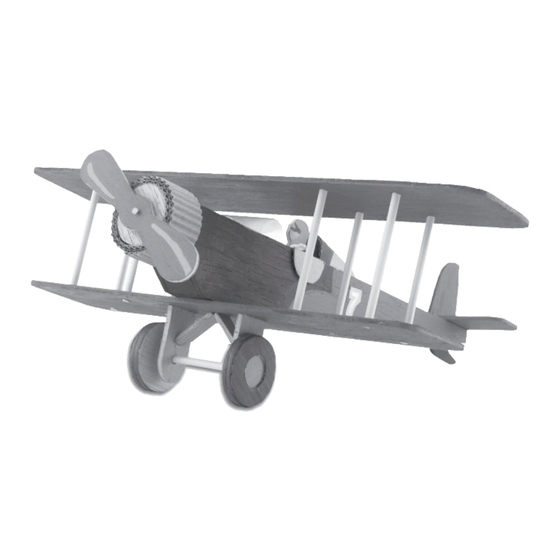
B i p l a n e
Please Note
The OPITEC range of projects is not primarily intended
as toys for young children. It is for teaching, designing
and making to ensure that pupils experience a range of
tools and processes.
Necessary Tools
Pencil
Scissors
Paint brush
Paints
1
Advertisement
Table of Contents

Related Manuals for Opitec Hobbyfix 101.706


Summary of Contents for Opitec Hobbyfix 101.706
- Page 1 1 Nail 1 Glasspaper 1 Glue Please Note The OPITEC range of projects is not primarily intended as toys for young children. It is for teaching, designing and making to ensure that pupils experience a range of tools and processes.
- Page 2 Instructions: General: Remove the parts carefully, try not to break any of the pieces. Only remove the parts as you need them 1) Firstly remove the part (3), from the corru- gated card sheet lay it on the foil Draw around the card with a pencil and then cut it out with scissors Note: Keep the remainder of the transparent foil.
- Page 3 5) Close the front of the fuselage with parts (H) and (I) 6) Press out part (5) from the corrugated card and cut off 10 x 40mm. Smooth the raised side of the card with a pencil or a ruler. 7) Cut out the tail fin (J+K) and clean up the 1 mm edges with sandpaper...
- Page 4 13) Remove the wing parts (P/Q) and sand the edges Paint the fuselage and wings (P/Q) 14) Glue the lower wing centrally under the fu- selage Note: Holes should be uppermost: Glue the doors, card piece (2) on either side of the cockpit 15) Lightly chamfer the ends of the 8 dowels- or use a pencil sharpener Join the wings, together gluing the dowels...
Need help?
Do you have a question about the Hobbyfix 101.706 and is the answer not in the manual?
Questions and answers