Advertisement
Available languages
Available languages
Quick Links
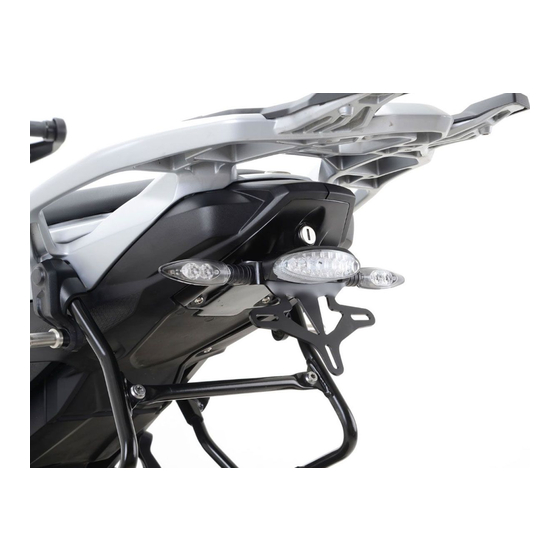
FITTING INSTRUCTIONS FOR LP0185BK LICENCE PLATE BRACKET
BMW S1000XR '15-
THIS KIT CONTAINS THE ITEMS PICTURED AND LABELLED BELOW.
DO NOT PROCEED UNTIL YOU ARE SURE ALL PARTS ARE PRESENT.
Please note that the way the kit is packed does not necessarily represent the way of mounting to the bike.
T
(
).
HE PARTS SHOWN MAY BE REPRESENTATIVE ONLY
FOR CLARITY OF INSTRUCTIONS ONLY
7
8
6
9
4
5
6
3 3
3
2
10
4
11
3
1
12
Advertisement

Related Manuals for R&G LP0185BK


Summary of Contents for R&G LP0185BK
- Page 1 FITTING INSTRUCTIONS FOR LP0185BK LICENCE PLATE BRACKET BMW S1000XR ’15- THIS KIT CONTAINS THE ITEMS PICTURED AND LABELLED BELOW. DO NOT PROCEED UNTIL YOU ARE SURE ALL PARTS ARE PRESENT. Please note that the way the kit is packed does not necessarily represent the way of mounting to the bike.
-
Page 2: Tools Required
LEGEND ITEM 1 = LA0003 TAIL LIGHT (x1). ITEM 2 = LA0003 TAIL LIGHT SHROUD (x1). ITEM 3 = M6 x 16mm LONG BUTTON HEAD BOLTS (x4). ITEM 4 = INDICATOR ADAPTORS (I0041) (x2). ITEM 5 = LICENCE PLATE BRACKET (TB0185 Part 1) (x1). ITEM 6 = METAL EXTENSIONS (E0059) (x2). - Page 3 Picture 3 Picture 4 Picture 5 Picture 6 Picture 7 Picture 8...
- Page 4 Picture 9 Picture 10 Picture 11 Picture 12 Picture 13 Picture 14...
- Page 5 Picture 15 Picture 16 Picture 17 Picture 18 Picture 19 Picture 20...
- Page 6 Picture 21 Picture 22 Picture 23 Picture 24 Picture 25 Picture 26...
- Page 7 Picture 27 Picture 28 Picture 29 Picture 30 Picture 31 Picture 32...
- Page 8 Picture 33 Picture 34 Picture 35 Picture 36 Picture 37 Picture 38...
- Page 9 Picture 39 Picture40 Picture 41 Picture 42 Picture 43 Picture 44...
- Page 10 Picture 45 Picture 46 Picture 47 Picture 48 Picture 49 Picture 50...
-
Page 11: Fitting Instructions
Picture 51 Picture 52 Picture 53 Picture 54 FITTING INSTRUCTIONS To fit the R&G tail tidy, remove the seat using the key at the rear of the bike, as shown in picture Remove the four Torx bolts that secure the plastic mudguard in place, as shown in pictures 2 & 3. ... - Page 12 R&G Tail Tidy fits correctly and has equal panel gaps all around. It is suggested to loosen these bolts whilst fitting the tail tidy and to re-tighten when all the parts are satisfactorily fitted. Remove the Torx bolt that connects the two plastic surround panels to the OEM licence plate hanger, as shown in picture 10.
- Page 13 with the brown wire on the OEM wiring. 1x set of RGR0002 resistors (available separately) are required to achieve the correct flash rate. If fitting R&G Mini Indicators with bulbs, the black wire on the Mini Indicators connects with the brown wire on either indicator and the black/white wire on the Mini Indicators connects with the black/red or black/blue wire on the OEM wiring.
- Page 14 Fit the four M6 x 16mm long button head bolts (item 3) through the four mounting holes on the licence plate bracket and into the threaded extensions on the rear two holes and through the plastic and into the threaded bosses on the front, as shown in pictures 51 & 52. Whilst tightening the front two bolts, ensure the swaged spacer on the licence plate bracket locates correctly through the slot and tightens up correctly.
- Page 15 INSTRUCTIONS DE MONTAGE POUR LP0185BK SUPPORT DE PLAQUE BMW S1000XR ’15- Assurez vous que toutes les pièces soient présentes avant de procéder au montage. La façon dont le kit est emballé ne correspond pas forcément à la façon de monter les pièces sur la moto.
-
Page 16: Outils Requis
LEGENDE ARTICLE 1 = LA0003 FEU DE PLAQUE (x1). ARTICLE 2 = LA0003 LINCEUL FEU DE PLAQUE (x1). ARTICLE 3 = M6 x 16mm BOULONS (x4). ARTICLE 4 = ADAPTATEURS DE CLIGNOTANTS (I0041) (x2). ARTICLE 5 = SUPPORT DE PLAQUE (TB0185 Part 1) (x1). ARTICLE 6 = EXTENSIONS METALLIQUE (E0059) (x2). - Page 17 Photo 3 Photo 4 Photo 5 Photo 6 Photo 7 Photo 8...
- Page 18 Photo 9 Photo 10 Photo 11 Photo 12 Photo 13 Photo 14...
- Page 19 Photo 15 Photo 16 Photo 17 Photo 18 Photo 19 Photo 20...
- Page 20 Photo 21 Photo 22 Photo 23 Photo 24 Photo 25 Photo 26...
- Page 21 Photo 27 Photo 28 Photo 29 Photo 30 Photo 31 Photo 32...
- Page 22 Photo 33 Photo 34 Photo 35 Photo 36 Photo 37 Photo 38...
- Page 23 Photo 39 Photo40 Photo 41 Photo 42 Photo 43 Photo 44...
- Page 24 Photo 45 Photo 46 Photo 47 Photo 48 Photo 49 Photo 50...
-
Page 25: Instructions De Montage
Photo 51 Photo 52 Photo 53 Photo 54 INSTRUCTIONS DE MONTAGE Pour monter la queue de support plaque R&G, enlever le siège en utilisant la clé située à l’arrière de la moto, voir photo 1. Enlever les 4 boulons Torx qui fixent le garde boue plastique en place, voir photos 2 & 3. ... - Page 26 caches soient correctement centrés pour vous assurer que le la queue de support de plaque R&G sera montée correctement. Nous conseillons de desserrer les voulons tout en montant la queue de support de plaque et pour resserrer lorsque l’ensemble des parties est installée de façon satisfaisante.
- Page 27 Si vous montez des clignotants latéraux R&G à LED, le fil jaune sur les clignotants se connectent avec le noir/rouge ou noir/bleu de chaque clignotant et le fil noir sur les mini clignotants se connecte avec le fil marron sur le fil d’origine OEM. 1 set de résistances RGR0002 (disponibles séparément) sont nécessaires afin d’obtenir l’éclairage optimal.
- Page 28 A présent le support de plaque peut être monté en position contre le corps en plastique. Tout en réalisant cela, tirer tout excès de fil depuis le dessus pour éviter qu’un excès de fil ne déborde de la moto, voir photo 50. ...
Need help?
Do you have a question about the LP0185BK and is the answer not in the manual?
Questions and answers