Table of Contents
Advertisement
Available languages
Available languages
Quick Links
PAGE 1 OF 22
LP0273
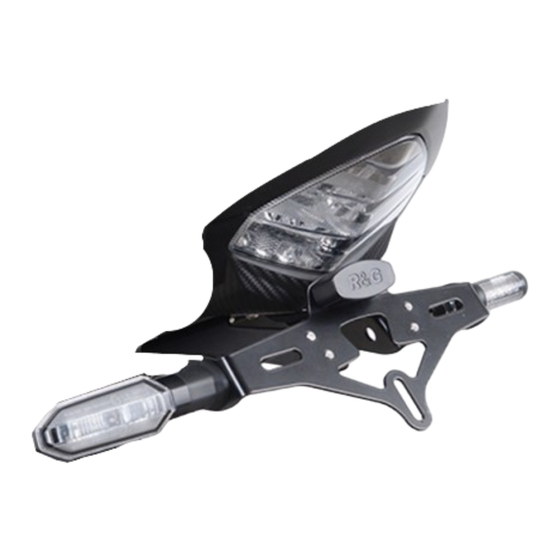
Fitting Instructions For LP0273 TAIL TIDY
HONDA CB500F 2019-
Picture B
Picture A
T
.
HIS KIT CONTAINS THE ITEMS PICTURED AND LABELLED OVER PAGE
S
.
OME PARTS MAY BE SHOWN FOR CLARITY OF INSTRUCTIONS ONLY
D
.
O NOT PROCEED UNTIL YOU ARE SURE ALL PARTS ARE PRESENT
P
.
LEASE READ ALL INSTRUCTIONS BEFORE PROCEEDING
IF IN ANY DOUBT WHEN FITTING OUR PRODUCTS, CONSULT ONE OF OUR DEAL-
ERS OR HAVE FITTED BY A QUALIFIED TECHNICIAN.
Please note that the way the kit is packed does not necessarily represent the way
of mounting to the bike.
In the event of rubber washers being used to hold components onto bolts,
these rubber washers can be thrown away.
DIGITAL COPIES OF THESE INSTRUCTIONS ARE AVAILABLE FROM
www.rg-racing.com
R&G Racing
Unit 1, Shelleys Lane, East Worldham, Alton, Hampshire GU34 3AQ.
Tel: +44 (0)1420 89007 Fax +44 (0)1420 87301
www.rg-racing.com
Email:
info@rg-racing.com
Advertisement
Table of Contents

Related Manuals for R&G LP0273


Summary of Contents for R&G LP0273
- Page 1 PAGE 1 OF 22 LP0273 Fitting Instructions For LP0273 TAIL TIDY HONDA CB500F 2019- Picture B Picture A HIS KIT CONTAINS THE ITEMS PICTURED AND LABELLED OVER PAGE OME PARTS MAY BE SHOWN FOR CLARITY OF INSTRUCTIONS ONLY O NOT PROCEED UNTIL YOU ARE SURE ALL PARTS ARE PRESENT...
-
Page 2: Tools Required
PAGE 2 OF 22 LP0273 TOOLS REQUIRED GENERAL TORQUE SETTINGS • M4 BOLT = 8Nm Set of metric Allen keys to include 4 & 5mm A/F size. M5 BOLT = • 6, 8, 10 & 13mm spanners or sockets. M6 BOLT = •... -
Page 3: Assembly Diagram
PAGE 3 OF 22 LP0273 ASSEMBLY DIAGRAM R&G Racing Unit 1, Shelleys Lane, East Worldham, Alton, Hampshire GU34 3AQ. Tel: +44 (0)1420 89007 Fax +44 (0)1420 87301 www.rg-racing.com Email: info@rg-racing.com... - Page 4 PAGE 4 OF 22 LP0273 Picture 1 Picture 2 Picture 3 Picture 4 Picture 5 Picture 6 R&G Racing Unit 1, Shelleys Lane, East Worldham, Alton, Hampshire GU34 3AQ. Tel: +44 (0)1420 89007 Fax +44 (0)1420 87301 www.rg-racing.com Email: info@rg-racing.com...
- Page 5 PAGE 5 OF 22 LP0273 Picture 7 Picture 8 Picture 9 Picture 10 Picture 11 Picture 12 R&G Racing Unit 1, Shelleys Lane, East Worldham, Alton, Hampshire GU34 3AQ. Tel: +44 (0)1420 89007 Fax +44 (0)1420 87301 www.rg-racing.com Email: info@rg-racing.com...
- Page 6 PAGE 6 OF 22 LP0273 Picture 13 Picture 14 Picture 15 Picture 16 Picture 17 Picture 18 R&G Racing Unit 1, Shelleys Lane, East Worldham, Alton, Hampshire GU34 3AQ. Tel: +44 (0)1420 89007 Fax +44 (0)1420 87301 www.rg-racing.com Email: info@rg-racing.com...
- Page 7 PAGE 7 OF 22 LP0273 Picture 19 Picture 20 Picture 21 Picture 22 R&G Racing Unit 1, Shelleys Lane, East Worldham, Alton, Hampshire GU34 3AQ. Tel: +44 (0)1420 89007 Fax +44 (0)1420 87301 www.rg-racing.com Email: info@rg-racing.com...
-
Page 8: Fitting Instructions
PAGE 8 OF 22 LP0273 FITTING INSTRUCTIONS • To fit the R&G tail tidy, remove the pillion seat using the key. • Underneath the pillion seat, disconnect the orange, blue and white connectors for the li- cence plate illuminator light and two indicators, as shown in picture 1. - Page 9 PAGE 9 OF 22 LP0273 If fitting OEM Indicators • Fit one indicator spacer (item 4 – I0032) to both rubber indicator mounts, as shown in picture 18, before fitting into the large slot on either side of the tail tidy, ensuring the shal- lower side of the rubber mount is on the inside.
- Page 10 PAGE 10 OF 22 LP0273 IMPORTANT: IF YOU MOUNT A LARGE PLATE AND PLACE IT AT THE LOWER OF THE PLATE BRACKET, IT IS POSSIBLE THAT THE PLATE WILL TOUCH THE REAR TYRE WHEN RIDING OVER A BIG BUMP ON A ROUGH ROAD. IT IS YOUR RESPONSIBILITY TO VERIFY THAT THIS CAN NOT OCCUR.
- Page 11 PAGE 11 OF 22 LP0273 NOTICE DE MONTAGE POUR LP0273 SUPPORT DE PLAQUE HONDA CB500F 2019- Photo B Photo A E KIT CONTIENT LES ARTICLES EN PHOTO ET ETIQUETTES SUR LA PAGE LES PARTIES PRESENTÉES PEUVENT ETRE UNIQUEMENT REPRESENTATIVES POUR LA CLARTE DES INSTRUCTIONS E PAS ROCÉDER AU MONTAGE AVANT DE VOUS ÊTRES ASSURE QUE TOUTES LES PIECES SOIENT PRÉ-...
-
Page 12: Outils Requis
PAGE 12 OF 22 LP0273 OUTILS REQUIS VALEURS DE SERRAGE • Clés Allen 4 & 5mm M4 BOULON = 8Nm • Clé à cliquet + douilles 6, 8, 10 & 13mm M5 BOULON = • Tournevis cruciforme M6 BOULON = •... - Page 13 PAGE 13 OF 22 LP0273 SCHEMA DE MONTAGE R&G Racing Unit 1, Shelleys Lane, East Worldham, Alton, Hampshire GU34 3AQ. Tel: +44 (0)1420 89007 Fax +44 (0)1420 87301 www.rg-racing.com Email: info@rg-racing.com...
-
Page 14: Notice De Montage
PAGE 14 OF 22 LP0273 NOTICE DE MONTAGE • Pour monter le support de plaque R&G, retirez le siège passager à l'aide de la clé. • Sous le siège passager, débranchez les connecteurs orange, bleu et blanc de feu de plaque d’immatricula- tion et deux clignotants, comme indiqué... - Page 15 PAGE 15 OF 22 LP0273 Si vous montez les clignotants d’origine Placer une entretoise de clignotant (article 4 - I0032) sur les deux supports en caoutchouc, comme in- diqué sur la photo 18, avant de l'installer dans la grande fente de chaque côté du support de plaque, en veillant à...
- Page 16 PAGE 16 OF 22 LP0273 • IMPORTANT : SI VOUS MONTEZ UNE PLAQUE DE GRANDE TAILLE ET QUE VOUS LA PLACEZ AU PLUS BAS DU SUPPORT DE PLAQUE, IL EST POSSIBLE QUE LA PLAQUE TOUCHE LA ROUE ARRIÈRE LORSQU’IL Y A UN POID IMPORTANT SUR LA ROUE ARRIÈRE OU LORSQUE VOUS ROULEZ SUR UNE GROSSE BOSSE.
- Page 17 PAGE 17 OF 22 LP0273 Montageanleitung für LP0273 KENNZEICHENHALTER HONDA CB500F 2019- Abbildung A Abbildung B ALLE KIT-TEILE SIND UNTEN ABGEBILDET UND GEKENNZEICHNET. DIE ABGEBILDETEN TEILE DIENEN LEDIGLICH ZUR ERKLÄRUNG. ÜBERPRÜFEN SIE ZUERST, DASS ALLE TEILE VORHANDEN SIND. LESEN SIE DIE MONTAGEANLEITUNG KOMPLETT DURCH, BEVOR SIE ANFANGEN WENN SIE BEI DER MONTAGE DIESES PRODUKTES UNSICHER SIND , BITTE EINEN UNSERER HÄNDLER KONTAKTIEREN ODER DAS KIT VON EINEM QUALIFIZIERTEN...
-
Page 18: Sie Benötigen Folgendes Werkzeug
PAGE 18 OF 22 LP0273 SIE BENÖTIGEN FOLGENDES WERKZEUG: ALLGEM ANZUGSDREHMOMENT M4 SCHRAUBE = 8Nm • Satz Inbusschlüssel inkl. Größe 4 & 5mm A/F M5 SCHRAUBE = • 6, 8, 10 & 13mm Steckschlüssel oder M6 SCHRAUBE = Schraubenschlüssel M8 SCHRAUBE = 20Nm •... - Page 19 PAGE 19 OF 22 LP0273 ZEICHNUNG ZUSAMMENBAU R&G Racing Unit 1, Shelleys Lane, East Worldham, Alton, Hampshire GU34 3AQ. Tel: +44 (0)1420 89007 Fax +44 (0)1420 87301 www.rg-racing.com Email: info@rg-racing.com...
- Page 20 PAGE 20 OF 22 LP0273 MONTAGEANELITUNG • Um das R&G Kennzeichenhalter montieren zu können, entfernen Sie zuerst den Beifahrersitz (der Schlüssel wird hierfür benötigt). • Unter Beifahrersitz, orange, blaue weiße Steckverbinder für Kennzeichenbeleuchtung und die zwei Blinker trennen – siehe Abbildung 1.
- Page 21 PAGE 21 OF 22 LP0273 Wenn Sie R&G Miniblinker montieren • Um die R&G Miniblinker zu montieren, zuerst eine Länge Schrumpfschlauch an den Kabeln für jeden Blinker anbringen. • Die zwei Blinkeradapter (Artikel 3 –I0031) an den Kabeln der Blinker positionieren—stellen Sie sicher, dass die zwei Seiten mit mittig erhöhtem Profil sich gegenüber liegen, bevor Sie die mitgelieferte...
- Page 22 PAGE 22 OF 22 LP0273 • Die Verbindungen mit der original Verkabelung verbinden und die ordnungsgemäße Funktion der kompletten Beleuchtung überprüfen. • Benutzen Sie die Kabelbinder, um die Kabel ordentlich im Heck zu verstauen. • Montieren Sie die Beifahrersitz wieder.
Need help?
Do you have a question about the LP0273 and is the answer not in the manual?
Questions and answers