Table of Contents
Advertisement
Available languages
Available languages
Quick Links
KLARWASSER-TAUCHPUMPE / SUBMERSIBLE WATER PUMP
KLARWASSER-TAUCHPUMPE / SUBMERSIBLE WATER PUMP
/ POMPE À EAU CLAIRE IMMERGÉE FTP 400 E4
KLARWASSER-TAUCHPUMPE
Originalbetriebsanleitung
POMPE À EAU CLAIRE IMMERGÉE
Traduction des instructions d'origine
PONORNÉ ČERPADLO NA ČISTOU VODU
Překlad originálního provozního návodu
BOMBA SUBMERSÍVEL PARA ÁGUA LIMPA
Tradução do manual de instruções original
IAN 298703
SUBMERSIBLE WATER PUMP
Translation of the original instructions
ZUIVER WATER-DOMPELPOMP
Vertaling van de originele gebruiksaanwijzing
BOMBA SUMERGIBLE PARA
AGUAS LIMPIAS
Traducción del manual de instrucciones original
Advertisement
Chapters
Table of Contents

Related Manuals for FLORABEST FTP 400 E


Summary of Contents for FLORABEST FTP 400 E
- Page 1 KLARWASSER-TAUCHPUMPE / SUBMERSIBLE WATER PUMP KLARWASSER-TAUCHPUMPE / SUBMERSIBLE WATER PUMP / POMPE À EAU CLAIRE IMMERGÉE FTP 400 E4 KLARWASSER-TAUCHPUMPE SUBMERSIBLE WATER PUMP Originalbetriebsanleitung Translation of the original instructions POMPE À EAU CLAIRE IMMERGÉE ZUIVER WATER-DOMPELPOMP Traduction des instructions d‘origine Vertaling van de originele gebruiksaanwijzing PONORNÉ...
- Page 2 Klappen Sie vor dem Lesen die Seite mit den Abbildungen aus und machen Sie sich anschließend mit allen Funktionen des Gerätes vertraut. Before reading, unfold the page containing the illustrations and familiarise yourself with all functions of the device. Avant de lire le mode d‘emploi, ouvrez la page contenant les illustrations et familiarisez-vous ensuite avec toutes les fonctions de l‘appareil.
- Page 3 ½" ¾" 1" G 1" 1 ½"...
-
Page 4: Table Of Contents
Inhalt Einleitung Einleitung ........4 Herzlichen Glückwunsch zum Kauf Ihres Bestimmungsgemäße neuen Gerätes. Sie haben sich damit für Verwendung ........ 4 ein hochwertiges Gerät entschieden. Allgemeine Beschreibung ..... 5 Dieses Gerät wurde während der Produkti- Lieferumfang ........5 on auf Qualität geprüft und einer Endkon- Übersicht ......... -
Page 5: Allgemeine Beschreibung
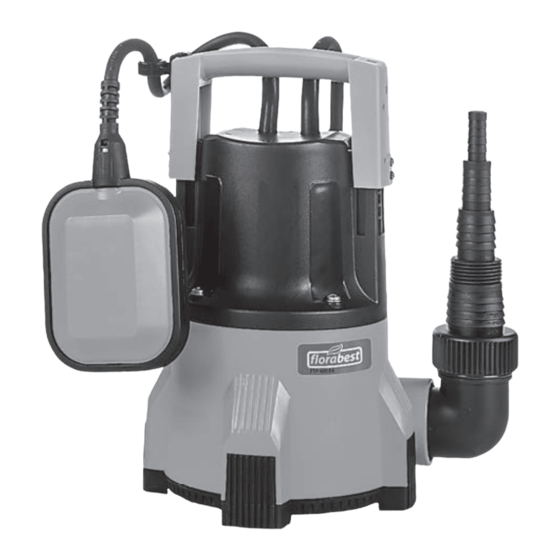
Allgemeine Zudem besitzt die Pumpe einen Rückfluss- Beschreibung Stopp, der das Zurückfließen des Wassers z. B. bei einem Stromausfall verhindert. Die Abbildung der wichtigs- Technische Daten ten Funktionsteile finden Sie auf der vorderen Ausklapp- Klarwasser-Tauchpumpe ..FTP 400 E4 seite. Nenneingangs- Lieferumfang spannung (U) ....230 V~, 50 Hz Leistungsaufnahme (P) ....400 W... -
Page 6: Sicherheitshinweise
Sicherheitshinweise Besondere Anweisungen zum sicheren Betrieb Bildzeichen auf dem Gerät • Befinden sich Personen im Was- Achtung! Nicht geeignet für ser, so darf das Gerät nicht be- Wasser mit hohem Sandan- trieben werden. Es besteht Ge- teil. fahr durch elektrischen Schlag. •... -
Page 7: Allgemeine Sicherheitshinweise
• Beachten Sie die weiteren Hin- • Bewahren Sie das Gerät an ei- weise im Kapitel „Wartung und nem trockenen Ort und außerhalb Reinigung“. der Reichweite von Kindern auf. Allgemeine Vorsicht! So vermeiden Sie Sicherheitshinweise Geräteschäden und even- tuell daraus resultierende Dieser Abschnitt behandelt die Personenschäden: grundlegenden Sicherheitsvorschrif-... - Page 8 • Schützen Sie das Gerät vor • Führen Sie die Elektroinstallation Frost und Trockenlaufen. entsprechend den nationalen • Verwenden Sie nur Original- Vorschriften aus. Zubehör und führen Sie keine • Prüfen Sie vor jedem Gebrauch Umbauten am Gerät durch. Gerät, Netzanschlussleitung und •...
-
Page 9: Inbetriebnahme
• Wenn die Netzanschlussleitung • Schließen Sie ein Hahnstück mit Innen- dieses Gerätes beschädigt wird, gewinde (G 1 ½“) direkt am Winkelad- muss sie durch den Hersteller apter (11) an. oder seinen Kundendienst oder eine ähnliche qualifizierte Per- Die Messung der maximalen Leis- son ersetzt werden, um Gefähr- tungsdaten erfolgt bei optimalen dungen zu vermeiden. -
Page 10: Prüfungen Vor Inbetriebnahme
Ein- und Ausschalten Achten Sie darauf, dass sich am Schachtboden im Laufe der Zeit Schmutz und Sand ansammeln 1. Stecken Sie den Netzstecker in die kann, der die Pumpe beschädigen Steckdose. Die Pumpe läuft sofort an, könnte. Wir empfehlen, die Pumpe wenn sich der Schwimmschalter in auf einen Ziegelstein oder einen korrekter Position befindet (siehe „Au-... -
Page 11: Manueller Betrieb/Flachabsaugung
Überprüfen Sie den Im manuellen Betrieb schaltet die Pumpe Schwimmschalter (5): nicht automatisch ab, da der Schwimm- - Er muss so positioniert sein, dass er schalter (5) überbrückt ist. sich frei heben und senken kann. Der Schwimmschalter (5) muss hierfür senk- Die Schaltpunkthöhe „Ein“... -
Page 12: Allgemeine Reinigungsarbeiten
Allgemeine 2. Setzen Sie den Rückfluss-Stopp (10) Reinigungsarbeiten so zwischen Winkeladapter (11) und Schlauch-Adapter (9) ein, dass sich • Nicht stationär installierte Geräte: das Ventil in Flussrichtung öffnet und gegen die Flussrichtung schließt. Reinigen Sie die Pumpe nach jedem Ge- brauch mit klarem Wasser. -
Page 13: Ersatzteile/Zubehör
Ersatzteile/Zubehör Ersatzteile und Zubehör erhalten Sie unter www.grizzly-service.eu Sollten Sie kein Internet haben, so wenden Sie sich bitte telefonisch an das Service-Center (siehe „Service-Center“ Seite 15). Halten Sie die unten genannten Bestellnummern bereit. Position Position Bezeichnung Bestell-Nr. Betriebs- Explosions- anleitung zeichnung 9/10 40,41,43... - Page 14 ausgesetzt sind und daher als Verschleißteile anschlussleitung verursacht werden. Die Pumpen dürfen nicht trocken laufen oder angesehen werden können (z. B. Rückfluss- Stopp) oder für Beschädigungen an zer- Frost ausgesetzt werden. brechlichen Teilen (z. B. Schalter). Abwicklung im Garantiefall Diese Garantie verfällt, wenn das Produkt beschädigt, nicht sachgemäß...
-
Page 15: Reparatur-Service
Reparatur-Service Service-Center Sie können Reparaturen, die nicht der Ga- Service Deutschland rantie unterliegen, gegen Berechnung von Tel.: 0800 54 35 111 unserer Service-Niederlassung durchführen E-Mail: grizzly@lidl.de IAN 298703 lassen. Sie erstellt Ihnen gerne einen Kos- tenvoranschlag. Service Österreich Wir können nur Geräte bearbeiten, die ausreichend verpackt und frankiert einge- Tel.: 0820 201 222 sandt wurden. -
Page 16: Fehlersuche
Fehlersuche Problem Mögliche Ursache Fehlerbehebung Steckdose, Netzanschlussleitung, Netzspannung fehlt Leitung, Netzstecker prüfen, ggf. Re- Pumpe läuft paratur durch Elektrofachmann nicht an Schwimmschalter in höhere Stellung Schwimmschalter ( 5) schaltet bringen nicht Einlaufgitter des Pumpenfußes mit Einlaufgitter des Pumpenfußes Wasserstrahl reinigen (siehe „Allge- verstopft meine Reinigungsarbeiten“) Pumpenleistung verringert durch... -
Page 17: Introduction
Content Introduction Introduction .......17 Congratulations on the purchase of your Areas of Application ....17 new device. With it, you have chosen a General Description ....18 high quality product. Scope of Delivery ......18 During production, this equipment has Overview ........18 been checked for quality and subjected to Functional description ......18 a final inspection. -
Page 18: General Description
General Description In addition, the pump also has a backflow stop that prevents water from flowing The illustration of the princi- back, for example during an interruption pal functioning parts can be in the power supply. found on the front foldout Technical Data page. -
Page 19: Notes On Safety
Notes on Safety Special instructions for safe operating Explanation of symbols • The equipment is not to be operat- Caution! Not suitable for wa- ed if there are people in the water. ter with high sand content! There is a risk of electric shock. • Connect the equipment only to Read and follow the operat- a socket with a residual current ing instructions provided for... - Page 20 Working with the equipment: of the manufacturer. Before ini- tial operation, have a specialist Caution: to avoid accidents check that the required electrical and injuries: protection measures are in place. • Monitor the equipment during • People who are unfamiliar operation (particularly in resi- with the operating instructions dential spaces, in order to detect...
-
Page 21: Operational Start-Up
Electrical safety: • Disconnect the mains plug from the socket before all work on the Caution: to avoid accidents and equipment, in case of leaks in injuries from electric shocks: the water system, during work breaks, and when not in use. •... -
Page 22: To Erect/Suspend
• For the use of a tap connector with Note that, over time, dirt and sand internal thread (G 1”) for connecting ex- may collect on the bottom of the shaft, ternal hose connection systems, cut the which could damage the pump. top three connections off directly over We recommend placing the pump the G 1”... -
Page 23: Switching On And Off
Switching on and off Check the float switch (5). - It must be positioned so that it 1. Insert the plug in the socket. The pump can lift and lower freely. The starts working immediately. switching point heights “On” The pump immediately starts running and “Off”... -
Page 24: Maintenance And Cleaning
General cleaning The float switch (5) must be positioned ver- instructions tically upwards on the pump for this. Clip the float switch retaining clip (6) into • In case of transport for utilization in one of the two recesses on the handle (1). different locations, the pump must be Pull the float switch cable (7) through the cleaned with clear water after every... -
Page 25: Storage
Storage Waste Disposal and En- vironmental Protection • Clean the pump before storage. • Store the appliance in a dry, frost-free Be environmentally friendly. Return the place, and where children cannot gain tool, accessories and packaging to a recy- access to it. cling centre when you have finished with •... -
Page 26: Troubleshooting
Troubleshooting Faults Causes Remedies Check plug socket, cable, line and Mains voltage is not applied plug, where appropriate, have re- Pump does paired through electrical specialist not start Float switch ( 5) does not switch Bring float switch into higher position Use a water jet to clean the pump Pump pedestal inlet grating pedestal inlet grating (see “General... -
Page 27: Guarantee
Guarantee The guarantee applies for all material and manufacturing defects. This guarantee Dear Customer, does not extend to cover product parts that This equipment is provided with a 3-year are subject to normal wear and may there- guarantee from the date of purchase. fore be considered as wearing parts (e.g. -
Page 28: Repair Service
Repair Service float switch is operational. Warranty and liability claims will be void in case on non- For a charge, repairs not covered by the compliance or if the pump runs dry. guarantee can be carried out by our ser- In particular, the guarantee is likewise void in the case of employment of the sewage vice branch, which will be happy to issue water pumps without base plate or (this... -
Page 29: Introduction
Sommaire Introduction Introduction ....... 29 Toutes nos félicitations pour l’achat de Fins d’utilisation ......29 votre nouvel appareil. Vous avez ainsi Description générale ....30 choisi un produit de qualité supérieure. Volume de la livraison ..... 30 La qualité de l’appareil a été vérifiée pen- Vue synoptique ....... -
Page 30: Description Générale
Description générale La pompe est de plus équipée d’un clapet anti-retour qui empêche l’eau de refluer, Vous trouverez les illustrations sur par exemple lors d’une panne de courant. la page de rabat avant. Détails techniques Volume de la livraison Pompe à eau immergée ... FTP 400 E4 Déballez l’appareil et vérifiez que la livrai- Raccordement son est complète. -
Page 31: Instructions De Sécurité
Instructions de sécurité Symboles de remarque et informations permettant une Explication des symboles meilleure utilisation de l‘appa- et des avis de sécurité reil. Attention ! Ne convient pour Consignes particulières pour une utilisation en l’eau avec une grande part de sable. toute sécurité Lisez et respectez le mode •... -
Page 32: Consignes Générales De Sécurité
être effectués par des enfants, à (par exemple des carburants moins qu’ils ne soient surveillés. pour moteur) ou explosifs, d‘eau • Il convient de surveiller les en- salée, de produits de nettoyage fants pour s’assurer qu’ils ne et alimentaires est interdite. La jouent pas avec l’appareil. - Page 33 fuite, peuvent s‘écouler et causer - que les raccordements électriques des dommages ou des pollutions. sont protégés de l‘humidité. Ne placez pas la pompe dans • En cas de risque d‘inondation les des étangs contenant des poissons raccordements doivent être situés ou des plantes de valeur.
-
Page 34: Mise En Service
sous caoutchouc avec la marque raccordement de systèmes externes de 05RN8-F. La longueur de ligne tuyaux, découpez les trois raccords doit être de 10 m. La section du supérieurs directement via le filetage de toron de la rallonge doit être égale tuyau G 1“. -
Page 35: Contrôls Devant La Mise En Marche
Service Faites attention à ce qu‘en aucun cas l‘appareil ne soit Le raccordement au réseau fixé ou suspendu par le câble d‘alimentation secteur. Il y a alors danger d‘une décharge La pompe que vous avez acquise est déjà électrique par les câbles munie d’un interrupteur de sécurité. -
Page 36: Mode Manuel/Aspiration À Plat
En cas d’installation stationnaire, Il y a un risque de fonctionnement l’interrupteur à flotteur (5) doit être à sec si le câble de l’interrupteur contrôlé régulièrement (au plus tard à flotteur (7) est trop long, en tous les trois mois). particulier si le clip de retenue de l’interrupteur à... -
Page 37: Entretien Et Nettoyage
Entretien et nettoyage Tous les travaux qui ne sont pas décrits ici, en particulier l‘ouverture de la pompe La pompe est un produit de qualité ayant doivent être exécutés par un électricien fait ses preuves et qui a été soumis a un professionnel. -
Page 38: Protection De L'environnement
Protection de l’environnement Respectez la réglementation relative à la protection de l’environnement (recyclage) pour l’élimination de l’appareil, des acces- soires et de l’emballage. Les appareils ne font pas partie des ordures ménagères. Déposez l’appareil à un point de recy- clage. Les pièces de plastique et de métal utilisées peuvent être triées selon leur nature et être ainsi recyclées. -
Page 39: Garantie
Garantie Volume de la garantie L’appareil a été fabriqué avec soin, selon Chère cliente, cher client, de sévères directives de qualité et il a été Ce produit bénéficie d’une garantie de 3 entièrement contrôlé avant la livraison. ans, valable à compter de la date d’achat. En cas de manques constatés sur ce La garantie s’applique aux défauts de maté- produit, vous disposez des droits légaux... -
Page 40: Service Réparations
Service Réparations tie prend fin en cas d’une utilisation non conforme à la destination. Contrôlez régu- lièrement le fonctionnement de l’interrupteur Vous pouvez, contre paiement, faire exécu- ter par notre service, des réparations qui ne à flotteur. En cas d’emploi non conforme ou font pas partie de la garantie. -
Page 41: Dépannage
Dépannage Pannes Causes Aide Vérifiez l‘alimentation en courant, la prise de courant, le câble, la rallonge, pas de tension de réseau la prise de courant, le cas échéant, La pompe ne réparation par un électrotechnicien démarre pas spécialisé l’interrupteur à flotteur ( 5) ne placer l‘interrupteur à... -
Page 42: Inleiding
Inhoud Inleiding Inleiding ........42 Hartelijk gefeliciteerd met de aankoop van Gebruiksdoel ......42 uw nieuw apparaat. Daarmee hebt u voor Algemene beschrijving ....43 een hoogwaardig product gekozen. Omvang van de levering ....43 Dit apparaat werd tijdens de productie op Overzicht ........ -
Page 43: Algemene Beschrijving
Algemene beschrijving Technische gegevens Zuiver water-dompelpomp ..FTP 400 E4 De afbeeldingen kunt u vinden op de voorste uitklappagina. Netspanning (U) ....230 V~, 50 Hz Prestatievermogen (P) ....400 W Omvang van de levering Hoeveelheid water max. (Qmax) ......ca. 10000 l/h Pak het apparaat uit en controleer, of de Bereikbare hoogte max. -
Page 44: Veiligheidsvoorschriften
Veiligheidsvoorschriften Bijzondere aanwijzingen voor een veilig bedrijf Verklaring van symbolen • Indien er zich personen in het Let op! water bevinden, mag het ap- Niet geschikt voor water met paraat niet bediend worden. Er een hoog zandgehalte. bestaat gevaar door een elektri- sche schok. Lees aandachtig de bij de •... -
Page 45: Algemene Veiligheidsvoorschriften
• Neem ook de aanwijzingen in • Bewaar het apparaat op een het hoofdstuk “Onderhoud en droge plaats en buiten de reik- reiniging” in acht. wijdte van kinderen. Algemene Opgepast! Zo vermijdt u veiligheidsvoorschriften schade aan het apparaat en eventueel daaruit voortvloei- Speciale opmerkingen bij de be- ende lichamelijke letsels: diening van het apparaat. - Page 46 • Bescherm het apparaat tegen • Voer de elektrische installatie vorst en tegen het drooglopen. overeenkomstig de nationale • Maak uitsluitend gebruik van ori- voorschriften uit. ginele accessoires en voer geen • Controleer telkens vóór gebruik ap- ombouw van het apparaat door. paraat, snoer en stekker op bescha- •...
-
Page 47: Ingebruikname
Ingebruikname Om de pompcapaciteit te vergroten, kan de terugstroomklep ( 10) uit de adapter Montagehandleiding (11) worden verwijderd (zie “Terugstroom- klep vervangen”). Dit is in het bijzonder Adapter vastschroeven: raadzaam bij slangaansluitingen kleiner 1. Schroef de hoekadapter (11) en de dan 1“. -
Page 48: Kontroles Voor Ingebruikname
Kontroles voor Bij een te gering waterpeil schakelt ingebruikname de drijfschakelaar de pomp automa- tisch uit. • Controleer de werking van de drijfschakelaar (zie „Bediening“). Houd het apparaat tijdens de • Kontroleer of de pomp op de werking onder toezicht om het schacht staat. -
Page 49: Handmatige Werking / Vlakke Afzuiging
laten zakken. Zo kan u zien of Observeer de pomp in de handma- de pomp aan- resp. uitschakelt. tige modus voortdurend. Schakel - Let erop dat de afstand tussen de pomp onmiddellijk uit (netstekker de vlotterschakelaar (5) en de uittrekken) wanneer er geen water vlotterschakelaar-brogclip (6) meer gepompt wordt. -
Page 50: Terugstroomklep Vervangen
Opslag • De schacht regelmatig van modder ont- doen (minstens elke drie maanden) en ook de schachtwanden reinigen. • Reinig de pomp vóór de opslag. • Verontreinigingen aan de onderzijde • Bewaar de pomp droog en vorstbesten- van de pomp kunnen met schoon water dig en buiten de reikwijdte van kinderen. -
Page 51: Reserveonderdelen/Accessoires
Reserveonderdelen/accessoires Reserveonderdelen en accessoires verkrijgt u op www.grizzly-service.eu Indien u geen Internet hebt, neem dan telefonisch contact op met het Service-Center (zie „Service-Center“ pagina 53). Hou de onderstaande bestelnummers klaar. Pos. Pos. Benaming Bestel- Gebruiksaanvijzing Explosietekening nummers 9/10 40,41,43 Adapter met slangaansluiting, met terugstroomklep 91101246 39,42... - Page 52 De garantievergoeding geldt voor materi- rigatiedoeleinden (bijvoorbeeld voor het besproeien van de tuin) of om permanent aal- of fabricagefouten. Deze garantie is niet van toepassing op productonderdelen, te laten pompen (bijvoorbeeld voor beek- die aan een normale slijtage blootgesteld lopen of vijverfonteinen). Bij gebruik dat in strijd is met deze voorschriften vervalt de zijn en daarom als aan slijtage onderhevi- ge onderdelen beschouwd kunnen worden...
-
Page 53: Reparatieservice
Service-Center vermijden, maakt u onvoorwaardelijk uitsluitend gebruik van het adres, dat Service Nederland u medegedeeld wordt. Zorg ervoor dat de verzending niet ongefrankeerd, Tel.: 0900 0400223 als volumegoed, per expresse of via (0,10 EUR/Min.) een andere speciale verzendingswijze E-Mail: grizzly@lidl.nl IAN 298703 plaatsvindt. -
Page 54: Foutopsporing
Foutopsporing Storingen Oorzaken Hulp stopkontakt, kabel, leiding, stekker geen stroom kontroleren, eventueel reparatie Pomp start door elektricien niet drijfschakelaar in een steilere positie drijfschakelaar ( 5) kapot brengen aanzuigrooster van het voetdeel met aanzuigrooster van het voetdeel waterstraal reinigen (zie „Algemene verstopt reinigings- en onderhoudswerk- zaamheden”) -
Page 55: Úvod
Obsah Úvod Úvod.......... 55 Blahopřejeme vám ke koupi vašeho nové- Účel použití ........ 55 ho přístroje. Rozhodli jste se pro vysoce Všeobecný popis ......56 kvalitní výrobek. Objem dodávky ......56 Kvalita tohoto přístroje byla kontrolována Přehled ......... 56 během výroby a byla provedena také Popis funkce ........ -
Page 56: Všeobecný Popis
Všeobecný popis Technická data Ponorné čerpadlo Obrázky najdete na přední na čistou vodu ......FTP 400 E4 výklopné straně. Jmenovité vstupní Objem dodávky napětí (U) ......230 V~, 50 Hz Příkon (P) ........400 W Vybalte nástroj a zkontrolujte, je-li komplet- Maximální dopravní množství ní. Obalový materiál řádně zlikvidujte. (Qmax) ...... -
Page 57: Bezpečnostní Pokyny
Bezpečnostní pokyny Zvláštní pokyny k bezpečnému provozu Obrázkové znaky na čerpadle • Nachází-li se osoby ve vodě, pak se tento přístroj nesmí pou- Pozor! žívat. Hrozí nebezpečí poranění Není vhodné pro vodu s vy- elektrickým proudem. sokým obsahem písku. • Připojte toto zařízení pouze na zástrčku s ochranným vypínačem Čtěte a dbejte na příslušný... -
Page 58: Všeobecné Bezpečnostní Pokyny
Všeobecné bezpečnostní Pozor! Takto zabráníte ško- pokyny dám na zařízení a případně škodám na osobách, které z Tato kapitola pojednává o základ- těchto škod vyplývají: ních bezpečnostních předpisech při práci s ponorným čerpadlem. • Nepracujte se zařízením poško- zeným, neúplným anebo přesta- Práce s tímto zařízením: věným bez souhlasu výrobce. - Page 59 • Přečtěte prosím k tématu „Údrž- je nechte odstranit autorizova- ba a čištění“ pokyny v návodu ným odborníkem. k použití. Všechna další opatře- • Nepoužívejte kabel na vytahová- ní mimo tento rámec, obzvlášť ní zástrčky ze zásuvky. Chraňte otevření tohoto zařízení, je kabel před horkem, olejem a třeba nechat vykonat elektro- ostrými hranami.
-
Page 60: Uvedení Do Provozu
Uvedení do provozu Za účelem zvýšení výkonu čerpadla možno zpětný toku ( 10) z adaptéru (11) vy- Montáž jmout (viď „výměna zpětného toku“). To se doporučuje především u hadicových přípo- Přišroubování adaptéru jek menších než 1“. Mjte prosím na zřeteli, 1. Přišroubujte na výstup čerpadla že v tom případe může voda při čerpání... -
Page 61: Kontroly Před Uvedením Do Provozu
Kontroly před uvedením do Pťi příliš nízkém stavu vodní hladiny provozu vypne plovákový spínač čerpadlo automaticky. • Zkontrolujte funkci plovákového vypínače (viz kap. „Obsluha“). Mějte tento nástroj během jeho • Zkontrolujte, zda čerpadlo stojí provozu pod dozorem, aby se za- pevně na dně šachty. včasu spoznalo automatické... -
Page 62: Ruční Provoz/ Plošné Odsávání
Údržba a čištění objímkou pro plovákový spínač (6) nebyly příliš malé. Při příliš malé vzdálenosti není zaručena Čistěte a udržujte Váš přístroj pravidelně. bezvadná funkce. Tím se zachová jeho výkonnost a zajistí - Při nastavování plovákového spí- dlouhá životnost. nače dbejte na to, aby plovákový Práce, které... -
Page 63: Výměna Závěrky Zpětného Toku
Odklízení a ochrana Výměna závěrky zpětného toku okolí Vyměňte vadnou zábranu proti zpětného Přístroj, příslušenství a obal odevzdejte v toku (viz „Náhradní díly/Příslušenství“). souladu s požadavkami na ochranu život- ního prostředí do recyklační sběrny. 1. Odšroubujte adaptér hadice (9) na úhlovém adaptéru (11) a vyjměte pře- Elektrické... -
Page 64: Hledání Závad
Hledání závad Problém Možná příčina Odstranění závady Kontrolovat zásuvku, kabel, Chybí síťové napětí vedení, zástrčku, příp. oprava Čerpadlo se elektroodborníkem nerozbíhá Plovákový spínač ( Plovákový spínač přesunout do vyšší nespíná polohy Vstupní mřížku patice vyčistěte Vstupní mřížka patice proudem vody (viz „Všeobecné čisticí ucpaná. -
Page 65: Záruka
Záruka Záruční oprava se vztahuje na materiálové nebo výrobní vady. Tato záruka se netýká Vážení zákazníci, dílů výrobku, které jsou vystaveny normál- Na tento přístroj poskytujeme 3letou záru- nímu opotřebení, a lze je považovat za spotřební materiál (např. závěrka zpětného ku od data zakoupení. -
Page 66: Opravna
potoků nebo rybníkové fontány). V případě jako nadměrné zboží, expres nebo jiný, zvláštní druh zásilky. Přístroj za- nepoužívání k původnímu účelu zaniká nárok na záruku. šlete včetně všech částí příslušenství Pravidelně kontrolujte funkci plovákového dodaných při zakoupení a zajistěte dostatečně bezpečný přepravní obal. spínače. -
Page 67: Introducción
Contenido Introducción Introducción ....... 67 ¡Felicitaciones por la compra de su nueva Uso previsto ....... 67 aspiradora! Con ello se ha decidido por Descripción general ....68 un producto de suprema calidad. Volumen de suministro ..... 68 Este aparato fue examinado durante la pro- Piezas funcionales ...... -
Page 68: Descripción General
Descripción general La bomba está adicionalmente equipada con un válvula de retención que impide el Las ilustraciones se encuentran reflujo del agua, por ejemplo, en caso de en la página abatible frontal. una interrupción de corriente. Datos técnicos Volumen de suministro Bomba sumergible Desembale el aparato y compruebe que para aguas limpias .... -
Page 69: Instrucciones De Seguridad
Instrucciones de seguridad Indicaciones especiales para un funcionamiento seguro Explicación de los símbolos gráficos • Si hay personas en el agua, no se deberá utilizar la bomba de ¡Atención! No se adecúa inmersión, porque existe el peli- para agua muy arenosa. gro de una descarga eléctrica. •... -
Page 70: Indicaciones Generales De Seguridad
Indicaciones generales de Precaución: Así puede evitar seguridad daños en el aparato y daños personales que podrían re- Esta sección trata de las normas sultar de ello: de seguridad básicas cuando se trabaja con este aparato. • No trabaje con el aparato daña- do, incompleto o cuando el fa- Trabajos con el aparato: bricante no haya dado su visto... - Page 71 • Utilizar solamente accesorios • Antes de utilizar el aparato, com- originales y no realice remode- probar el cable y el enchufe por laciones en el aparato. si estuviesen dañados. No deben • Leer las instrucciones del ma- repararse cables defectuosos, nual de servicio, relativas al sino que tienen que cambiarse tema “Mantenimiento y limpie-...
-
Page 72: Puesta En Servicio
Puesta en servicio La medición de los datos de rendi- miento máximo se realiza con una Montaje salida recta y directa. El adaptador angular (11) y la válvula de reten- Atornillar el adaptador ción ( 10) podrían perjudicar el 1. Atornille el adaptador acodado (12) y rendimiento. -
Page 73: Puesta En Marcha
Conectar y desconectar tiempo, que podrían deteriorar la bomba. Recomendamos colocar la bomba sobre un ladrillo. Si el nivel 1. Colocar el enchufe en la caja de em- de agua es demasiado bajo, puede palme (la bomba se pone en marcha secarse rápidamente el fango acu- inmediatamente). -
Page 74: Modo Manual, Aspiración Plana
sacando el cable (7) por el ojal del En el modo manual, la bomba no se des- clip de sujeción (6). conecta automáticamente, ya que el con- mutador flotante (5) está puenteado. Comprobar el del interruptor de El interruptor del flotador (5) debe colocar- se en la bomba en vertical hacia arriba. -
Page 75: Trabajos Generales De Limpieza Y Mantenimiento
Existe peligro de electrocución o de 1. Desenrosque el adaptador de la man- lesiones por componentes en movi- guera (9) del adaptador de ángulo (11) miento. y retire el dispositivo de reflujo (10). 2. Coloque el paro contra reflujo (10) de Trabajos generales de lim- tal manera entre el adaptador acoda- pieza y mantenimiento... -
Page 76: Pedido De Piezas De Repuesto
Pedido de piezas de repuesto Encontrará las piezas de repuesto y accesorios en www.grizzly-service.eu Si no tuviese acceso a Internet, póngase en contacto telefónico con el Service-Center (ver página 78). Tenga a mano los números de pedido. Part. Part. Denominación Nº de pedido Instrucciones Plano de de uso explosión... - Page 77 Atención: Las bombas sumergibles son después de haberlo desempacado. Las re- bombas de desagüe. El diseño de una paraciones a efectuar al cabo del período de garantía están sujetas a pago. bomba sumergible persigue el propósito de elevar o bien bombear un determinado Volumen de la garantía volumen de agua dentro del rango de su El aparato fue producido cuidadosamente...
-
Page 78: Servicio De Reparación
Service-Center o vía E-Mail. Se le darán otras infor- maciones acerca de la gestión de su Servicio España reclamación. • Tras consultar con nuestro servicio de Tel.: 902 59 99 22 postventa, un aparato identificado (0,08 EUR/Min. + 0,11 EUR/lla- como defectuoso puede ser enviado mada (tarifa normal)) libre de franqueo a la dirección de... -
Page 79: Búsqueda De Fallos
Búsqueda de fallos Fallas Causas Solución Controlar la caja de enchufe, el ca- ble, la línea, el enchufe y el fusible, Falta tensión de red en caso dado se requiere repara- Bomba no ción por un especialista arranca Interruptor de nivel de flotador Colocar el interruptor de nivel de flo- 5) no conmuta tador en una posición más elevada... -
Page 80: Introdução
Conteúdo Introdução Introdução .........80 Parabéns pela compra do seu novo apare- Uso previsto .......80 lho. Com a sua compra, decidiu-se por um Descrição geral ......81 produto de alta qualidade. Volume de fornecimento ....81 Este aparelho foi testado durante a produ- Vista geral ........81 ção em relação à... -
Page 81: Descrição Geral
Descrição geral Para além disso, a bomba possui um dispositivo anti-refluxo que impede que As ilustrações encontram-se a água corra, por exemplo, em casos de nas abas dianteiras deste falta de corrente eléctrica. manual de instruções. Dados técnicos Volume de fornecimento Bomba submersível para água limpa .... -
Page 82: Medidas De Segurança
Medidas de segurança Sinais indicativos com infor- mações de como trabalhar Explicação dos símbolos melhor com o aparelho. e das indicações de segurança Instruções especiais para um funcionamento seguro Atenção! Não apropriado para água com uma elevada • O aparelho não pode ser opera- percentagem arenosa. -
Page 83: Indicações Gerais De Segurança
• Se os lubrificantes escoarem alimentícios. A temperatura do para fora é possível que o líqui- líquido a ser bombeado não do fique sujo. deve exceder 35°C. • Observe as outras indicações no • Mantenha o aparelho num sítio capítulo “Manutenção e limpeza”. seco e fora do alcance das crianças. - Page 84 podem escorrer e, com isso, rança da empresa de abasteci- causar danos ou poluição. mento de energia e em perfeitas Não use a bomba em lagoas condições de funcionamento. de jardim onde haja peixes ou - Protecção das conexões eléc- plantas valiosos.
-
Page 85: Colocação Em Funcionamento
condutos de mangueira de bor- • Para a utilização de um conector de racha com a marcação 05RN8- torneira com rosca interior (G 1“), F. A linha deve ter 10 m de para a conexão a sistemas externos de comprimento. O corte transver- conexão a mangueiras, corte as três sal do cabo de extensão deve- conexões superiores diretamente sobre... -
Page 86: A Tomada Em Funcionamento
Cuide para nunca segurar Colocar o aparelho em funciona- nem suspender o aparelho mento somente após ter em aten- pelo cabo de ligação à rede. ção todas as exigências anterior- Há risco de choque eléctrico mente mencionadas. se o cabo estiver danificado. Ligação e desligamento Tenha em conta que, com o passar do tempo, pode haver acumulação de... -
Page 87: Modo Manual/Aspiração Plana
Modo manual/ Alterne o ponto de conexão aspiração plana e desconexão ao: selecionar um dos dois níveis de enga- Atenção: Evitar o funciona- te da pega de transporte (1). mento a seco da bomba! Pe- variar o comprimento do cabo do rigo de sobreaquecimento! interruptor de boia (7). -
Page 88: Trabalhos Gerais De Limpeza
Substituir a dispositivo Solicite à nossa equipa de assistência técnica a execu- antirefluxo ção de serviços não descritos neste manual de instruções. Substitua a dispositivo anti-refluxo se verifi- Utilize unicamente peças ori- car que está danificada (ver “Peças sobres- ginais. Existe perigo de feri- salentes/Acessórios”). -
Page 89: Peças Sobressalentes/Acessórios
e, deste modo, prontas para serem recicla- das. Para tal, dirija-se aos nossos Serviços de Assistência Técnica. A eliminação do aparelhos inutilizado que nos enviar será realizada por nós gratuitamente. Peças sobressalentes/Acessórios Pode obter as peças de reposição e os acessórios em www.grizzly-service.eu Caso não tenha internet entre em contacto, por telefone, com o centro de assistência (ver “Service-Center“... - Page 90 ração do aparelho não se inicia nenhum uso de força, e em caso de intervenções novo prazo de garantia. que não tenham sido realizadas pela nos- sa estação de serviço autorizada. Período de garantia e reclamações legais por defeitos Perde-se o direito a garantia no caso de O período de garantia não é...
-
Page 91: Serviço De Reparação
Serviço de reparação Procedimento em caso de reclama- ção de garantia As reparações que não sejam abrangidas Para assegurar um processamento rápido pela garantia podem ser efetuadas pelo da sua reclamação, siga por favor as se- guintes instruções: nosso centro de serviço, mediante fatura- •... -
Page 92: Diagnóstico De Falhas
Diagnóstico de falhas Falhas Motivos Eliminação Inspeccionar a tomada, o cabo, a linha, a ficha e o fusível e, caso seja Falta corrente necessário, levar para reparação a um A bomba técnico especializado não funciona O interruptor flutuante automáti- Colocar o interruptor flutuante auto- co ( 6) não funciona mático numa posição mais elevada... -
Page 93: Traduction De La Déclaration De Conformité Ce Originale
Traduction de la déclaration de conformité CE originale Nous certifions par la présente que la Pompe à eau immergée série FTP 400 E4 Numéro de série 201805000001 - 201805065681 est conforme aux directives UE actuellement en vigueur : 2014/30/EU • 2014/35/EU • 2011/65/EU* En vue de garantir la conformité... -
Page 94: Traducción De La Declaración De Conformidad Ce Original
Traducción de la Declaración de conformidad CE original Mediante la presente declaramos que la Bomba sumergible para aguas limpias la serie FTP 400 E4 Número de serie 201805000001 - 201805065681 corresponde a las siguientes Directivas de la UE corrientes en su respectiva versión vigente: 2014/30/EU •... -
Page 95: Tradução Do Original Da
Tradução do original da Declaração de conformidade CE Vimos, por este meio, declarar que a Bomba submersível para água limpa da série FTP 400 E4 Número de serie 201805000001 - 201805065681 corresponde às respectivas normas da UE na sua versão em vigor: 2014/30/EU • 2014/35/EU • 2011/65/EU* Para garantir a conformidade, foram aplicadas as seguintes normas harmonizadas bem como normas e disposições nacionais: EN 60335-1:2012/A11:2014 •... -
Page 96: Translation Of The Original Ec Declaration Of Conformity
Translation of the original EC declaration of conformity We hereby declare that the Submersible Water Pump model series FTP 400 E4 Serial number 201805000001 - 201805065681 conforms with the following applicable relevant version of the EU guidelines: 2014/30/EU • 2014/35/EU • 2011/65/EU* In order to guarantee consistency, the following harmonised standards as well as natio- nal standards and stipulations have been applied: EN 60335-1:2012/A11:2014 •... -
Page 97: Překlad Originálního Prohlášení O Shodě Ce
Překlad originálního prohlášení o shodě CE Potvrzujeme tímto, že Ponorné čerpadlo na čistou vodu konstrukční řady FTP 400 E4 Pořadové číslo 201805000001 - 201805065681 odpovídá následujícím příslušným směrnicím EÚ v jejich právě platném znění: 2014/30/EU • 2014/35/EU • 2011/65/EU* Aby byl zaručen souhlas, byly použity následující harmonizované normy, národní nor- my a ustanovení: EN 60335-1:2012/A11:2014 •... -
Page 98: Vertaling Van De Originele Ce-Conformiteitsverklaring
Vertaling van de originele CE-conformiteitsverklaring Hiermede bevestigen wij dat de Zuiver water-dompelpomp bouwserie FTP 400 E4 Serienummer 201805000001 - 201805065681 is overeenkomstig met de hierna volgende, van toepassing zijnde EU-richtlijnen: 2014/30/EU • 2014/35/EU • 2011/65/EU* Om de overeenstemming te waarborgen, werden de hierna volgende, in overeenstem- ming gebrachte normen en nationale normen en bepalingen toegepast: EN 60335-1:2012/A11:2014 •... -
Page 99: Eg-Konformitätserklärung
Original EG-Konformitätserklärung Hiermit bestätigen wir, dass die Klarwasser-Tauchpumpe Baureihe FTP 400 E4 Seriennummer 201805000001 - 201805065681 folgenden einschlägigen EU-Richtlinien in ihrer jeweils gültigen Fassung entspricht: 2014/30/EU • 2014/35/EU • 2011/65/EU* Um die Übereinstimmung zu gewährleisten, wurden folgende harmonisierte Normen sowie nationale Normen und Bestimmungen angewendet: EN 60335-1:2012/A11:2014 •... -
Page 101: Explosionszeichnung
Explosionszeichnung • Exploded Drawing Vue éclatée • Explosietekening • Rozvinutý výkres Plano de explosión • Vista em corte FTP 400 E4 informativ informative informatif • • informatief informační informativo • • 2018-04-27_rev02_sh 1 0 1... - Page 102 GRIZZLY TOOLS GMBH & CO. KG Stockstädter Straße 20 DE-63762 Großostheim GERMANY Stand der Informationen · Last Information Update · Version des informations · Stand van de informatie · Stav informací · Estado de las informaciones · Estado das informações: 04/2018 ·...
Need help?
Do you have a question about the FTP 400 E and is the answer not in the manual?
Questions and answers