FLORABEST FTP 400 C2 Translation Of Original Operation Manual
Submersible water pump
Hide thumbs
Also See for FTP 400 C2:
- Translation of original operation manual (98 pages) ,
- Translation of original operation manual (46 pages) ,
- Operation manual (86 pages)
Table of Contents
Advertisement
Available languages
Available languages
Quick Links
Advertisement
Chapters
Table of Contents

Related Manuals for FLORABEST FTP 400 C2


Summary of Contents for FLORABEST FTP 400 C2
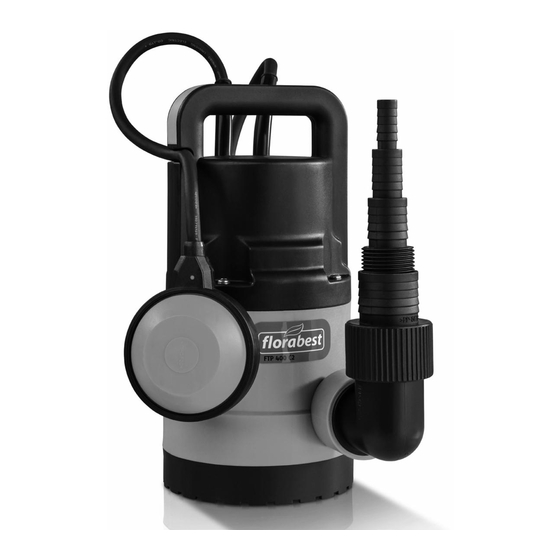
- Page 1 ® SUBMERSIBLE WATER PUMP FTP 400 C2 BOMBA SUBMERSÍVEL SUBMERSIBLE WATER PUMP PARA ÁGUA LIMPA Translation of original operation manual Tradução do manual de instruções original KLARWASSER-TAUCHPUMPE Originalbetriebsanleitung IAN 96809...
- Page 2 Antes de começar a ler abra na página com as imagens e, de seguida, familiarize-se com todas as funções do aparelho. Before reading, unfold the page containing the illustrations and familiarise yourself with all functions of the device. Klappen Sie vor dem Lesen die Seite mit den Abbildungen aus und machen Sie sich anschließend mit allen Funktionen des Gerätes vertraut.
- Page 3 ½’’ ¾’’ 1’’ G 1 ½’’ 1 ½’’...
-
Page 4: Table Of Contents
Conteúdo Introdução Introdução ........4 Parabéns pela compra do seu novo apare- Uso previsto .........4 lho. Com a sua compra, decidiu-se por um Descrição geral ......5 produto de alta qualidade. Volume de fornecimento ....5 Este aparelho foi testado durante a produ- Vista geral ........5 ção em relação à... -
Page 5: Descrição Geral
é completo. Eliminar a emba- Dados técnicos lagem de maneira apropriada. Tipo ......FTP 400 C2 Bomba submersível para água limpa Adaptador angular + adaptador com Tomada de corrente..230 V ~ 50 Hz união de mangueira Potência de entrada .....400 W... -
Page 6: Dados De Rendimento
Explicação dos símbolos e às informações deste manual não pode- das indicações de segurança rão, por isso, ser postos em vigor. Dados de rendimento Atenção! Nao utilizar para agua arenosa! A medição dos dados máximos de potên- cia ocorre nas condições ideais, como a Leia e observe as instruções de ser- saída reta e direta. - Page 7 Trabalhos com o aparelho: em aposentos), a fim de detectar a tempo um desligamento automático ou Cuidado! Assim poderá evitar aci- o funcionamento a seco da bomba. Ve- dentes e ferimentos: rifique regularmente o funcionamento do interruptor flutuante (veja o capítulo •...
-
Page 8: Colocação Em Funcionamento
• O aparelho não pode ser operado Serviço à Clientela por ele autorizado se se encontrarem pessoas na água. ou por uma pessoa qualificada para Existe perigo provocado por choques tal, a fim de evitar-se perigos. elétricos. • Não use o cabo para puxar a ficha da •... -
Page 9: Conexão Do Conduto De Pressão
Conexão do conduto de Colocação/suspensão pressão A bomba pode ser colocada dentro A instalação da bomba pode ser feita de água ou suspensa. com condutos fixos, ou Para suspender e/ou puxar a bom- com mangueiras flexíveis. ba para fora, poderá usar a corda incluída no volume de entrega •... -
Page 10: Operação
foi concectado de modo correto, No modo de funcionamento automático, o • verifique o estado correto das interruptor flutuante ( 6) liga e desliga a tomadas elétricas, bomba automaticamente. • certifique-se, que jamais entre Ajustar o interruptor flutuante humidade ou poeira na conexão elétrica. -
Page 11: Indicações De Manutenção
Existe o perigo de funcionamento com água clara. em seco, se o cabo do interruptor • O fundo do poço deve ser periodica- flutuante ( 7) for demasiado com- mente limpo de lama (no mais tardar a prido. cada três meses). As paredes do poço também devem ser limpas. -
Page 12: Armazenamento
Reciclagem/Protecção 4. Posicione a peça de base (4) no corpo da bomba (3) de modo ambiental a que a reentrância (14) esteja posicionada à altura da saída da Por favor, coloque o aparelho, os acessó- bomba (5) na peça de base (4). rios e a embalagem nos respectivos eco- pontos para serem reciclados. -
Page 13: Falhas - Motivos - Eliminação
Falhas – Motivos – Eliminação Falhas Motivos Eliminação - Falta corrente - Verificar a corrente A bomba não fun- - O interruptor flutuante auto- - Colocar o interruptor flutuante ciona mático ( 6) não funciona automático numa posição mais elevada - Grelha de entrada da peça - Limpar a grelha de entrada da de base (4) suja... -
Page 14: Garantia
Garantia tamente após se ter desembalado o produ- to. Após decorrido o período de garantia, Prezada cliente, prezado cliente, as reparações necessárias estão sujeitas a Este aparelho tem uma garantia de 3 anos pagamento. a contar a partir da data da compra. Âmbito da garantia Em caso de deficiências verificadas neste produto, estão à... - Page 15 lidades implica que ocorram defeitos nas compra. • Pode consultar o número do artigo na vedações, na roda livre, no motor, ou em outras peças. placa de identificação. Mesmo bombas não são apropriadas • Se ocorrerem erros na funcionalidade ou outros defeitos, contate imedia- para o transporte de materiais abrasivos tamente por telefone ou e-mail o (areia, pedras).
-
Page 16: Serviço De Reparação
Serviço de reparação Service-Center As reparações que não sejam abrangidas Assistência Portugal pela garantia podem ser efetuadas pelo Tel.: 70778 0005 (0,12 EUR/Min.) nosso centro de serviço, mediante fatura- E-Mail: grizzly@lidl.pt IAN 96809 ção. Ele apresentar-lhe-á de bom grado um orçamento dos custos. Importador Podemos reparar apenas os aparelhos que tenham sido devidamente embalados e... -
Page 17: Introduction
Content Introduction Introduction .......17 Congratulations on the purchase of your Areas of Application ....17 new device. With it, you have chosen a General Description ....18 high quality product. Scope of Delivery ......18 During production, this equipment has Overview ........18 been checked for quality and subjected Functional description ......18 to a final inspection. -
Page 18: General Description
Dispose of the packag- power supply. ing material correctly. Technical Data Submersible water pump (pump) Submersible water pump .....FTP 400 C2 Angle adapter + adapter with hose connection Mains connection .... 230 V~, 50 Hz 8 m nylon rope Power consumption ..... -
Page 19: Performance Data
Performance data Symbols in the manual Warning symbols (the danger The measurement of the maximum per- can be explained at the place formance data takes place under optimal of the exclamation mark) conditions, such as a straight, direct exit. with information on damage The angle piece and backflow stop may and injury prevention. - Page 20 Working with the equipment: • Monitor the equipment during opera- tion (particularly in residential spaces, Caution: to avoid accidents and in order to detect automatic switching injuries: off or dry running of the pumps in time. Regularly check the function of the float •...
-
Page 21: Start-Up
is in operation. • Disconnect the mains plug from the • Before operating your new pump, have socket before all work on the equip- a specialist check: ment, in case of leaks in the water sys- The earthing, the protective multiple tem, during work breaks, and when not earthing;... -
Page 22: To Erect/Suspend
tion systems, cut off the three top pump. connections directly above the We recommend placing the pump G 1 ½ “ tube thread. on a brick or a grid. If the water level is too low, the silt in The measurement of the maximum the shaft can quickly dry out and im- performance data takes place pede the pump when warming up. -
Page 23: Switching On And Off
Switching on and off again. In this case, you can see whether the pump switches on 1. Insert the plug in the socket. The pump and off. starts working immediately. - Ensure that the distance between the float switch and the float switch 2. -
Page 24: To Replace The Backflow Stop
• Clean precipitation from the float Any measures above and beyond these, par- switch ( 6) with clear water. ticularly opening the equipment, are to be • Regularly remove sludge from the pit carried out by an electrician. In the case of base (at the latest every 3 months) and repairs, always contact our service centre. -
Page 25: Replacement Parts/Accessories
Replacement parts/Accessories Spare parts and accessories can be obtained at www.grizzly-service.eu If you do not have internet access, please contact the Service Centre via telephone (see “Service-Center” page 28). Please have the order number mentioned below ready. Item Item Description Order Instruction Exploded... -
Page 26: Faults - Causes - Remedies
Faults - Causes - Remedies Faults Causes Remedies - Mains voltage is not applied - Check mains voltage Pump does not start - Float switch ( 6) does not - Bring float switch into higher switch position - Base ( 4) inlet grating - Use a water jet to clean the blocked... -
Page 27: Guarantee
Guarantee guidelines and conscientiously checked prior to delivery. Dear Customer, This equipment is provided with a 3-year The guarantee applies for all material and manufacturing defects. This guarantee guarantee from the date of purchase. In case of defects, you have statutory rights does not extend to cover product parts that against the seller of the product. -
Page 28: Repair Service
rigation systems) or as constant water-flow send the equipment inc. all accessories supplied at the time of purchase and pumps (such as in artificial streams or or- namental fountains). Inappropriate use will ensure adequate, safe transport pack- invalidate the warranty. aging. -
Page 29: Einleitung
Inhalt Einleitung Einleitung ........29 Herzlichen Glückwunsch zum Kauf Ihres Bestimmungsgemäße neuen Gerätes. Sie haben sich damit für ein Verwendung ......29 hochwertiges Gerät entschieden. Allgemeine Beschreibung ... 30 Dieses Gerät wurde während der Produktion Lieferumfang ........30 auf Qualität geprüft und einer Endkontrolle Übersicht ........ -
Page 30: Allgemeine Beschreibung
Stopp, der das Zurückfließen des Wassers das Verpackungsmaterial ordnungsgemäß. z.B. bei einem Stromausfall verhindert. Technische Daten Klarwasser-Tauchpumpe (Pumpe) Winkeladapter + Adapter mit Schlauch- Klarwasser-Tauchpumpe ..FTP 400 C2 anschluss 8 m Nylonseil Nenneingangsspannung ... 230 V~, 50 Hz Originalbetriebsanleitung Leistungsaufnahme .......400 W Maximale Fördermenge (Qmax) ..10000 l/h... -
Page 31: Leistungsdaten
Leistungsdaten Bildzeichen auf dem Gerät Die Messung der maximalen Leistungsda- Achtung! Nicht für reines Sandwas- ten erfolgt bei optimalen Bedingungen wie ser benutzen! gerader, direkter Ausgang. Lesen und beachten Sie die zum Ge- rät gehörende Betriebsanleitung! Achtung! Ziehen Sie bei Beschä- digung oder Durchschneiden der Netzanschlussleitung sofort den Stecker aus der Steckdose. - Page 32 Arbeiten mit dem Gerät: schalten oder Trockenlaufen der Pumpe rechtzeitig zu erkennen. Prüfen Sie Vorsicht: So vermeiden Sie Unfälle regelmäßig die Funktion des Schwimm- und Verletzungen: schalters (siehe Kapitel „Inbetriebnah- me“). Bei Nichtbeachtung erlöschen • Personen, die mit der Betriebsanleitung Garantie- und Haftungsansprüche.
-
Page 33: Inbetriebnahme
Schlag. dose zu ziehen. Schützen Sie die • Bei Betrieb des Gerätes muss nach Netzanschlussleitung vor Hitze, Öl und dem Aufstellen der Netzstecker frei scharfen Kanten. zugänglich sein. • Tragen oder befestigen Sie das Gerät • Bevor Sie Ihre neue Pumpe in Betrieb nicht an der Netzanschlussleitung. -
Page 34: Druckleitung Anschließen
Druckleitung anschließen Aufstellen/Aufhängen Die Installation der Klarwasser-Tauchpumpe Die Pumpe kann im Wasser aufge- erfolgt stellt oder aufgehängt werden. entweder mit fester Rohrleitung Zum Aufhängen und/oder Heraus- oder mit flexibler Schlauchleitung. ziehen der Pumpe können Sie das im Lieferumfang enthaltene Nylon- •... -
Page 35: Bedienung
Betrieb • Prüfen Sie, ob die Pumpe standsi- cher aufgestellt oder sicher aufge- hängt ist. Beaufsichtigen Sie das Gerät • Prüfen Sie, ob die Druckleitung während des Betriebs, um automa- ordnungsgemäß angebracht wur- tisches Abschalten oder Trockenlau- fen der Pumpe rechtzeitig zu erken- •... -
Page 36: Wartung Und Reinigung
schalter und der Schwimmschalter- Prüfen Sie die Funktion des Schwimm- Rasterung ( 8) nicht zu gering schalters ( 6) regelmäßig (spätestens ist. Bei zu geringem Abstand wird alle drei Monate). die einwandfreie Funktion nicht • Entfernen Sie Fusseln und faserige Par- gewährleistet. -
Page 37: Lagerung
Entsorgung/ fußes (4) und ziehen Sie den Pumpenfuß ab. Umweltschutz 2. Reinigen Sie das Schaufelrad mit klarem Wasser. Führen Sie Gerät, Zubehör und Verpa- Achtung! Die Pumpe nicht auf ckung einer umweltgerechten Wiederver- dem Schaufelrad abstellen oder wertung zu. abstützen! 3. -
Page 38: Ersatzteile/Zubehör
Ersatzteile/Zubehör Ersatzteile und Zubehör erhalten Sie unter www.grizzly-shop.de oder www.grizzly-service.eu Sollten Sie kein Internet haben, so wenden Sie sich bitte telefonisch an das Service- Center (siehe „Service-Center“ Seite 42). Halten Sie die unten genannten Bestellnummern bereit. Position Position Bezeichnung Bestell-Nr. Betriebs- Explosions- anleitung... -
Page 39: Fehlersuche
Fehlersuche Problem Mögliche Ursache Fehlerbehebung Steckdose, Netzanschlussleitung, Netzspannung fehlt Leitung, Stecker prüfen, ggf. Repara- Pumpe läuft tur durch Elektrofachmann nicht an Schwimmschalter ( 6) schaltet Schwimmschalter in höhere Stellung nicht bringen Einlaufgitter des Pumpenfußes ( Einlaufgitter des Pumpenfußes mit 4) verstopft Wasserstrahl reinigen Pumpenleistung verringert durch Pumpe reinigen und ggf. -
Page 40: Garantie
Garantie Garantieumfang Das Gerät wurde nach strengen Qualitäts- Sehr geehrte Kundin, sehr geehrter Kunde, richtlinien sorgfältig produziert und vor Sie erhalten auf dieses Gerät 3 Jahre Ga- Anlieferung gewissenhaft geprüft. rantie ab Kaufdatum. Im Falle von Mängeln dieses Produkts Die Garantieleistung gilt für Material- oder stehen Ihnen gegen den Verkäufer des Fabrikationsfehler. -
Page 41: Reparatur-Service
pen (z.B. zur Gartenbewässerung) oder als die Adresse, die Ihnen mitgeteilt wird. Stellen Sie sicher, dass der Versand Dauerlaufpumpen (z.B. für Bachläufe oder Teichfontänen). Bei Zweckentfremdung er- nicht unfrei, per Sperrgut, Express oder lischt der Garantieanspruch. sonstiger Sonderfracht erfolgt. Senden Sie das Gerät bitte inkl. -
Page 42: Service-Center
Service-Center Service Deutschland Tel.: 0800 54 35 111 E-Mail: grizzly@lidl.de IAN 96809 Service Österreich Tel.: 0820 201 222 (0,15 EUR/Min.) E-Mail: grizzly@lidl.at IAN 96809 Service Schweiz Tel.: 0842 665566 (0,08 CHF/Min., Mobilfunk max. 0,40 CHF/Min.) E-Mail: grizzly@lidl.ch IAN 96809 Importeur Bitte beachten Sie, dass die folgende Anschrift keine Serviceanschrift ist. -
Page 43: Ração De Conformidade Ce
Declaração de conformidade CE Vimos, por este meio, declarar que o Bomba submersível para água limpa da série FTP 400 C2 Número de série 201405000001 - 201405062848 corresponde às respectivas normas da UE na sua versão em vigor: 2004/108/EC • 2006/95/EC • 2011/65/EU* Para garantir a conformidade, foram aplicadas as seguintes normas harmonizadas bem como normas e disposições nacionais:... -
Page 44: Translation Of The Original Ec Declaration Of Conformity
Original CE Konfor- original EC declara- mitätserklärung tion of conformity Hiermit bestätigen wir, dass die We hereby confirm that the Klarwasser-Tauchpumpe FTP 400 C2 series Baureihe FTP 400 C2 submersible water pump serial number Seriennummer 201405000001 - 201405062848 201405000001 - 201405062848 conforms with the following applicable folgenden einschlägigen EU-Richtlinien in... -
Page 45: Vista En Corte
Vista en corte • Exploded Drawing Explosionszeichnung FTP 400 C2 informativo, informative, informativ 20140403_rev02_gs... - Page 46 GRIZZLY GARTENGERÄTE GMBH & CO. KG Am Gewerbepark 2 D-64823 Groß-Umstadt Estado das informações · Last Information Update · Stand der Informationen: 03 / 2014 Ident.-No.: 79300152032014-PT IAN 96809...
Need help?
Do you have a question about the FTP 400 C2 and is the answer not in the manual?
Questions and answers