Table of Contents
Advertisement
Advertisement
Table of Contents

Related Manuals for AEG 30006VL-WN


Summary of Contents for AEG 30006VL-WN
- Page 1 30006VL-WN User Manual Cooker USER MANUAL...
-
Page 2: Table Of Contents
13. ENERGY EFFICIENCY..................... 28 FOR PERFECT RESULTS Thank you for choosing this AEG product. We have created it to give you impeccable performance for many years, with innovative technologies that help make life simpler features you might not find on ordinary appliances. Please spend a few minutes reading to get the very best from it. - Page 3 ENGLISH manufacturer is not responsible for any injuries or damages that are the result of incorrect installation or usage. Always keep the instructions in a safe and accessible location for future reference. 1.1 Children and vulnerable people safety WARNING! Risk of suffocation, injury or permanent disability.
- Page 4 Do not operate the appliance by means of an external • timer or separate remote-control system. WARNING: Unattended cooking on a hob with fat or • oil can be dangerous and may result in fire. NEVER try to extinguish a fire with water, but switch •...
-
Page 5: Safety Instructions
ENGLISH Be careful when you touch the storage drawer. It can • get hot. To remove the shelf supports first pull the front of the • shelf support and then the rear end away from the side walls. Install the shelf supports in the opposite sequence. - Page 6 • Connect the mains plug to the mains • The vapours that very hot oil releases socket only at the end of the can cause spontaneous combustion. installation. Make sure that there is • Used oil, that can contain food...
-
Page 7: Care And Cleaning
ENGLISH other purposes, for example room • If you use an oven spray, obey the heating. safety instructions on the packaging. • Do not clean the catalytic enamel (if 2.4 Care and Cleaning applicable) with any kind of detergent. WARNING! 2.5 Internal light Risk of injury, fire, or damage to the appliance. -
Page 8: Product Description
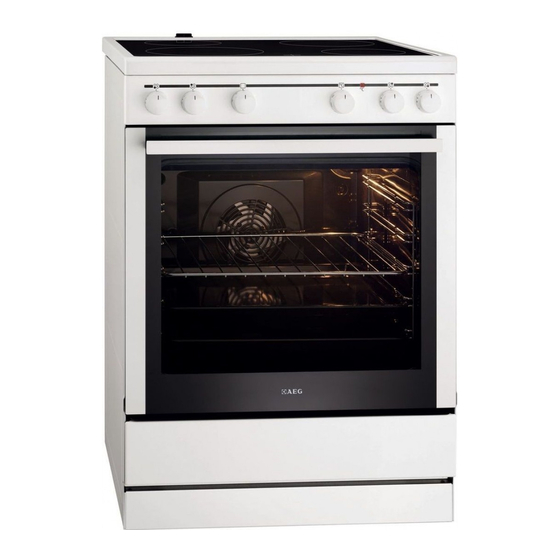
3. PRODUCT DESCRIPTION 3.1 General overview Knob for the oven functions Knob for the temperature Temperature indicator / symbol Knobs for the hob Heating element Lamp Shelf support, removable Shelf positions 3.2 Cooking surface layout Cooking zone 1200 W... -
Page 9: Hob - Daily Use
ENGLISH Clean the appliance and the accessories 2. Let the appliance operate for 1 hour. before first use. 3. Set the function and set the Put the accessories and the removable maximum temperature. shelf supports back to their initial 4. Let the appliance operate for 15 position. -
Page 10: Hob - Care And Cleaning
Heat setting Use to: Time Hints (min) Keep cooked food warm. as nec- Put a lid on the cookware. essary 1 - 2 Hollandaise sauce, melt: but- 5 - 25 Mix from time to time. ter, chocolate, gelatine. 1 - 2... -
Page 11: Oven - Daily Use
ENGLISH with vinegar and clean the glass surface with a moist cloth. 8. OVEN - DAILY USE WARNING! Refer to Safety chapters. 8.1 Oven functions Symbol Oven function Application Off position The appliance is off. Oven Lamp To activate the lamp without a cooking function. Circulated cooking To roast or roast and bake food with the same cooking temperature on more than one shelf posi-... -
Page 12: Oven - Hints And Tips
8.2 Activating and deactivating the oven It depends on the model if your appliance has knob symbols, indicators or lamps: • The indicator comes on when the oven heats up. • The lamp comes on when the oven operates. -
Page 13: Tips On Baking
ENGLISH 9.1 Baking • You can extend baking times by 10 – 15 minutes if you bake cakes on more • Your oven may bake or roast than one shelf position. differently to the appliance you had • Cakes and pastries at different before. - Page 14 Food Temperature (°C) Time (min) Biscuits 180 - 190 10 - 20 Pastry: Choux 180 - 190 30 - 40 Pastry: Shortcrust 180 - 190 25 - 35 Meringues 80 - 100 120 - 150 1) Preheat the oven.
- Page 15 ENGLISH Food Temperature Time (min) Shelf position (°C) Pastries made with egg white, merin- 80 - 100 120 - 150 gues Macaroons 100 - 120 30 - 50 Biscuits made with yeast dough 150 - 160 20 - 40 Puff pastries 20 - 30 170 - 180 Rolls...
- Page 16 Food Temperature Time (min) Shelf position (°C) 2 positions Biscuits made with yeast dough 160 - 170 30 - 60 2 / 4 Puff pastries 170 - 180 30 - 50 2 / 4 1) Preheat the oven. 9.5 Conventional Baking on one level...
- Page 17 ENGLISH Food Temperature (°C) Time (min) Shelf posi- tion Fruit flans (made with yeast dough / 35 - 55 sponge mixture) Fruit flans made with short pastry 170 - 190 40 - 60 Yeast cakes with delicate toppings 40 - 80 160 - 180 (e.g.
- Page 18 Food Temperature (°C) Time (min) Shelf posi- tion Vegetables au gratin 15 - 30 180 - 200 Baguettes topped with melted 15 - 30 200 - 220 cheese Sweet bakes 180 - 200 40 - 60 Fish bakes 180 - 200...
- Page 19 ENGLISH Food Quantity Temperature Time (min) Shelf po- (°C) sition Chop, spare rib 1 - 1.5 kg 180 - 190 60 - 90 Meat loaf 750 g - 1 kg 170 - 190 50 - 60 Pork knuckle (pre- 750 g - 1 kg 200 - 220 90 - 120 cooked)
- Page 20 Food Quantity Temperature Time (min) Shelf posi- (°C) tion Turkey 4 - 6 kg 180 - 200 180 - 240 Fish Food Quantity Tempera- Time (min) Shelf posi- ture (°C) tion Whole fish 1 - 1.5 kg 210 - 220 40 - 70 9.8 Roasting with Turbo Grilling...
- Page 21 ENGLISH Food Quantity Temperature Time (min) Shelf posi- (°C) tion Saddle of lamb 1 - 1.5 kg 160 - 180 40 - 60 Poultry Food Quantity Temperature Time (min) Shelf posi- (°C) tion Poultry portions 200 - 250 g each 200 - 220 30 - 50 Half chicken...
- Page 22 9.11 Preserving - Bottom heat • The jars cannot touch each other. • Put approximately 1/2 litre of water into the baking tray to give sufficient moisture in the oven. • Use only preserve jars of the same • When the liquid in the jars starts to dimensions available on the market.
-
Page 23: Oven - Care And Cleaning
ENGLISH Food Quantity Defrosting Further de- Comments time (min) frosting time (min) Chicken 1 kg 100 - 140 20 - 30 Put the chicken on an up- turned saucer in a big plate. Turn halfway through. Meat 1 kg 100 - 140 20 - 30 Turn halfway through. -
Page 24: Removing The Oven Door
3. Close the door until the slider locks. 4. Remove the door. To remove the door, pull the door outwards first from one side, and then the other. When the cleaning procedure is completed, insert the oven door in the opposite sequence. -
Page 25: Troubleshooting
ENGLISH 10.6 Replacing the lamp The drawer below the oven can be removed for cleaning. Put a cloth on the bottom of the interior 1. Pull the drawer out until it stops. of the appliance. It prevents damage to the lamp glass cover and the cavity. WARNING! Danger of electrocution! Disconnect the fuse before... -
Page 26: Installation
Problem Possible cause Remedy You cannot activate the ap- The fuse is blown. Make sure that the fuse is pliance. the cause of the malfunction. If the fuse is blown again and again, contact a quali- fied electrician. Residual heat indicator does... - Page 27 ENGLISH Minimum distances Dimension 12.3 Levelling of the appliance CAUTION! Make sure you install the anti-tilt protection at the correct height. Make sure that the surface behind the appliance is smooth. 1. Set the correct height and area for Use small feet on the bottom of the appliance before you attach the appliance to set the appliance top anti-tilt protection.
-
Page 28: Energy Efficiency
This appliance is supplied without a main plug or a main cable. 13. ENERGY EFFICIENCY 13.1 Product information for hob according to EU 66/2014 Model identification 30006VL-WN Type of hob Hob inside Freestanding Cooker Number of cooking zones Heating technology... - Page 29 13.3 Product Fiche and information for ovens according to EU 65-66/2014 Supplier's name Model identification 30006VL-WN Energy Efficiency Index 100.0 Energy efficiency class Energy consumption with a standard load, conven- 0.95 kWh/cycle tional mode Energy consumption with a standard load, fan-forced 0.85 kWh/cycle...
- Page 30 Keep food warm Choose the lowest possible temperature setting to use residual heat and keep a meal warm. 14. ENVIRONMENTAL CONCERNS appliances marked with the symbol Recycle materials with the symbol with the household waste. Return the Put the packaging in relevant containers product to your local recycling facility or to recycle it.
- Page 31 ENGLISH...
- Page 32 www.aeg.com/shop...
Need help?
Do you have a question about the 30006VL-WN and is the answer not in the manual?
Questions and answers