Table of Contents
Advertisement
Quick Links
Advertisement
Chapters
Table of Contents
Troubleshooting

Related Manuals for Xerox MF Series


Summary of Contents for Xerox MF Series
- Page 1 XEROX TECHNICAL DOCUMENT 252 787 467 - A...
- Page 2 - 2 - 252 787 467 - A CONTENTS TECHNICAL DESCRIPTION 252 787 467 - A INSTALLATION GUIDE 252 787 467 - A MAINTENANCE GUIDE 252 787 467 - A ILLUSTRATED PARTS LIST 252 787 467 - A PERSONNALISATION 252 787 467 - A PRINTER TECHNICAL DOCUMENT 251 475 943 - A TECHNICAL BULLETIN...
-
Page 3: Table Of Contents
- 1 - TD 252 787 467 - A TECHNICAL DESCRIPTION GENERAL NTRODUCTION ENERAL DESCRIPTION CHARACTERISTICS HYSICAL CHARACTERISTICS ENERAL TECHNICAL CHARACTERISTICS ENERAL CHARACTERISTICS OF CONSUMABLES FUNCTIONING ONTROL PANEL BOARD BOARD SUPPLY CRYSTALS RESET EQUIVALENT SYMBOLS SET... -
Page 4: General
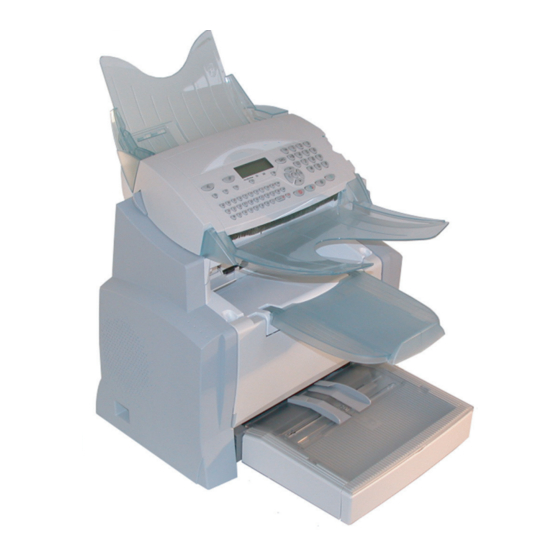
- 2 - TD 252 787 467 - A GENERAL NTRODUCTION Scanner Document feed tray for scanning Control panel Adjustable paper guide Original document Scanner release output stacker button Printer output stacker Printer On/Off switch Printer paper Second cassette feed tray paper tray (500 pages) Second paper... -
Page 5: General Description
TD 252 787 467 - A - 3 - ENERAL DESCRIPTION The MF series of faxes is part of a range of multifunction SMS (Short Message Service) office equip- ment. Control panel Scanner module CPU board Laser printer The product consists of a color scanner with a resolution of 600 dpi and a black-and-white laser printer with a resolution of 600 dpi. -
Page 6: Characteristics
- 4 - TD 252 787 467 - A CHARACTERISTICS HYSICAL CHARACTERISTICS Environment • Operating: • Storage: - The machine should not be exposed to fax: direct sunlight. - Temperature: 0 °C to 40 °C. - Supply: 230 V/50 Hz. - Temperature changes: ≤... - Page 7 TD 252 787 467 - A - 5 - Scanner Type Color CIS Resolution in dpi Grey scale 256 levels Paper size in mm. A4 (210 x 297) • Maximum width in mm. • Minimum width in mm. Guided: 209 mm / Not guided: 180 mm •...
- Page 8 - 6 - TD 252 787 467 - A Fax-Modem Type PSTN-G3 Maximum speed in bps (V34Fax) 33 600 V34Fax capacity in bps 33 600 à 2 400 • Incrementation in bps 2 400 V17 capacity in bps 14 400, 12 000, 9 600, 7 200 V29 capacity in bps 9 600, 7 200 V27ter capacity in bps...
-
Page 9: General Characteristics Of Consumables
TD 252 787 467 - A - 7 - E-mail and fax communication Compatibility ITU T37 Mail protocol : sending SMTP Mail protocol : polling POP3 Mail format MIME • Charset US-ASCII • Encoding 7 bits, base 64, quoted-printable SMS communication Transmission and reception Mailing 10 directly... -
Page 10: Functioning
- 8 - TD 252 787 467 - A FUNCTIONING The equipment is a Group 3 multifunction fax functioning in accordance with the UIT-T T30 recommendation. It consists of a laser printer, a CIS (Contact Image Sensor) color sheet feeder scanner, a control panel with a 64-key alphanumerical keyboard and an LCD screen with 2 lines of 16 characters. - Page 11 TD 252 787 467 - A - 9 - Diagram of the connector and sensor locations (loudspeaker) Carte à puce (smart card reader) Liaison UC (CPU interconnect) Sensors: • PSF (“présence feuille”): sheet present, detects the insertion of a sheet to be scanned (location reference Z2202).
-
Page 12: Cpu Board
- 10 - TD 252 787 467 - A Signal Input/Output VEILLE* Not used REVEIL* Not used STSC* Start of scan sensor PSF* Sheet present sensor OUVCAP* Cover open sensor P3V3 3.3 V supply VALIM 5 V supply ALIMCOUPE 5 V supply Differential LF signal to loudspeaker Differential LF signal to... - Page 13 TD 252 787 467 - A - 11 - Block diagram of the electronics architecture Driver Pupitre/ OASIS 2 moteur/ Moteur/ Front Panel Motor Motor ADF driver Vidéo Imprimante/ Printer video Imprimante/ UART Printer ECP (not used) USB slave USB slave 16 bits SDRAM SDRAM...
- Page 14 - 12 - TD 252 787 467 - A Diagram of the Connector Locations: Control panel Printer FlatBed Motor List of Connectors: Connector Location ref. Number of pins Male/female Type Printer P4201 Male straight P4370 Female Elbow, top contact Control panel P4100 Female Elbow, top...
- Page 15 TD 252 787 467 - A - 13 - Signal Input/Output SCLKIMP Serial link clock printer sync VIDEO Printer video 17-20-21 Ground 22-25 not connected linked to 10 5 V supply 5 V supply • Control panel : connections to the control panel board Signal Input/Output IOPUCE...
- Page 16 - 14 - TD 252 787 467 - A • ECP: Parallel Interface to PC Signal Input/Output HOSTCLK Data clock (forward) DATAECP0 Data bus LSB DATAECP1 Data bus bit 1 DATAECP2 Data bus bit 2 DATAECP3 Data bus bit 2 DATAECP4 Data bus bit 4 DATAECP5...
- Page 17 TD 252 787 467 - A - 15 - • STN: Switched Telephone Network Interface Signal Input/Output Not connected Loopback L1 Telephone line pair Telephone line pair Loopback L2 Not connected...
-
Page 18: Supply
- 16 - TD 252 787 467 - A SUPPLY The 24 V and 5 V supply voltages are supplied by the printer. Motor driver 24 V + 24 V Resistors R4048 // R4049 P12V 12 V regulator Z4051 current generator Resistors R4044 and R4045 5 V regulator... -
Page 19: Crystals
TD 252 787 467 - A - 17 - CRYSTALS DIGICOLOR2 12 MHz Y50 71.0524 MHz Y350 Printer Time stamp 32.768 kHz Y500 Modem 29.4912 MHz Y550 25 MHz Y8800 RESET Low voltage detect modem reset (I/O) Modem MAX809 - T : 3.08 V 3.3 V Z210 / max 809 reset... -
Page 20: Equivalent Symbols Set
- 18 - TD 252 787 467 - A EQUIVALENT SYMBOLS SET Adding the functionality to choose a " default symbols set " for PCL5 printing. " Technical Parameters Menu " : adding of the "2995 SYMBOL SET" Menu that allow to set up a "default symbols set", according to the following equivalence-table (default value is "CS1", equivalent to "ROMAN8"... - Page 21 - 1 - IG 252 787 467 - A INSTALLATION GUIDE CONTENTS INSTALLATION REQUIREMENTS PACE REQUIREMENTS LECTRICAL REQUIREMENTS Mains Telephone line NVIRONMENTAL CONDITIONS UNPACKING CONNECTIONS ONNECTING THE TELEPHONE LINE AND ONNECTING THE MAINS SUPPLY AND SWITCHING ON PC ( ONNECTING THE OPTION PAPER SUPPLY NSTALLING THE PRINTER PAPER TRAY...
- Page 22 IG 252 787 467 - A - 2 - Soft-switch 2: Scanner / Printer Configuration Soft-switch 3: Line Configuration Soft-switch 4: Fax Protocol Configuration Soft-switch 5: Voice/Loudspeaker Configuration Soft-switch 6: Line Adjustment Soft-switch 7: Reserved Soft-switch 8: Remote Readout/Internal Answering Machine / Modem Soft-switch 9: Approval + Communication Applications Soft-switch 10: Communications: Locks/Miscellaneous Soft-switch 11: Retransmissions/Logs...
-
Page 23: Installation Requirements
- 3 - IG 252 787 467 - A INSTALLATION REQUIREMENTS PACE REQUIREMENTS The figure above shows the overall dimensions of the machine, optional accessories not included. -
Page 24: Electrical Requirements
IG 252 787 467 - A - 4 - LECTRICAL REQUIREMENTS 1.2.1 AINS Single-phase AC supply with earth, in conformance with the information on the label on the back of your fax. Note(s) : - The machine cannot be connected to an IT type power supply. - The mains input of the machine conforms to the overvoltage safety level. -
Page 25: Connections
- 5 - IG 252 787 467 - A CONNECTIONS Centronics ONNECTING THE TELEPHONE LINE AND • Plug one end of the telephone lead (1) into socket (A) of the fax and the other end into the tele- phone wall socket (the types of connector may vary depending on the country). •... -
Page 26: Paper Supply
IG 252 787 467 - A - 6 - PAPER SUPPLY NSTALLING THE PRINTER PAPER TRAY Using the left and right notches of the printer as a guide, carefully push in the tray until it stops (as shown in the illustration). Put the tray cover in place. -
Page 27: Installing The Trays
- 7 - IG 252 787 467 - A INSTALLING THE TRAYS OCUMENT LOADING TRAY Install the tray by clipping the two lugs in the corresponding openings at the back of the terminal. OCUMENT OUTPUT TRAY Install the tray by clipping the two lugs in the corresponding openings at the front near the top of the ter- minal. -
Page 28: Printer Output Tray
IG 252 787 467 - A - 8 - RINTER OUTPUT TRAY With both hands, slightly bend the centre part of the stacker upwards in order to insert its clips into the notches located on the upper part of the printer. Release the stacker so that it recovers its initial shape. INSTALLING THE CONSUMABLES Refer to the User Guide. - Page 29 - 9 - IG 252 787 467 - A When the display shows the date and the time, you can access the configuration bytes by means of the key sequence: MENU * # The description of these parameters can be found below. They are modified in the same manner as all other parameters.
-
Page 30: List Of Configurations (Sw)
IG 252 787 467 - A - 10 - (SW) IST OF CONFIGURATIONS 7.3.1 1: R SWITCH INGING AND UTOMATIC RINTING Value Naming Reserved Reserved SOS-DURPAUSE: Long/short pause while dialing Values: # 0 (Short 2sec.) or 1 (Long 6sec.) Reserved Reserved SOS-IMPAUTO: Automatic log print Values: 0 (No) or 1 (Yes) -
Page 31: Soft-Switch 5: Voice/Loudspeaker Configuration
- 11 - IG 252 787 467 - A Value Naming SOS-DISINF: Unlimited DIS length Values: 0 (No)# 1 (Yes) SOS-LGINF: Maximum length of scan, printing, communication Values: # 0 (1 meters)1 (3 meters) SOS-ECM: Restricted ECM Values: 0 (No)# 1 (Yes) 7.3.5 5: V SWITCH... -
Page 32: Soft-Switch 9: Approval + Communication Applications
IG 252 787 467 - A - 12 - 7.3.9 9: A SWITCH PPROVAL OMMUNICATION PPLICATIONS Value Naming Reserved Reserved Reserved SOS-REPERR: Redialing from page fault Values: 0 (No) # 1 (Yes) SOS-NOTREMIS: Printing of first page on trasmission rapport Values: 0 (No) # 1 (Yes) SOS-GRILLAGE: Burn phone numbers Values: # 0 (No) 1 (Yes) -
Page 33: Soft-Switch 13: Internet
- 13 - IG 252 787 467 - A 7.3.13 S 13: I SWITCH NTERNET Value Naming SOS-BRIDEMAIL: Restricted text e-mail reception Values: # 0 (No)1 (Yes) SOS-ACKNORECNET: Send "message not received" reply on reception of corrupted mes- sages Values: 0 (No) # 1 (Yes) SOS-EFFMSGNOK: Delete corrupted messages Values: 0 (No) # 1 (Yes) SOS-PROMONET: Auto directory enrichment (Internet promotion) -
Page 34: Soft-Switch 16: Internet
IG 252 787 467 - A - 14 - 7.3.16 S 16: I SWITCH NTERNET Value Naming SOS-ACKNORECNET2: Send a "message not understood" reply on reception of TIFF att- chment Values: # 0 (Send message) 1 (Do not send message) SOS-MAILSWIMP: Printout when rerouting mailswitch Values: # 0 (Printout) 1 (No printout) Reserved... -
Page 35: Soft-Switch 19: Miscellaneous Software Functions
- 15 - IG 252 787 467 - A 7.3.19 S 19: M SWITCH ISCELLANEOUS OFTWARE UNCTIONS Value Naming Reserved Reserved SOS-GROUPE: Restriction on groups (or distribution list) Values: # 0 (No groups)1 (Groups accepted) SOS-REGULREC: T30 reception control inhibited Values: # 0 (No) 1 (Yes) Reserved SOS-MENUCLAVIER: Hide keyboard menus and force QWERTY keyboard... -
Page 36: Soft-Switch 23: Miscellaneous
IG 252 787 467 - A - 16 - 7.3.23 S 23: M SWITCH ISCELLANEOUS Value Naming SOS-JBIG: SUPER G3 capability to execute communication with JBIG encoding Values: 0 (No SUPER G3) 1 (negociated SUPER G3) SOS-BRID-LAN: Restriction on LAN function Values: # 0 (No)1 (Yes) SOS-FSI-NOCOVER: Inhibition of generation of cover pages Values: # 0 (FSI V6 cover page) 1 (FSI V7 cover page) -
Page 37: Soft-Switch 26: Miscellaneous
- 17 - IG 252 787 467 - A Value Naming SOS-TXADTERMINAL: Transmit the terminal address in the server number # 0: No 1: Yes SOS-RXADTERMINAL: Receive the terminal address in the server number # 0: No 1: Yes SOS-EXPBITPDF: Export the attached file format field (Image/PDF) when exporting the directory via e-mail. -
Page 38: Soft-Switch 28: Miscellaneous
IG 252 787 467 - A - 18 - 7.3.28 S 28: M SWITCH ISCELLANEOUS Value Naming Activation of fax modification for DTS label #0: Missing 1: Present Carrier drop in ECP mode for DTS label #0: Missing 1: Présent Disable the 1 second timer before the hanging up #0: Enabled 1: Disabled... -
Page 39: Software Download
- 19 - IG 252 787 467 - A OFTWARE OWNLOAD Three methods can be used to update the machine software: • by means of a link to a PC, • by means of an STN (switched telephone network) connection, •... -
Page 40: Downloading Via Local Network
IG 252 787 467 - A - 20 - - Click on <Emettre> (send): the transmission is effected when it reaches the top of the transmission queue. • The Quadrige calls the fax. If the connection is made, the fax displays Téléchargement en cours (download in progress) and the comm. -
Page 41: Remote Readout
- 21 - IG 252 787 467 - A - Check that the download was successfull by typing the following sequence on the terminal keyboard: , *, V. The terminal display shows the software version and the checksum. REMOTE READOUT Attention - Before and after each intervention on a machine equipped with the Remote Readout option, perform a manual transmission of the Remote Readout parameters to the Server center, if the state of the machine allows it. -
Page 42: Inital Consumables
IG 252 787 467 - A - 22 - The remote readout using the threshold criterion can be triggered only once per consumable. Once the remote readout has been transmitted, the criterion will no longer be tested until the consumable has been replaced. - Page 43 - 23 - IG 252 787 467 - A Field Type Char. / Num. Manual entry 0x43 long T_CPT_PAGES_JOURS 0x45 char* T_DATE_SEUIL_JOURS 0x46 long T_INIT_NOIR 0x47 long T_CPT_NOIR T_SEUIL_NOIR 0x48 long 0x49 char* T_DATE_SEUIL_NOIR 0x4a char* T_DATE_CHG_NOIR 0x5a long T_INIT_OPC 0x5b long T_CPT_OPC...
-
Page 44: Remote Readout Report
IG 252 787 467 - A - 24 - 8.4.2 EMOTE EADOUT EPORT For each transmission a remote readout report is printed. It contains all the data that have been transmit- ted to the server in transparent mode. In the case of a transmission in fax mode, the fax that is received is identical to this report. -
Page 45: Description Of The Parameters
- 25 - IG 252 787 467 - A 8.4.3 ESCRIPTION OF THE ARAMETERS The different fields shown in the report are described below. General Information • No 23 millions (TNO_23MIL): the 23M of the module managed by the server, entered by the installer;... -
Page 46: Reminders
IG 252 787 467 - A - 26 - • Précédente télérelève le… (T_DATE_SEUIL_NOIR): date of the last remote readout triggered by the toner threshold criterion, or installation date if there has not been any previous remote readout; • (XXXX pages) (T_CPT_NOIR): theoretical number of pages remaining to be printed at the ins- tant of the triggering of the previous remote readout by the toner threshold criterion (or 0 if there has not been any previous remote readout);... -
Page 47: Saving Data On Eeprom Card
- 27 - IG 252 787 467 - A If this transmission is not possible for any reason, print out the Remote Readout parameters or display the copy counter and note these values on the intervention report. SAVING DATA ON EEPROM CARD The control panel is equipped with a reader that can read and write on EEPROM cards in I2C format (“directory card”). -
Page 48: 10. Packing And Transport Of The Machine
IG 252 787 467 - A - 28 - - Time period of connection to the Internet - Fixed times for Internet access - Prohibited time period for periodic connection - Internet connection/transmission modes - Internet rerouting mode - LAN configuration mode (manual/automatic) - Internet provider connection/mail service/servers/authentification parameters des providers internet - LAN mail service/server/authentification parameters. - Page 49 - 1 - MG 252 787 467 - A MAINTENANCE GUIDE CONTENTS SCANNER AND COMMUNICATION REVENTIVE MAINTENANCE Paper transport rollers Paper separator module CIS window Control panel keys and covers CANNING AND COMMUNICATION ERROR CODES General codes Internet codes HECKS ADJUSTMENTS Supply voltages: connections between power supply board and CPU board Adjustment of scanner chassis...
- Page 50 MG 252 787 467 - A - 2 - ERIODIC MAINTENANCE RROR MESSAGES AND CORRECTIVE MEASURES EPAIR ISASSEMBLY ASSEMBLY WORKSHEETS EPLACING THE PRINTER...
-
Page 51: Scanner And Communication
- 3 - MG 252 787 467 - A SCANNER AND COMMUNICATION REVENTIVE MAINTENANCE To maintain the fax in good working order, it is recommended to periodically perform the following operations: • Cleaning the paper transport rollers (document loader, feed rollers, idler rollers). •... -
Page 52: Cis Window
MG 252 787 467 - A - 4 - • Open the control panel/scanner by actuating the opening lever located on the left of the fax. Attention - The opening is limited to approx. 60° by stops: do not try to force the panel any further. Wipe the elements of the paper separator module with a lint-free cloth soaked with isopropyl alcohol. - Page 53 - 5 - MG 252 787 467 - A Code 03 - Stopped by operator Communication stopped by the operator by pressing the key. Code 04 - Programmed number invalid Invalid single-key or quick-dial number: check the number (for example, a delayed transmission has been programmed with a single key and the number corresponding to this key has been deleted).
-
Page 54: Internet Codes
MG 252 787 467 - A - 6 - Code 17 - Mailbox number x unknown You want to recover a document from a mailbox of a correspondent but the mailbox with this number does not exist with this correspondent. Code 18 - Retransmission impossible You have requested the retransmission of a document by a fax that does not have a retransmit function. -
Page 55: Checks - Adjustments
- 7 - MG 252 787 467 - A HECKS ADJUSTMENTS 1.3.1 UPPLY VOLTAGES CONNECTIONS BETWEEN POWER SUPPLY BOARD AND BOARD CPU board pin Value Function + 5 V 5 V supply Ground + 5 V 5 V supply + 24 V 24 V supply Note(s) : •... -
Page 56: Block Diagram Of Worksheets
MG 252 787 467 - A - 8 - • D6 = CIS support - CIS flat cable • D7 = Motor drive • D8 = Control panel - Equipped control panel - Control panel flat cable - Chassis 1.4.3 LOCK DIAGRAM OF WORKSHEETS Trays Rack... - Page 57 - 9 - MG 252 787 467 - A SUBJECT: W HITE ROLLER Tools • None. Preliminary steps • None. Disassembly • Stand at the back of the fax. Latch Opening limiter Stop White roller White roller end housings • Press the control panel opening lever. •...
- Page 58 - 10 - MG 252 787 467 - A SUBJECT: P APER SEPARATOR Tools • Phillips screwdriver. Preliminary steps • None. Disassembly • Stand at the back of the fax. Mounting screw Side blade spring Fixing plate Center blade spring Separator plate Slide plate •...
- Page 59 - 11 - MG 252 787 467 - A SUBJECT: C ONTROL PANEL IRCUIT BOARD LASTOMER PLAY LASS OP COVER WITH LOUDSPEAKER Tools • Phillips screwdriver (small size). • Flat screwdriver. Preliminary steps Attention - The active surface of the CIS is fragile and light-sensitive. Take care to protect it and to expose it to light as little as possible during the operation.
- Page 60 - 12 - MG 252 787 467 - A SUBJECT: C ONTROL PANEL IRCUIT BOARD LASTOMER ’ PLAY LASS OP COVER WITH LOUDSPEAKER CONT • Lift the control panel at its upper left-hand corner (D), hold it and apply a medium amount of pressure halfway down its side (E), then free the left-hand side of the control panel by pushing downwards (F).
- Page 61 - 13 - MG 252 787 467 - A SUBJECT: CPU BOARD OVERS Tools • Hex screwdriver (Torx10). Preliminary steps • Disassembly • Open the control panel by means of tits lever, remove the right cover C (remove the screw A) •...
- Page 62 - 14 - MG 252 787 467 - A SUBJECT: C ONTROL PANEL CANNER CHASSIS RINTER Tools • Phillips screwdriver. • Flat screwdriver. Preliminary steps • Remove the CPU board (worksheet D4). Disassembly • Open the control panel by means of its lever, remove the two mounting screws. Mounting screws •...
- Page 63 - 15 - MG 252 787 467 - A SUBJECT: CIS - CIS SUPPORT FLAT CABLE Tools • Phillips screwdriver. Preliminary steps Attention - The active surface of the CIS is fragile and light-sensitive. Take care to protect it and to expose it to light as little as possible during the operation.
- Page 64 - 16 - MG 252 787 467 - A SUBJECT: M SUBJECT: M OTOR DRIVE OTOR DRIVE Tools • Phillips screwdriver. Preliminary steps • Remove the control panel / scanner chassis - printer (worksheet D5). Disassembly • Free the wires that supply the motor drive from their cable guide. •...
- Page 65 - 17 - MG 252 787 467 - A SUBJECT: C ONTROL PANEL QUIPPED CONTROL PANEL ONTROL PANEL FLAT CABLE HASSIS Tools • Phillips screwdriver. Preliminary steps • Remove the top cover (worksheet D3) and the control panel/chassis - printer (worksheet D5). Disassembly •...
-
Page 66: Functions Of The Administrator
MG 252 787 467 - A - 18 - UNCTIONS OF THE ADMINISTRATOR 1.5.1 NITIALIZING AND ERASING THE MEMORIES First set the installation parameter C bit 8 to 1. ONFIGURATION • Reset to default configuration (factory configuration) of all parameters (user and installer (or technical)): MENU •... -
Page 67: Other Functions
- 19 - MG 252 787 467 - A 1.5.2 THER FUNCTIONS For these functions, bit 8 of configuration 1 of the installation parameters must first have been set to 1. • Printout of all parameters (including installation and technical parameters): MENU •... -
Page 68: Replacing The Cpu Board
MG 252 787 467 - A - 20 - • Manually reboot the machine (with SOS 1 bit 8 set to 1): MENU • Display PCL/SG Script fonts checksum: MENU • Retransmission of faxes to print to rerouting mail: MENU •... -
Page 69: Laser Printer
- 21 - MG 252 787 467 - A • Perform a remote readout (if the function has been enabled). See chapter 8 of the Installation Guide. • Save the directory and the parameters on an EEPROM card (MENU * 5). See chapter 9 of the Installation Guide. - Page 70 - I - NI/IPL 252 787 467 - A NOMENCLATURE ILLUSTREE ILLUSTRATED PART LIST SOMMAIRE / CONTENTS UTILISATION DES TABLEAUX DE NOMENCLATURE OLONNES DES TABLEAUX OMMANDES DE PIÈCES DE RECHANGE USING THE PART LIST TABLES ABLE COLUMNS PARE PARTS ORDERING 1 / F LANCHE IGURE...
-
Page 71: Utilisation Des Tableaux De Nomenclature
NI/IPL 252 787 467 - A - 2 - UTILISATION DES TABLEAUX DE NOMENCLATURE OLONNES DES TABLEAUX • Colonne REPERE : repère de l’article illustré sur la planche correspondante Nota 1 : un repère précédé d’un tiret «-» est un repère non illustré. Nota 2 : un repère peut être illustré... -
Page 72: Able Columns
- 3 - NI/IPL 252 787 467 - A PART LIST TABLES ABLE COLUMNS • ITEM NUMBER column: number of the item illustrated on the corresponding figure. Note 1: An item number preceded by a hyphen "-" is a non-illustrated item. Note 2: An item may be illustrated in a figure without being listed in the corresponding part list: such an article cannot be replaced other than by replacing the subassembly of which it is part. -
Page 73: Planche 1 / Figure
- 4 - NI/IPL 252 787 467 - A 1 / F LANCHE IGURE... - Page 74 - 5 - NI/IPL 252 787 467 - A ITEM No. REFERENCE DESIGNATION 252212957 MF de base Basic MF unit 252358576 Introducteur scanner assemblé Loading scanner assembly Voir § 3 Cordon d’alimentation secteur See § 3 AC Power cord Voir § 3 Cordon ligne téléphonique See §...
-
Page 75: Planche 2 / Figure
- 6 - NI/IPL 252 787 467 - A 2 / F LANCHE IGURE... -
Page 76: Ensemble Pupitre-Chassis Scanner Et Imprimante
- 7 - NI/IPL 252 787 467 - A ITEM No. REFERENCE DESIGNATION Voir § 3 Pupitre équipé See § 3 equiped Control panel 252358691 Scanner assemblé Scanner assembly 252358386 Capot droit Right cover 252591241 Bac supplémentaire 500 feuilles (selon modèle ou option) SCPU (option) 252362314... -
Page 77: Planche 3 / Figure
- 8 - NI/IPL 252 787 467 - A 3 / F LANCHE IGURE... -
Page 78: Ensemble Pupitre-Chassis Scanner Et Imprimante
- 9 - NI/IPL 252 787 467 - A ITEM No. REFERENCE DESIGNATION 252358691 Ensemble pupitre-châssis scanner Control panel-scanner chassis assembly 185836395 Vis de fixation imprimante pupitre-scanner Mounting screws for printer/control panel-scanner ENSEMBLE PUPITRE-CHASSIS SCANNER ET IMPRIMANTE LANCHE CONTROL PANEL-SCANNER CHASSIS ASSEMBLY AND PRINTER IGURE... -
Page 79: Planche 4 / Figure
- 10 - NI/IPL 252 787 467 - A 4 / F LANCHE IGURE... -
Page 80: Ensemble Déliasseur Et Rouleau Blanc
- 11 - NI/IPL 252 787 467 - A ITEM No. REFERENCE DESIGNATION 251242568 Ensemble pupitre Control panel assembly 232025128 Kit déliasseur Separator assembly 251521782 Ensemble châssis scanner Scanner chassis assembly 233354606 Pignon 37-29 3729 pinion 236802401 Palier Bearing 236804301 Rouleau blanc White roller 251126863A... -
Page 81: Planche 5 / Figure
- 12 - NI/IPL 252 787 467 - A 5 / F LANCHE IGURE... -
Page 82: Imprimante Assemblée Printer Assembly
- 13 - NI/IPL 252 787 467 - A ITEM No. REFERENCE DESIGNATION 189139276 Imprimante Printer 252358500 Interface colorée Colored interface 251474529 Capot accès papier Paper access cover 251268041 Mylar carte UC Mylar UC board Voir § 3 Carte UC See §... -
Page 83: Planche 6 / Figure
- 14 - NI/IPL 252 787 467 - A 6 / F LANCHE IGURE... -
Page 84: Ensemble Plastron Control Panel Assembly
- 15 - NI/IPL 252 787 467 - A ITEM No. REFERENCE DESIGNATION Voir § 3 Etiquette plastron See § 3 Control panel label Voir § 3 Plastron See § 3 Control panel top cover 251125746 Vitre afficheur Display glass 186828412 Afficheur LCD LCD display... -
Page 85: Planche 7 / Figure
- 16 - NI/IPL 252 787 467 - A 7 / F LANCHE IGURE... -
Page 86: Tiroir Tray
- 17 - NI/IPL 252 787 467 - A ITEM No. REFERENCE DESIGNATION 188412147 Tiroir papier Tray assembly 188480710 Couvercle Cover TIROIR LANCHE TRAY IGURE... -
Page 87: Planche 8 / Figure
- 18 - NI/IPL 252 787 467 - A 8 / F LANCHE IGURE... -
Page 88: Ensemble Support Cis Et Motorisation
- 19 - NI/IPL 252 787 467 - A ITEM No. REFERENCE DESIGNATION 252296606 Nappe CIS CIS flat cable 237866016 Motorisation Motor drive 233354635 Pignon 44/18 44/18 pinion 143623768 Vis de fixation motorisation Mounting screws for motor drive 237868726 Fil de masse Grounding wire ENSEMBLE SUPPORT CIS ET MOTORISATION LANCHE... -
Page 89: Planche 9 / Figure
- 20 - NI/IPL 252 787 467 - A 9 / F LANCHE IGURE... -
Page 90: Prise Papier Paper Charger
- 21 - NI/IPL 252 787 467 - A ITEM No. REFERENCE DESIGNATION 188454067 Structure gauche assemblée Left frame assy 188480728 Ventilateur Frame unit 188478806 Moteur Motor 251616891 Support assemblé Hollder assembly 251616883 Platine assemblée Holder assembly 188454075 Guide papier assemblé Regulation plate assembly 188454054 Structure droite assemblée... -
Page 91: Planche 10 / Figure
- 22 - NI/IPL 252 787 467 - A 10 / F LANCHE IGURE... -
Page 92: Four
- 23 - NI/IPL 252 787 467 - A ITEM No. REFERENCE DESIGNATION 188454033 Guide assemblée Guide assy 188454046 Four Fusing unit FOUR 10 / LANCHE FUSER UNIT IGURE... -
Page 93: Planche 11 / Figure
- 24 - NI/IPL 252 787 467 - A 11 / F LANCHE IGURE... -
Page 94: Cartes Et Tête D'impression Cards And Print Head
- 25 - NI/IPL 252 787 467 - A ITEM No. REFERENCE DESIGNATION 188454088 Carte alimentation Power supply 188454108 Carte HT HT Card 188454096 Tête d’impression assemblé Print head assembly CARTES ET TÊTE D’IMPRESSION 11 / LANCHE CARDS AND PRINT HEAD IGURE... -
Page 95: Planche 12 / Figure
- 26 - NI/IPL 252 787 467 - A LANCHE 12 / IGURE 12... - Page 96 - 27 - NI/IPL 252 787 467 - A ITEM No. REFERENCE DESIGNATION Unité de transfert 188454012 Transfert unit Avance papier assemblée 188454025 Paper take-up assembly Galet 188480877 Roller Embrayage 251617207 Clutch Ressort pour palette imprimante 188478799 Pressure spring Palette imprimante 188478819 Tray Capteur...
- Page 97 - 1 - Perso 252 787 467 - A 3. - PERSONNALISATION Modèle / Model : XEROX PLANCHE REPERE DESIGNATION REFERENCE Cordon d’alimentation secteur / AC adaptor Français/French 186770538 Anglais/English 143826202 Allemand/German 186770538 Espagnol/Spanish 186770538 Italien/Italian 186770538 Néerlandais/Dutch 186770538 Autriche/Austria...
- Page 98 PRINTER 20 PPM SERVICE MANUAL TECHNICAL DOCUMENT 251 475 943 - A...
- Page 99 SAFETY PRECAUTIONS FOR INSPECTION AND SERVICE • When performing inspection and service procedures, observe the following precautions to prevent accidents and ensure utmost safety. ✽ Depending on the model, some of the precautions given in the following do not apply. •...
- Page 100 WARNING 2. Before starting the procedures, be sure to unplug the power cord. • This product contains a high-voltage unit and a circuit with a large current capacity that may cause an electric shock or burn. • The product also contains parts that can jerk suddenly and cause injury. •...
- Page 101 WARNING 8. Do not touch a high-temperature part. • A part marked with the symbol shown on the left and other parts such as the exposure lamp and fusing roller can be very hot while the machine is ener- gized. Touching them may result in a burn. •...
- Page 102 CAUTION 2. Precautions for Servicing with Covers and Parts Removed. • Wherever feasible, keep all parts and covers mounted when energizing the product. • If energizing the product with a cover removed is absolutely unavoidable, do not touch any exposed live parts and use care not to allow your clothing to be caught in the moving parts.
- Page 103 1-3. Used Batteries Precautions ALL Areas CAUTION Danger of explosion if battery is incorrectly replaced. Replace only with the same or equivalent type recommended by the manufacturer. Dispose of used batteries according to the manufacturer’s instructions. Germany VORSICHT! Explosionsgefahr bei unsachgemäßem Austausch der Batterie. Ersatz nur durch denselben oder einen vom Hersteller empfohlenen gleichwertigen Typ.
- Page 104 1-4. Other Precautions • When handling circuit boards, observe the “HANDLING of PWBs”. • The PC Drum is a very delicate component. Observe the precautions given in “HAN- DLING OF THE PC DRUM” because mishandling may result in serious image problems. •...
- Page 105 4. Precautions for Dis/Reassembly • Be sure to unplug the copier from the outlet before attempting to service the copier. • The basic rule is not to operate the copier anytime during disassembly. If it is absolutely necessary to run the copier with its covers removed, use care not to allow your clothing to be caught in revolving parts such as the timing belt and gears.
- Page 106 8. Handling of the PC Drum ✽ Only for Products Not Employing an Imaging Cartridge. During Transportation/Storage • Use the specified carton whenever moving or storing the PC Drum. • The storage temperature is in the range between –20°C and +40°C. •...
- Page 107 C. Soak a small amount of either ethyl alcohol or iso- propyl alcohol into a clean, unused Dust-Free Cot- ton Pad which has been folded over into quarters. Now, wipe the surface of the PC Drum in one con- tinuous movement from its rear edge to its front edge and off its surface one to two times.
-
Page 108: Safety Information
1-6. Safety information Laser Safety • This is a digital machine certified as a class 1 laser product. There is no possibility of danger from a laser, provided the machine is serviced according to the instruction in this manual. Internal Laser Radiation semiconductor laser Maximum power of the laser diode 15 mW... - Page 109 the U.S.A., Canada (CDRH Regulation) • This machine is certified as a Class I Laser product under Radiation Performance Stan- dard according to the Food, Drug and Cosmetic Act of 1990. Compliance is mandatory for Laser products marketed in the United States and is reported to the Center for Devices and Radiological Health (CDRH) of the U.S.
- Page 110 Finland, Sweden LUOKAN 1 LASERLAITE KLASS 1 LASER APPARAT VAROITUS! Laitteen käyttäminen muulla kuin tässä käyttöohjeessa mainitulla tavalla saattaa altistaa käyttäjän turvallisuusluokan 1 ylittävälle näkymättömälle lasersäteilylle. puolijohdelaser Laserdiodin suurin teho 15 mW aallonpituus 770-800 nm VARNING! Om apparaten används på annat sätt än i denna bruksanvisning specificerats, kan användaren utsättas för osynlig laserstrålning, som överskrider gränsen för laserklass 1.
-
Page 111: Laser Safety Label
1-7. Laser Safety Label A laser safety label is attached to the machine as shown below. 4136S505AB 1-8. Laser Caution Label A laser caution label is attached to the inside of the machine as shown below. 4136S001AA P-13... - Page 112 1-9. PRECAUTIONS FOR HANDLING THE LASER EQUIPMENT • When laser protective goggles are to be used, select ones with a lens conforming to the above specifications. • When a disassembly job needs to be performed in the laser beam path, such as when working around the printerhead and PC Drum, be sure first to turn the printer OFF.
- Page 113 INDEX GENERAL TROUBLESHOOTING MECHANICAL/ELECTRICAL MAINTENANCE DIS/REASSEMBLY, ADJUSTMENT...
- Page 114 CONTENTS 1. Safety Precautions for Inspection and Service ..........11 1-1. Warning ....................11 1-2. Caution .....................13 1-3. Used Batteries Precautions ..............15 1-4. Other Precautions ..................16 1-5. Precautions for Service ................16 1-6. Safety information ..................110 (1) Laser Safety ..................110 (2) Internal Laser Radiation ..............110 1-7.
- Page 115 7-1. Overview ....................M-11 7-2. PC Drum ....................M-13 7-3. Developing System ..................M-14 7-4. Detection of Toner Cartridge ..............M-15 (1) Installation detection ................M-15 (2) Detection of a new Toner Cartridge ..........M-15 (3) Toner near empty and empty detection ...........M-15 8. IMAGE TRANSFER ..................M-16 8-1.
- Page 116 1-2. Removal of Units ..................D-4 (1) Removal of the PH Unit ..............D-4 1-3. Disassembly of the Engine ...............D-5 (1) Removal of the Main Motor ..............D-5 (2) Removal of the Paper Empty Sensor ..........D-5 (3) Removal of the Paper Take-Up Solenoid ........D-6 (4) Removal of the Paper Take-Up Clutch Gear ........D-7 (5) Removal of the Torque Limiter ............D-8 (6) Disassembly of the Fusing Unit ............D-9...
-
Page 117: General
GENERAL... -
Page 118: Specifications
SPECIFICATIONS Printer Type Desktop Laser Beam Printer Exposure System Laser diode + Polygon Mirror Resolution 600 dpi (1200 dpi in half-speed mode) Copy Paper Size A4, A5, B5 8.5 × 14, 8.5 × 11, 3 × 5, 5.5 × 8.5, 7 1/4 × 10 1/2 Media Type Plain paper (60 to 90 g/m Recycled paper (60 to 90 g/m... - Page 119 Controller (GDI) Control Panel LED × 1, SW × 1 ASIC N1-Chips (Naltec Original ASIC) Memory Configuration Standard ROM: 64 KB (in ASIC) EEPROM: 1 Kilobit Flash ROM: 2 Megabits (250 KB) RAM: 8 MB (64-Megabit SDRAM: 64 Megabits × 1) Interface IEEE1284 Parallel (Compatible/Nibble/ECP) USB 1.1...
-
Page 120: Precautions For Installation
PRECAUTIONS FOR INSTALLATION 2-1. Installation Site To ensure utmost safety and avoid breakdown, the printer should NOT be used in a place: • Where it will be subjected to extremely high or low temperature or humidity. • Where it will be subjected to sudden fluctuations in either temperature or humidity. •... -
Page 121: Precautions For Use
PRECAUTIONS FOR USE 3-1. To Ensure the Printer is Used in an Optimum Condition • Never place a heavy object on the printer or subject the printer to shocks. • Insert the power plug all the way into the outlet. •... -
Page 122: Handling Of The Consumables
HANDLING OF THE CONSUMABLES Before using any consumables, always read the label on its container carefully. • Paper can easily damp. To prevent absorption of moisture, store paper in a place with lit- tle moisture. • Keep consumables out of the reach of children. •... -
Page 123: Mechanical/ Electrical
MECHANICAL/ ELECTRICAL... -
Page 124: Components Layout
COMPONENTS LAYOUT 4136M534AA 1. Print Head (PH) Unit 5. Multipurpose (MP) Tray 2. Exit Roller 6. Toner Cartridge 3. Fusing Unit 7. Drum Cartridge 4. Image Transfer Section... -
Page 125: Paper Path
PAPER PATH Exit Tray Multipurpose Tray 4136M539AA • The printer adopts the 1-way paper feeding system by means of the Multipurpose Tray (capable of holding up to 150 sheets of paper). • The paper taken up and fed in by the Paper Take-Up Roll is transported through the printer by the Image Transfer Roller, Fusing Roller, and Exit Roller and fed out of the printer face down onto the Exit Tray. -
Page 126: Electrical Components Layout
ELECTRICAL COMPONENTS LAYOUT 3-1. Printer PWB-P 4136M001AB Main Motor Front Door Switch Cooling Fan Motor Multipurpose Tray Paper Empty Sensor Fusing Roller Heater Lamp Exit Sensor Thermistor SL-1 Paper Take-Up Solenoid Thermostat PU-1 Power Unit Print Head Unit HV-1 High Voltage Unit Paper Take-Up Switch PWB-P Controller/Mechanical Control Board... -
Page 127: Operating Sequence
OPERATING SEQUENCE 4-1. Print Start Sequence /PRINT Polygon Motor Main Motor Paper Take-Up Solenoid Drum Charge Drum charge DC Drum charge DC Output Exposure Output Charge Charge Developing Output Reverse bias Reverse bias Image Unexposed area output Transfer Negative output Negative output Output 4-2. -
Page 128: Print Head (Ph
PRINT HEAD (PH) 5-1. Construction • The laser beam light emitted from the Print Head is used to scan the image as driven by the Polygon Motor. SOS Sensor G1 Lens Semiconductor Laser G2 Lens 1st Mirror 2nd Mirror SOS Mirror Polygon Mirror 4136M005AA... -
Page 129: Laser Exposure Process
5-2. Laser Exposure Process • The laser beam light emitted from the Print Head is used to create an electrostatic latent image on the surface of the PC Drum. • The following control is provided to correctly time image printing. Print Head Unit Laser Diode Polygon Motor... -
Page 130: Laser Emission Timing
5-3. Laser Emission Timing • When a READY signal is detected a given period of time after the print command has been issued, the Controller/Mechanical Control Board outputs a laser ON signal. • The laser ON signal makes a laser beam to be emitted and the laser beam travels to the Polygon Mirror, G1 Lens, and the SOS Mirror to eventually hit the SOS Sensor, which generates an SOS signal. -
Page 131: Laser Emission Area
5-4. Laser Emission Area Main scanning direction • The print start position is determined by the main scanning print start signal (/HSYNC) output from the Controller/Mechanical Control Board and the width of the paper. • The laser emission area is determined by the paper size. Areas with a width of 4 mm on both edges are not, however, printed. -
Page 132: Cooling Of The Printer Interior
5-5. Cooling of the Printer Interior • The Cooling Fan Motor is used to discharge heat generated from the PH Unit out of the printer, thereby preventing the PH Unit from getting hot. PH Unit Cooling Fan Motor 4136M518AA... -
Page 133: Drum Charge
DRUM CHARGE Overview • The PC Drum is charged with static electricity before laser exposure. • The Drum Charge Brush and the Pre-charge Film are used for charging. • Since the Drum Charge Brush and the Pre-charge Film directly deposit charge on the PC Drum, they produce little ozone. -
Page 134: Ic (Imaging Cartridge) Section
IC (IMAGING CARTRIDGE) SECTION 7-1. Overview • The illustration below shows the construction of the Toner Cartridge and the Developing Unit. • This printer adopts the single-component FMT, or Fine Micro Toning, developing system. • The Toner Agitating Screw conveys toner in the Toner Cartridge onto the Toner Supply Roller. - Page 135 • The Imaging Cartridge consists of a T/C (Toner Cartridge) and a D/C (Drum Cartridge) (see the illustration below). D/C (Drum Cartridge) Imaging Cartridge 4136M511AA 4136M513AA T/C (Toner Cartridge) M-12...
-
Page 136: Pc Drum
7-2. PC Drum • The PC Drum used in this printer is the organic photoconductor (OPC) type. • The drum consists of two layers - Charge Transport Layer (CTL) and the Charge Gener- ating Layer (CGL) - applied to an aluminum alloy base (cylinder). Handling Precautions: The PC Drum of this type exhibits light fatigue after being exposed to light for a long time, which results in its sensitivity being changed. -
Page 137: Developing System
7-3. Developing System • The Toner Agitating Screw conveys toner in the Toner Cartridge onto the Toner Supply Roller. • The Toner Supply Roller transports the toner to the Sleeve Roller. • The 1st Toner Blade located above the Sleeve Roller spreads a thin, even coat of toner over the Sleeve Roller. -
Page 138: Detection Of Toner Cartridge
7-4. Detection of Toner Cartridge Installation detection • The IC chip (CSIC) built into the Toner Cartridge detects that the Imaging Cartridge is installed in position when the power switch is turned OFF and ON, and the Front Door is opened and closed. -
Page 139: Image Transfer
IMAGE TRANSFER 8-1. Overview • The toner image formed on the surface of the PC Drum during the developing process is transferred onto the paper. • This printer adopts the roller image transfer system, in which the Image Transfer Roller is used to transfer the image onto the paper. -
Page 140: Fusing Unit
FUSING UNIT 9-1. Overview • The toner image transferred onto the paper is securely fixed to the paper. • A heated roller system is used as the fusing system. The paper, to which the toner image has been transferred, is fed between the Fusing Roller heated by the Fusing Roller Heater Lamp and the Pressure Roller. -
Page 141: Fusing Unit Temperature Control
9-2. Fusing Unit Temperature Control Temperature change Thermistor-detected temperature Warm-up 205 °C Printing 185 °C (600 dpi) 160 °C Printing 155 °C (1200 dpi) Standby 130 °C Mode 1: 300 sec. Mode 2: 208 sec. Mode 3 Thermistor-Detected Temperature at Start of Temperature Control Less than 50 °C 50 °C to 130 °C More than 130 °C Power OFF... -
Page 142: Temperature Control Mode
Temperature control mode During a print cycle, the fusing temperature is regulated in accordance with the elapsed time since the completion of the warm-up cycle. • Mode 1 Mode 1 lasts for 5 min. If, however, mode 1 is interrupted in mid-operation and the ther- mistor temperature is 50 °C or more, the timer count before the interruption continues. -
Page 143: 10. Paper Take-Up Section
10. PAPER TAKE-UP SECTION 10-1. Multipurpose Tray Paper take-up mechanism • When the Paper Take-Up Solenoid is energized, drive from the Main Motor is transmitted to the Paper Take-Up Roll through the Paper Take-Up Clutch, turning the Paper Take-Up Roll. •... -
Page 144: Paper Empty Detection
Paper empty detection • There is a Multipurpose Tray Paper Empty Sensor provided on the upper portion of the Multipurpose Tray. It detects paper loaded in the tray. • When there is a paper stack loaded in the tray, the actuator is raised to block the Paper Empty Sensor. -
Page 145: 11. Paper Exit
11. PAPER EXIT 11-1. Paper Exit Mechanism • The paper exit mechanism transports the paper that has been subjected to the fusing process onto the Exit Roller. • The Exit Sensor detects not only a paper misfeed but also an open Upper Cover. Exit Tray Exit Roll Face-down Exit... -
Page 146: Maintenance
MAINTENANCE... -
Page 147: Maintenance Schedule
MAINTENANCE SCHEDULE • To ensure that the printer produces good printed pages and to extend its service life, it is recommended that the maintenance jobs described in this schedule be carried out as instructed. Replace Ref. Page in Making one PM Parts Clean This Manual... -
Page 148: Guidelines For Life Specifications Values By Unit
1-1. Guidelines for Life Specifications Values by Unit • The life specifications value represents the number of printed pages produced or figures equivalent to it when given conditions (see the Table given below) are met. It can be more or less depending on how each individual printer is used. Print Conditions Job type Making one printed page per job... -
Page 149: Replacement/Cleaning Of Parts
REPLACEMENT/CLEANING OF PARTS Cleaning of the Paper Take-Up Roll <Printer> 1. Remove the Imaging Cartridge. ☞ E-5 NOTE • The Imaging Cartridge is the Drum Cartridge, to which the Toner Cartridge is mounted. 2. Using a soft cloth, wipe the surface of the Paper Take-Up Roll clean of dirt. -
Page 150: Replacement Of The Image Transfer Roller
Replacement of the Image Transfer Roller 1. Remove the Imaging Cartridge. ☞ E-5 2. Remove the Fusing Unit. ☞ E-8 3. Place the levers of the bushings (white) on the right and left ends of the Image Transfer Roller toward this side and remove the Image Transfer Roller from the Image Transfer Roller holder. -
Page 151: Replacement Of Units
REPLACEMENT OF UNITS Replacement of the Toner Cartridge <Removal Procedures> 1. Open the Front Door. 4136E005AA 2. Remove the Imaging Cartridge. 4136E006AA 3. Pull the lever of the Toner Cartridge in the direc- tion shown in the illustration and disconnect the Toner Cartridge from the Drum Cartridge. - Page 152 <Installation Procedures> 1. Take out a new Toner Cartridge and shake it in the horizontal direction sufficiently so that toner is agitated. NOTE • Placing the Toner Cartridge in an upright position or shaking it vigorously will spill toner. 4136E008AA 2.
-
Page 153: Replacement Of The Drum Cartridge
Replacement of the Drum Cartridge <Removal Procedures> 1. Remove the Imaging Cartridge. ☞ E-5 2. Pull the lever of the Toner Cartridge in the direc- tion shown in the illustration and disconnect the Drum Cartridge. 4136E011AC <Installation Procedures> 1. Mount the Toner Cartridge to a new Drum Car- tridge. -
Page 154: Replacement Of The Fusing Unit
Replacement of the Fusing Unit <Removal Procedures> 1. Turn OFF the power switch and leave the printer to stand idle for about 20 min. 2. Remove the Left and Right Covers. 3. Remove two screws and two washers. Then, remove the Fusing Unit protective metal bracket. 4136E013AC 4. - Page 155 <Installation Procedures> 1. Take out the Fusing Unit and cushioning materials. 2. Connect connector A. 3. Mount the Fusing Unit in the printer and secure it in position by tightening the two screws. 4. Connect connectors B and C. NOTE •...
-
Page 156: Dis/Reassembly, Adjustment
DIS/REASSEMBLY, ADJUSTMENT... -
Page 157: Precautions For Disassembly/Adjustments
PRECAUTIONS FOR DISASSEMBLY/ADJUSTMENTS 1-1. Parts That Must Not be Touched Variable resistors on board Do not turn the variable resistors on boards for which no adjusting instructions are given in ADJUSTMENT. -
Page 158: Removal Of The Controller/Mechanical Control Board
Removal of the Controller/Mechanical Control Board <Removal Procedures> 1. Remove the Right Cover. 2. Remove three screws and the protective metal bracket. 4136D054AA 3. Disconnect all connectors and flat cables from the Controller/Mechanical Control Board. NOTE • Use utmost care not to snap off the flat cable. 4. -
Page 159: Removal Of The Power Unit
Removal of the Power Unit 1. Remove the Fusing Unit. ☞ E-8 2. Remove two screws and the Power Switch stay. 3. Remove the Power Switch. 4136D060AA 4. Disconnect one connector from the Controller/ Mechanical Control Board. 5. Remove six screws, disconnect three connectors, and remove the Power Unit Assy. -
Page 160: Removal Of Units
1-2. Removal of Units Removal of the PH Unit CAUTION • NEVER attempt to replace the PH Unit with power being supplied to the printer. Doing that could lead to exposure to the laser beam, resulting in blind- ness. • NEVER attempt to disassemble or adjust the PH Unit. Doing that could lead to exposure to the laser beam, resulting in blindness. -
Page 161: Disassembly Of The Engine
1-3. Disassembly of the Engine Removal of the Main Motor 1. Remove the Left Cover. 2. Disconnect one connector. 3. Remove two screws, two washers, and the Main Motor. 4136D010AA Removal of the Paper Empty Sensor 1. Remove the Front Door. 2. -
Page 162: Removal Of The Paper Take-Up Solenoid
7. Disconnect one connector and remove the Paper Empty Sensor. 4136D014AA Removal of the Paper Take-Up Solenoid 1. Remove the Left Cover. ☞ E-8 2. Disconnect one connector of the Paper Take-Up Solenoid. 4136D058AA 3. Remove one screw and the Paper Take-Up Sole- noid. -
Page 163: Removal Of The Paper Take-Up Clutch Gear
Removal of the Paper Take-Up Clutch Gear 1. Remove the Fusing Unit. ☞ E-8 2. Remove the Power Unit. ☞ D-3 3. Remove the Paper Take-Up Upper Guide Assy. ☞ D-5 4. Disconnect one connector and remove the Cool- ing Fan Motor. 5. -
Page 164: Removal Of The Torque Limiter
12. Remove one screw and the Paper Take-Up Sole- noid. 4136D018AA 13. Unhook two tabs and remove the Paper Take-Up Clutch Gear. 4136D057AA Removal of the Torque Limiter 1. Remove the Paper take up Clutch Gear. 2. Unhook three tabs and take apart the Paper Torque Limiter Take-Up Clutch Gear then, remove the Torque Coupling... -
Page 165: Disassembly Of The Fusing Unit
After setting replaced Paper Take-Up Clutch Gear (Torque Limiter) to the shaft, Rotate the Paper Take- Up Clutch Gear by hand (Need to be released Sole- noid Flapper). 4136D060AA Look at the stop position of the Take-Up Roller from Clutch Gear side. 1. - Page 166 2. Remove two screws and disconnect the Fusing Unit. 4136D021AA 3. Remove two bushings and the Pressure Roller. 4136D022AA Precautions for Installation of Bushings • Make sure that the slits in the bushing are properly aligned with the rib of the Fusing Unit. 4136D040AA 4.
- Page 167 8. Remove the four Fusing Roller Paper Separator Fingers. NOTE • Use care not to lose the springs. 4136D033AA 9. Remove one screw and the Thermistor. NOTE • When reinstalling the Thermistor, route the har- ness as shown in the illustration. 10.
-
Page 168: Troubleshooting
TROUBLESHOOTING... -
Page 169: Introduction
INTRODUCTION • This chapter contains the items required or used when troubleshooting various printer problems. 1-1. Electric Components Check Procedures • The following procedures can be used to check to see if an electric component is fully operational when a paper misfeed or a malfunction occurs in the printer. Sensors Step Check... -
Page 170: Switches
Switches Step Check Result Action Replace the switch. Does the input signal (NO) to the Controller/Mechani- Replace the Con- cal Control Board go from LOW to HIGH when the troller/Mechanical switch is actuated? Control Board. Not Use 4025T523AB Solenoids Step Check Result Action... -
Page 171: Motors
Motors Step Check Result Action Is the LOCK signal of the Controller/Mechani- Replace the Controller/ cal Control Board HIGH when the printer is in Mechanical Control Board. the standby state? Replace the motor. YES Replace the motor. Does the REM signal of the Controller/ Mechanical Control Board go from HIGH to Replace the Controller/ LOW when the motor is energized? -
Page 172: Overall Control Configuration
1-2. Overall Control Configuration • Understanding the overall control configuration will help perform the troubleshooting pro- cedures for paper misfeeds, malfunctions, and image problems. Control Panel (PWB-O) Controller/Mechanical Power Unit (PU1) PH Assy Control Board 2nd Paper Cassette Printer Drive System Control System Line 4136T009CA... -
Page 173: Paper Misfeed
PAPER MISFEED 2-1. Initial Check Items • When a paper misfeed occurs in the printer, first make the following initial checks. Check Action Does the paper meet product specifications? Replace paper. Replace paper. Is the paper curled, wavy, or damp? Instruct user in correct paper storage. -
Page 174: Locations Of Misfeed Detection Sensors
2-2. Locations of Misfeed Detection Sensors • 150-sheet-capacity Printer (printer only) Exit Sensor (PS3) Paper Take-Up Switch (S1) 4136T007AA... -
Page 175: Misfeed Detection Timing And Troubleshooting Procedures
2-3. Misfeed Detection Timing and Troubleshooting Procedures Paper Take-Up/Transport Misfeed <Detection Timing> Type Description The Paper Take-Up Switch is actuated earlier than a predeter- mined period of time after the paper take-up sequence has been Misfeed detected at started. the paper take-up sec- The Paper Take-Up Switch is not actuated even after the lapse of tion a predetermined period of time after the paper take-up sequence... -
Page 176: Fusing/Exit Misfeed
Fusing/Exit Misfeed <Detection Timing> Type Description The paper unblocks the Exit Sensor when the Power Switch is Detection of paper left turned ON, the Front Door is opened and closed, or when a mis- in Fusing Unit feed occurs or transport of paper is stopped. The paper unblocks the Exit Sensor earlier than a predetermined period of time after the Paper Take-Up Switch has been actuated. -
Page 177: Malfunctions/Warning
MALFUNCTIONS/WARNING 3-1. List of Malfunctions Malfunction Name Description • The LOCK signal is not detected within a predetermined period of time that begins 1 sec. after the Polygon Motor has been energized. • No new LOCK signal is detected for a 1-sec. period that begins 1.5 Polygon Motor sec. - Page 178 Controller-related malfunctions Engine initialization failure Engine I/F failure ROM malfunction DRAM malfunction EEPROM malfunction Video transfer malfunction Data decompression failure Vide output failure Unsupported engine failure T-10...
-
Page 179: Malfunction Detection Timing And Troubleshooting Procedures
3-2. Malfunction Detection Timing and Troubleshooting Proce- dures When any of the following malfunctions is detected, all drives are shut down and a hard- ware error message is displayed on the control panel. Polygon Motor malfunction <Detection Timing> Description • The LOCK signal is not detected within a predetermined period of time that begins 1 sec. -
Page 180: Laser Malfunction
Laser malfunction <Detection Timing> Description • The laser output exceeds the upper limit value. • The laser output remains lower than the lower limit value. • The Start Scan signal (-S_SCAN) is not detected at all within a predetermined period of time after the laser has been turned ON. -
Page 181: Warm-Up Failure
Warm-up failure <Detection Timing> Description • The voltage of the Thermistor remains low for a predetermined period of time when a warm-up cycle is started. • The temperature detected by the Thermistor remains lower than a reference value for a predetermined period of time for the period of time that begins 5 sec. -
Page 182: Abnormally Low Fusing Temperature
Abnormally low fusing temperature <Detection Timing> Description • The temperature detected by the Thermistor remains lower than the set temperature continuously for a predetermined period of time while the fusing temperature control is being provided. (The set temperatures are as follows: 140 °C during a print mode at 600 dpi;... -
Page 183: Abnormally High Fusing Temperature
Abnormally high fusing temperature <Detection Timing> Description • The temperature detected by the Thermistor remains higher than 235 °C for a predeter- mined period of time while the fusing temperature control is being provided. <Troubleshooting Procedures> Relevant Electric Parts Fusing Unit Controller/Mechanical Control Board (PWB-P) Thermistor (TH1) Thermostat (TS1) -
Page 184: Controller-Related Malfunctions
Controller-related malfunctions • The following are malfunctions and failures as they relate to the controller. Controller-related malfunctions Engine initialization failure Engine I/F failure ROM malfunction DRAM malfunction EEPROM malfunction Video transfer malfunction Data decompression failure Video output failure Unsupported engine failure <Troubleshooting Procedures>... -
Page 185: Malfunctions Related To Power Supply
MALFUNCTIONS RELATED TO POWER SUPPLY 4-1. Power is not Turned ON. Relevant Electric Parts Controller/Mechanical Control Board (PWB-P) Power Unit (PU1) Wiring Diagram Step Check Result Action (Location) Is the power cord plugged Plug the power cord into the – into the power outlet? power outlet. -
Page 186: Image Quality Problems
IMAGE QUALITY PROBLEMS 5-1. Troubleshooting Procedure by Image Quality Problem Blank print and black print <Typical Faulty Images> 4011T035AA 4011T036AA <Troubleshooting Procedures> Step Check Result Action Is a printed page blank? YES Check PH Unit connectors for proper connection. Is the coupling of the drive mechanism of Check coupling of drive mech- the Imaging Cartridge properly connected? anism for connection and cor-... -
Page 187: Void Areas
Void areas <Typical Faulty Image> 4011T008AA <Troubleshooting Procedures> Step Check Result Action Is paper damp? YES Replace paper for one just unwrapped. Is the PC Drum scratchy? YES Replace Drum Cartridge. Is there foreign matter on paper path? YES Remove foreign matter. Is Image Transfer Roller dirty or scratchy? YES Replace Image Transfer Roller. -
Page 188: Low Image Density
Low image density <Typical Faulty Image> 4011T003AA <Troubleshooting Procedures> Step Check Result Action Is paper damp? YES Replace paper for one just unwrapped. Is there toner left in Toner Cartridge? Replace Toner Cartridge. Is PC Drum faulty (life)? YES Replace Drum Cartridge. Is developing bias faulty? YES Replace High Voltage Unit (HV1). -
Page 189: Foggy Background
Foggy background <Typical Faulty Image> 4011T004AA <Troubleshooting Procedures> Step Check Result Action Is PC Drum scratchy? YES Replace Drum Cartridge. Is developing bias contact terminal in good Clean contact terminal or contact with the mating part? check terminal position. Is PH window dirty? YES Clean. -
Page 190: Black Lines, Black Bands
Black lines, black bands <Typical Faulty Images> 4011T017AA 4011T023AA <Troubleshooting Procedures> Step Check Result Action Is paper path dirty with toner? YES Clean. Is PC Drum scratchy or dirty? YES Replace Drum Cartridge. Is Fusing Roller scratchy or dirty? YES Replace Fusing Unit (Fusing Roller). -
Page 191: Uneven Image
Uneven image <Typical Faulty Images> 51-mm-pitch uneven image 51.8-mm-pitch uneven image 4136T004AA 4136T008AA 75.3-mm-pitch uneven image 94.2-mm-pitch uneven image 4136T005AA 4136T006AA <Troubleshooting Procedures> Step Check Cause Result Action Is uneven image at a Image Transfer Roller is YES Replace Image Transfer pitch of 50.6 mm? scratchy or dirty.
Need help?
Do you have a question about the MF Series and is the answer not in the manual?
Questions and answers