Overland Storage NEO 200s Getting Started
2u tape library
Hide thumbs
Also See for NEO 200s:
- Replacement instructions (5 pages) ,
- Instructions (3 pages) ,
- User manual (170 pages)
Table of Contents
Advertisement
Quick Links
Download this manual
See also:
User Manual
NEO 200
2U Tape Library
S
getting started
© Copyright 2009
First edition: July 2009
The information in this document is subject to change without
notice.
AL540-96014
IMPORTANT:
The shipping lock must be removed for the robotics to work
properly. A robot move error is displayed if the shipping lock is not
removed. See Step 1, Removing and storing the shipping lock.
WARNING!
The 2U Tape Library weighs 15.6 kg (34.3 lb) without media and 20.4
kg (44.9 lb) with media (24 cartridges). When moving the Library,
to reduce the risk of personal injury or damage to the device:
• Observe local health and safety requirements and guidelines for
manual material handling.
• Remove all tapes to reduce the overall weight of the device and
prevent cartridges from falling into the robotic path and dam-
aging the Library.
• Obtain adequate assistance to lift and stabilize the device during
installation or removal.
WARNING!
When placing the Library into a rack, to reduce the risk of personal
injury or damage to equipment:
• Extend the rack leveling jacks to the floor.
• Ensure that the full weight of the rack rests on the leveling jacks.
• Install stabilizing feet on the rack.
• Extend only one rack component at a time. Racks may become
unstable if more than one component is extended.
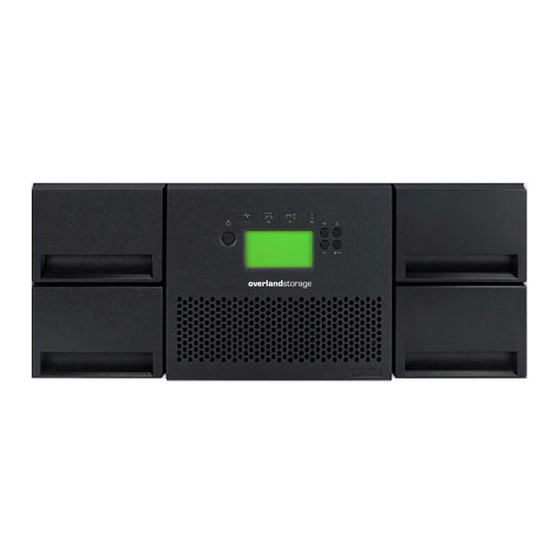
Front panel overview
1. Power button
3. LEDs
5. Control keys
7. Magazines
Page 1
2. Mailslot
4. LCD screen
6. Air vents
Advertisement
Table of Contents

Related Manuals for Overland Storage NEO 200s


Summary of Contents for Overland Storage NEO 200s
- Page 1 NEO 200 2U Tape Library IMPORTANT: getting started The shipping lock must be removed for the robotics to work properly. A robot move error is displayed if the shipping lock is not removed. See Step 1, Removing and storing the shipping lock. WARNING! The 2U Tape Library weighs 15.6 kg (34.3 lb) without media and 20.4 kg (44.9 lb) with media (24 cartridges).
-
Page 2: Back Panel Overview: Parallel Scsi
1. FC ports 2. Fan Back panel overview: parallel SCSI 3. Power connector 4. Tape drive assembly 5. Ethernet port 6. Serial port (Factory use only) 7. USB port 8. Magazine release hole 9. Pull-out tab containing 10. Tape drive assembly LED product information 1. -
Page 3: Using The Remote Management Interface (Rmi)
Attention — Amber if the Library has detected a condition that user Status icons attention is necessary, but that the device can still perform most operations. The green Status OK icon indicates that the Library is Error — Amber if an unrecoverable tape drive or Library error occurs. fully operational and that no user interaction is required. -
Page 4: Installing Tape Drives
NOTE: See Step 12 for additional FC configuration information. See the 2U Tape Library and 4U Tape Libraryuser and service guide for instructions on changing the FC configuration. 4b Planning the parallel SCSI configura- tion If you are unfamiliar with configuring parallel SCSI devices, read the parallel SCSI configuration information in the 2U Tape Library and 4U Tape Libraryuser and service guide. -
Page 5: Changing The Scsi Id
Attach one end of the parallel SCSI cable to one of the connectors on the tape drive. Attach the other end of the cable to the HBA or to the 5 Changing the SCSI ID connector on the previous device on the SCSI bus. If the tape drive is the last or only device on the SCSI bus, attach a On a parallel SCSI Library, if you need to change the SCSI ID for one terminator to the remaining SCSI connector on the tape drive. -
Page 6: Powering On The Library
The unused ends of a fanout cable are single channel and not suitable From the Home screen, press Next until the display shows for use with most disk arrays. Use the other ends to connect tape drives, Status/Information. Press Enter. or coil and secure them to the rack to minimize stress on the connectors. -
Page 7: Magazine Release
Access to this feature requires the administrator password, if set. To set the date and time from the OCP: 13 Magazine release From the Home screen, press Next until the display shows Library Date/Time. Press Enter. When possible, release the magazines from the OCP or RMI. If you must remove the magazines when the Library is not powered on: 1) Enter the administrator password, if requested. -
Page 8: Loading Cartridges
16 Verifying the installation Verify that the Library has the most up-to-date firmware revision and upgrade the firmware if necessary. You can upgrade firmware from the OCP using a USB flash drive or through the RMI. To find the firmware revision of the Library on the front panel: From the Home screen, press Next until the display shows Status/Information. - Page 9 OCP menu Page 9...
Need help?
Do you have a question about the NEO 200s and is the answer not in the manual?
Questions and answers