
Related Manuals for Overland Storage NEO S-Series


Summary of Contents for Overland Storage NEO S-Series
-
Page 1: Users Guide
S-Series Tape Library Overland ® Storage Users Guide November 2014 10400645-001... - Page 2 Overland Storage. Overland Storage provides this manual as is, without warranty of any kind, either expressed or implied, including, but not limited to, the implied warranties of merchantability and fitness for a particular purpose. Overland Storage may make improvements or changes in the product(s) or programs described in this manual at any time.
-
Page 3: Table Of Contents
NEO S-Series User Guide Contents Introduction ............................ 6 1.1 Document Purpose............................. 6 1.2 Product Warranty Caution .......................... 6 General Warnings .......................... 7 2.1 Document Conventions: ..........................7 2.2 General Product Warnings ......................... 7 Product Overview ........................... 9 3.1 Supported Configurations ........................10 3.2 Supported Tape Drives .......................... - Page 4 NEO S-Series User Guide 4.15 Verifying the host............................31 4.16 Powering up/down the library ........................31 Tape Cartridges and Magazines ....................31 5.1 Tape Cartridges............................31 5.1.1 Using and Maintaining Tape Cartridges ..................32 5.1.2 Labeling Tape Cartridges ......................33 5.1.3...
- Page 5 NEO S-Series User Guide 6.4.6 Status ............................68 6.4.7 Configuration ..........................71 6.4.8 Operations ..........................80 6.4.9 Service ............................81 6.5 Partitioning the library ..........................85 6.5.1 Drive naming ..........................85 6.5.2 Mixing of drives ........................... 86 6.5.3 SCSI element addressing ......................89 6.5.4...
-
Page 6: Introduction
Introduction Document Purpose This document provides information to install, operate, and upgrade a NEO S-Series Tape Library. It covers the NEO StorageLoader (1U), T24 (2U), and T48 (4U) libraries. The instructions are intended for the trained System Administrators and trained Users who need physical and functional knowledge of the NEO S-Series library. -
Page 7: General Warnings
NEO S-Series User Guide General Warnings Document Conventions: Indicates that failure to follow directions could result in bodily harm or WARNING death. Indicates that failure to follow directions could result in damage to CAUTION equipment or data. Provides clarifying information or specific instructions. - Page 8 NEO S-Series User Guide Product Weight WARNING Risk of personal injury Before lifting a library: Observe local health and safety requirements and guidelines for manual material handling. Remove all tapes to reduce the weight. Remove all tape drives to reduce the weight.
-
Page 9: Product Overview
Do not insert any tools or any part of your body into openings of an operating system. A NEO S-Series library provides a compact, high capacity, low-cost solution for simple, unattended data backup. It is compatible with most operating systems and environments with the appropriate interface card. However, the library requires either direct support from the operating system or a compatible backup application to take full advantage of its many features. -
Page 10: Supported Configurations
Library controller Supported Tape Drives The NEO S-Series was developed to integrate industry-standard LTO Ultrium tape drives from IBM. Mixed drive generations and mixed interfaces are supported within a single library. Listed below are the tape drives that have been implemented and qualified for use in A NEO S-Series. -
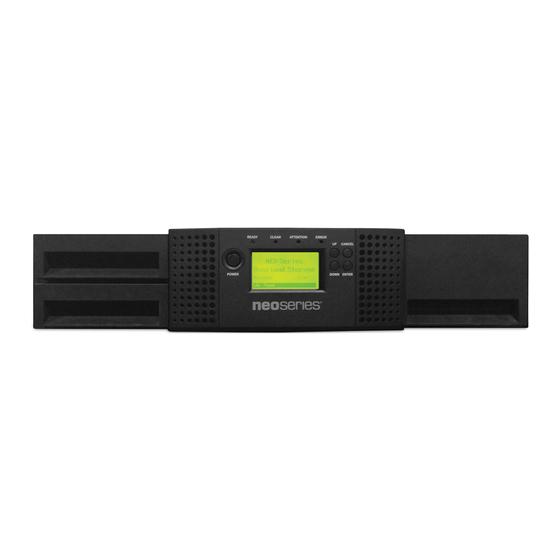
Page 11: Front Panel
NEO S-Series User Guide Front Panel NEO StorageLoader (1U): NEO T24 Tape Library (2U): NEO T24 Tape Library (4U): Air Vents Power Button Pressing the button will initiate a controlled power down of the library (soft power down). Ready LED, Green Illuminated during power on;... -
Page 12: Rear Panel
Left Magazines Rear Panel The rear panel of the NEO S-Series provides access to the drive interface connectors, the power connector, Ethernet, serial and USB ports, and the magazine release holes. All libraries support parallel SCSI, SAS, and Fibre channel tape drives. -
Page 13: Power Supplies
NEO S-Series User Guide 3.4.1 Power Supplies The power supply model utilized is dependent on the library model. NEO StorageLoader (1U): NEO T24 Tape Library (2U): NEO T48 Tape Library (4U): Power Connector (110/220 VAC) LED (green) is illuminated when the power supply is producing good power for the library. - Page 14 NEO S-Series User Guide SAS connectors all LTO generations: Half-Height Tape Drives: Half-Height Tape Drive with Ethernet Port: Half-Height Tape Drive with Two SAS Connectors: Magazine Release Holes Error LED (Amber) Ethernet Port for Service/Diagnostics (not used) Drive Fan Vent...
-
Page 15: Library Controller
NEO S-Series User Guide 3.5.1 Library Controller Ethernet Port (RMI Connection) Serial Port (Engineering Diagnostics) Controller LED (blinking = OK; if not blinking, failure) USB Port (Firmware upgrades, key storage) 3.5.2 Ethernet Port The Ethernet port is only available on the library controller and connect the library to a network or PC for working with the RMI. -
Page 16: Installing The Library
NEO S-Series User Guide Installing the Library This chapter provides instructions for installing a NEO S-Series tape library. Location Requirements The library was designed for rack installation and must be installed using the NOTE provided rack rails. Installation on a table top or other similar surface could result in library operation errors. -
Page 17: Lun Scanning
NEO S-Series User Guide LUN scanning The NEO S-Series tape library uses a single SCSI ID per tape drive to control the tape drive (LUN 0) and library robotic (LUN 1). NOTE The library requires an HBA that supports LUN scanning. - Page 18 NEO S-Series User Guide The library allows the selection of the following three Fibre Channel port behaviors: • LN Port (default setting) – an automatic configuration that tries arbitrated loop first, then switched Fabric. • L Port – arbitrated loop •...
-
Page 19: Host Preparation
NEO S-Series User Guide Use an appropriate HBA for your tape drive due to performance NOTE requirements. A lower Gbps HBA might result in performance degradation when moving highly compressible data to a higher Gb tape drive. In a SAN installation, all switches between the host and the library must be of the appropriate type. -
Page 20: Installation Precautions
15° C (30° F) from where the module was stored, allow it to acclimate for at least 12 hours prior to unpacking. Unpacking the NEO S-Series Tape Library: 1. Before opening and removing the tape library from the box, inspect the container for shipping damage. -
Page 21: Identifying Library Components
NOTE damage the library. Identifying Library Components Confirm that you received the following: 1. NEO S-Series tape library 2. Library documentation Optional components, depending on the ordered configuration: 1. Cables, for instance SAS and / or Ethernet cables 2. Power cord 3. -
Page 22: Rack Mounting The Library
NEO S-Series User Guide To remove and store the shipping lock: 1. Remove the yellow label that is securing the shipping lock on the top of the library. Figure 1 Remove the yellow label 2. Remove the shipping lock. Figure 2 Remove the shipping lock 3. - Page 23 NEO S-Series User Guide Rack mounting the library: The steps to install a library in a rack are for all unit highs common. In the following figures, a 1U library is shown as an example. 1. Determine the location and in the rack for the library to be installed.
-
Page 24: Installing A Tape Drive
NEO S-Series User Guide 7. Slide the library onto the rack rails. 8. Secure the library to the rack using a 3# Phillips screwdriver placed through the small holes in the mounting bracket to tighten the M5 screw(s) on each side of the library. - Page 25 NEO S-Series User Guide 3. Remove one drive bay cover to install a half-height tape drive; remove two drive bay covers to install a full-height tape drive. 4. Slightly pull out the pull-out tab for the product ID label so it does not interfere with the tape drive, see Figure 7...
-
Page 26: Installing The Library Controller
NEO S-Series User Guide 4.12 Installing the library controller The library controller is installed from the rear of the library. If the library does not already have a library controller installed, install the library controller now. Required tool: • #2 Phillips screwdriver To install a library controller: 1. - Page 27 NEO S-Series User Guide The 4U library may be configured for a redundant power by installing a second power supply. In this case both Power supplies work parallel and in case one fails a warning will be displayed. Required tool: #2 Phillips screwdriver To install a power supply: 6.
-
Page 28: Connecting The Cables
NEO S-Series User Guide 4.14 Connecting the cables 4.14.1 Connecting the power cord High voltage DANGER Risk of electric shock Use only approved power cords. Observe local health and safety requirements and guidelines for manual material handling. Usage of not approved power cords... -
Page 29: Connecting The Sas Cable
NEO S-Series User Guide Figure 11 Connect the FC cable 2. Attach the other end of the FC cable to a switch or HBA. 4.14.3 Connecting the SAS cable Use only cables specified for your LTO SAS tape drive. NOTE Each SAS tape drive has a mini-SAS connector. - Page 30 NEO S-Series User Guide The connection to the Ethernet network is via an industry stand RJ45 copper interface on the rear panel of the library. The Ethernet connection is used to access the library RMI over the network. To connect the library to the Ethernet network, inset the Ethernet cable into the Ethernet port of the library, see Chapter Error! Reference source not found.
-
Page 31: Verifying The Host
4.16 Powering up/down the library Press the power button on the front bezel to power up/down the NEO S-Series Tape Library. The powering up can take a few minutes including scanning the inventory and configuration (e.g. drives installed) In the following figure, a 4U library is shown as an example. -
Page 32: Using And Maintaining Tape Cartridges
NEO S-Series User Guide Table 5: LTO-6 Tape Drive Cartridge Type LTO-6 Ultrium 6.25 TB Data Cartridge LTO-5 Ultrium 6.25 TB WORM Data Cartridge Ultrium Universal Cleaning Cartridge LTO-3 and later tape drives support both rewriteable and WORM data NOTE cartridges. -
Page 33: Labeling Tape Cartridges
NEO S-Series User Guide 5.1.2 Labeling Tape Cartridges The device contains a bar code reader that reads the tape labels and stores the inventory data in memory. The device then provides the inventory information to the host application, OCP, and RMI. Having a bar code label on each tape cartridge enables the bar code reader to identify the cartridge quickly, thereby speeding up inventory time. -
Page 34: Read And Write Compatibility
NEO S-Series User Guide Slide the switch to the right to write-protect the cartridge. An indicator, such as a red mark or small padlock, is visible showing that the cartridge is write-protected. Insertion Arrow Barcode Label Write-Protect Switch Write-Protected Write-Enabled 5.1.4 Read and Write Compatibility... -
Page 35: Magazines
NEO S-Series User Guide Magazines The NEO S-Series Tape Library makes use of removable magazines in each model. Tape cartridges are stored in magazines. Magazines may be removed and inserted individually. Magazines are locked to prevent unauthorized removal when inserted in the library and unlock Magazine access may become password protected. For safety reasons, the robotic motion is stopped whenever when a magazine is removed from the library. -
Page 36: Mail Slot
NEO S-Series User Guide Figure 16 Slot numbering scheme (4U) 5.2.2 Mail slot Mail slots are used to import/export individual tape cartridges without interrupting the library operation. The command to open the mail slot may be denied if the robotics is busy with some operation. In that case “Busy“ is displayed on the OCP and the command has to be repeated once the robotics operation is finished. -
Page 37: Operating The Library
NEO S-Series User Guide Operating the Library The library provides two main interfaces: Operator control panel (OCP) — With the OCP, you can monitor, configure, and control the library from the front panel. Remote management interface (RMI) — With the RMI, you can monitor, configure, and control the library from a web browser. -
Page 38: Moving Media Within The Library
NEO S-Series User Guide 4. Numeric error codes are only used for unrecoverable, fatal errors (see chapter Main error codes, Page 145), otherwise text status messages are provided. 6.1.3 Moving media within the library Choose the appropriate library model: 1U library:... -
Page 39: Note About The Led's
NEO S-Series User Guide Figure 17 Home screen (OCP - 1U) 6.2.2 Note about the LED’s All LED’s are updated during power up and reset sequences. Upon power up or after software reset, the library will illuminate all LED’s as soon as POST allows. This will help the user to verify if all LED’s are functional. When initialization starts, all LED’s will be extinguished and the ready/activity LED will flash at a rate of approximately 1-... -
Page 40: Input Modes (Ocp Navigation)
NEO S-Series User Guide 6.2.3 Input modes (OCP Navigation) There are several modes to enter values in the different menu items within the OCP. These modes differ depending upon the menu item selected. The data entry modes are selectable predefined values, toggle values (e.g. on/off) and numerical value entry like network addresses. -
Page 41: Menu Flow Charts
NEO S-Series User Guide 6.2.5 Menu flow charts Figure 18 Menu symbol key (OCP - 1U) 10400645-001 © 2014 Overland Storage, Inc. Page 41... - Page 42 NEO S-Series User Guide Figure 19 Main menu (OCP - 1U) 10400645-001 © 2014 Overland Storage, Inc. Page 42...
- Page 43 NEO S-Series User Guide Figure 20 Information menu (OCP - 1U) 10400645-001 © 2014 Overland Storage, Inc. Page 43...
- Page 44 NEO S-Series User Guide Figure 21 Library information menu (OCP - 1U) 10400645-001 © 2014 Overland Storage, Inc. Page 44...
- Page 45 NEO S-Series User Guide Figure 22 Drive information menu (OCP - 1U) 10400645-001 © 2014 Overland Storage, Inc. Page 45...
- Page 46 NEO S-Series User Guide Figure 23 Inventory menu (OCP - 1U) 10400645-001 © 2014 Overland Storage, Inc. Page 46...
- Page 47 NEO S-Series User Guide Figure 24 Commands menu (OCP - 1U) 10400645-001 © 2014 Overland Storage, Inc. Page 47...
- Page 48 NEO S-Series User Guide Figure 25 Configuration menu (OCP - 1U) 10400645-001 © 2014 Overland Storage, Inc. Page 48...
- Page 49 NEO S-Series User Guide Figure 26 Configuration menu, continuation (OCP - 1U) 10400645-001 © 2014 Overland Storage, Inc. Page 49...
- Page 50 NEO S-Series User Guide Figure 27 Drive configuration menu (OCP - 1U) 10400645-001 © 2014 Overland Storage, Inc. Page 50...
- Page 51 NEO S-Series User Guide Figure 28 Service menu (OCP - 1U) 10400645-001 © 2014 Overland Storage, Inc. Page 51...
- Page 52 NEO S-Series User Guide Figure 29 Library service menu (OCP - 1U) 10400645-001 © 2014 Overland Storage, Inc. Page 52...
- Page 53 NEO S-Series User Guide Figure 30 Drive service menu (OCP - 1U) 10400645-001 © 2014 Overland Storage, Inc. Page 53...
-
Page 54: 4U Operator Control Panel (Ocp)
NEO S-Series User Guide Figure 31 Drive FW Upgrade menu (OCP - 1U) 2U, 4U Operator control panel (OCP) 6.3.1 Power-Up Display When the library powers up, or resets, it goes through several internally controlled processes that initialize and prepare the unit for normal operation. These processes are called Power-On-Self-Test (POST). While the POST is in process, the OCP will have appropriate information displayed to keep the user informed. -
Page 55: Note About The Led's
NEO S-Series User Guide Figure 32 Home screen (OCP - 2U, 4U) 6.3.2 Note about the LED’s All LED’s are updated during power up and reset sequences. Upon power up or software reset, the library will illuminate all LED’s as soon as POST allows. This will help the user to verify if all LED’s are functional. When initialization starts, all LED’s will be extinguished and the ready/activity LED will flash at a rate of approximately 1-... -
Page 56: Power On/Off
NEO S-Series User Guide Toggle values Toggle values are used to switch between two different states like on and off. After navigating to the menu item the display shows the actual state. Pressing the <ENTER> button will switch to the possible new state. Pressing <ENTER>... -
Page 57: Menu Flow Charts
NEO S-Series User Guide 1.1.1 Menu flow charts Startup Screen Home Screen Mainmenu Commands Service Information Menu Menu Menu Configuration Menu Figure 33 Main menu (OCP - 2U, 4U) 10400645-001 © 2014 Overland Storage, Inc. Page 57... - Page 58 NEO S-Series User Guide Information Menu Library Status Library Info Drive Info Library Identity Drive Identity Drive Status Library Network-General Library Error Log Library IPv4 Settings- example Figure 34 Information menu 1 of 2 (OCP - 2U, 4U) 10400645-001 © 2014 Overland Storage, Inc.
- Page 59 NEO S-Series User Guide Information Menu Inventory View License key Magazine Inventory Drive Inventory Figure 35 Information menu 2 of 2 (OCP - 2U, 4U) 10400645-001 © 2014 Overland Storage, Inc. Page 59...
- Page 60 NEO S-Series User Guide Commands Menu Open Mailslot Unlock Magazines Move Medium Reinventory Figure 36 Commands menu (OCP - 2U, 4U) 10400645-001 © 2014 Overland Storage, Inc. Page 60...
- Page 61 NEO S-Series User Guide Configuration Menu Logical Library Restore Defaults Library Settings Set Date and Time Set Access PIN Network Save Library Config Drive Restore Library Config Add License Key Drive (example SCSI) Figure 37 Configuration menu (OCP - 2U, 4U) 10400645-001 ©...
- Page 62 NEO S-Series User Guide Service Menu Library Verify Service Menu-Library Run Tests Display Contrast Dump all USB Reboot Library FW Upgrade by USB Upload Skin file Figure 38 Service menu 1 of 2 (OCP - 2U, 4U) 10400645-001 © 2014 Overland Storage, Inc.
- Page 63 NEO S-Series User Guide Service Menu Clean Drive Service Menu-Drive Drive Test Drive Power Drive FW Upgrade by USB Figure 39 Service menu 2 of 2 (OCP - 2U, 4U) FC drive dialog Values Comments Firmware Revision String Vendor ID...
-
Page 64: Remote Management Interface
NEO S-Series User Guide Loop ID A -- | 0..127 Topology B Auto | point to point | arb loop Speed B Auto | 1 | 2 | 4 | 8 Gb/s Loop ID B -- | 0..127 SAS drive dialog... -
Page 65: Status Icons As Shown By The Rmi
NEO S-Series User Guide • Viewing the static library identity, Page 66 • Viewing the static drive identity, Page 66 • Viewing the static drive identity, Page 66 2. Status • Viewing the dynamic library identity, Page 68 • Viewing the dynamic drive identity, Page 70 •... -
Page 66: Login
NEO S-Series User Guide 6.4.4 Login NOTE Some options of the RMI take the library offline. This inactive mode can interfere with host-based application software, causing data loss. Make sure the library is idle before attempting to perform any remote operations that will take the library offline. - Page 67 NEO S-Series User Guide Figure 41 Library identity (RMI) The following information is displayed: • Library information: • Serial Number • Product ID • Currently Installed Library Firmware • Bootcode Firmware Revision • Bar Code Reader • WWide Node Name •...
-
Page 68: Status
NEO S-Series User Guide Drive information (up to 4 full-high or 8 half-height tape drives): • Vendor ID= Manufacturer identification of the drive • Product ID= Model identification of the drive • Serial Number= Serial number of the drive • Firmware Revision= Operating firmware level of the drive •... - Page 69 NEO S-Series User Guide Figure 44 Library status (RMI) Library status: • Status =Indicates library is ready to accept commands • Cartridge in Transport=Indicates robot has a cartridge • Number Of Moves (Odometer)=Indicates total number of moves • Total Power On Time= Indicates total library power on time •...
- Page 70 NEO S-Series User Guide 6.4.6.2 Viewing the dynamic drive identity This page provides detailed information about all drives that are present in the library. If multiple tape drives are installed in the library, the information will be shown by selecting it from the pull down menu.
-
Page 71: Configuration
NEO S-Series User Guide <> button activated Figure 47 Tape cartridge inventory (RMI) 6.4.7 Configuration 6.4.7.1 Changing the System Configuration This page allows the user to change the system configuration. 10400645-001 © 2014 Overland Storage, Inc. Page 71... - Page 72 NEO S-Series User Guide Figure 48 System Configuration (RMI) The following information is displayed: Library Master Drive = The drive number the library LUN will be hosted by (appear as a LUN of) Library Mode Specifies the library mode for the library. The library supports three behavior modes: Random, Sequential, and Automatic.
- Page 73 NEO S-Series User Guide After selecting, a warning page will inform the user of the impact of their proposed change. In some cases, a pop-up screen will ask the operator to confirm their change. Many changes will also require a reboot.
- Page 74 NEO S-Series User Guide 6.4.7.5 Changing the Network configuration This page shows the current network configuration of the library related to the RMI access and allows modification to the configuration. When a change is requested, a pop-up window will ask to confirm the changes. Changes in this menu may affect the ability to access the RMI unless the correct IP address is resolved.
- Page 75 NEO S-Series User Guide Subnet Mask-Used to set the Network Mask, contact your Network administrator to receive this setting address if required. Gateway address- Used to set the Gateway Address, contact your Network administrator to receive this setting address if required (used when an IP address does not match any other routes in the routing table) IPv4 DNS Server 1 This is the IP address of your name server (DNS server).
- Page 76 NEO S-Series User Guide Figure 53 SNMP (RMI) Changes that can be made are: • SNMP • SNMP Enabled • IPv4 SNMP Target Addresses IPv4 Target 1 IPv4 Target 2 IPv4 Target 3 • IPv6 SNMP Target Addresses IPv6 Target 1...
- Page 77 NEO S-Series User Guide • Service: allows viewing and modification of all possible entries incl. on the configuration tab the Trace level and Trace filter selection options. In any other log level these are disabled. Figure 54 User settings (RMI) Changes that can be made are: •...
- Page 78 NEO S-Series User Guide Figure 55 Date/time (RMI) Changes that can be made are: Clock Configuration • Time (24 hour format) : hh:mm:ss • Date: MM:DD:YYYY • Clock Synchronization Configuration (SNTP): Enable Clock Synchronization: check box=checked status means enabled and the unit will attempt to synchronize its clock with an external time source, the following apply;...
- Page 79 NEO S-Series User Guide Figure 56 Error Log mode (RMI) Selections that can be made are: • Error Log Mode • Trace Level • Trace Filter 6.4.7.10 Setting event for Email Notification parameters This page allows the user to modify the event notification parameters.
-
Page 80: Operations
NEO S-Series User Guide Figure 58 Factory defaults (RMI) Selections that can be made are: Configuration Reset • Restore factory defaults: Selection of this button will restore all factory default settings as outlined in section 8.7. Please note that OEM library applications may require operational settings which differ from the factory default settings. -
Page 81: Service
NEO S-Series User Guide 6.4.8.2 Determining current media Inventory This page allows the user to rescan the library to determine the current media inventory. Figure 60 Media Inventory (RMI) Inventory scan will only be applied after the <Rescan> button is selected. - Page 82 NEO S-Series User Guide Selections that can be made are: • System Test • Slot To Slot Test Selects the number of test cycles (No Cycles) before starting the test. To cancel the test before it completes the cycles, select the <Stop> button.
- Page 83 NEO S-Series User Guide Figure 64 Firmware (RMI) 6.4.9.4 Reboot of the library NOTE Ensure that the library is idle before attempting to perform any remote operations that will take the library offline. Some options of the RMI take the library offline. This inactive mode can interfere with host-based application software, causing data loss.
- Page 84 NEO S-Series User Guide Select the appropriate logs for: • Log Type: Error Trace Informational Trace Warning Trace Configuration Change Trace Standard Trace • Total Number Of Entries • Start Entry • Number Of Entries Per Page Changes will only be applied after the <Update> button is selected. <Clear Log> erases the log.
-
Page 85: Partitioning The Library
NEO S-Series User Guide Figure 68 Cartridge Memory (RMI) Partitioning the library Depending on the unit form factor, the number of drives present in the library and the utilized drive types it is possible to create up to 4 logical libraries (partitions). The logical libraries resource allocation is magazine related; this means the number of available slots correlates to the magazine borders (12 slots per magazine). -
Page 86: Mixing Of Drives
NEO S-Series User Guide 6.5.2 Mixing of drives The 4U library supports a mix of drives from different LTO generations in the same physical library and the same logical library. They also support a mix of SAS and FC interfaces in the same physical library and the same logical library. - Page 87 NEO S-Series User Guide Figure 70 2-Partition-System (drives and correlated magazines) Configuration of a 3-Partition-System Must have at least three drives installed. A drive must be installed in drive position 1, another drive must be installed in drive position 2, and another drive must be installed in either drive position 3 or drive position 4.
- Page 88 NEO S-Series User Guide Figure 71 3-Partition-System (drives and correlated magazines) 10400645-001 © 2014 Overland Storage, Inc. Page 88...
-
Page 89: Scsi Element Addressing
NEO S-Series User Guide Configuration of a 4-Partition-System Must have four drives installed. Each partition will contain one drive and one magazine. Figure 72 4-Partition-System (drives and correlated magazines) 6.5.3 SCSI element addressing General Addressing Scheme Every logical library starts at the first drive slot with the current assigned element start address (default value 256). It will be incremented from bottom to the top slots for every drive slot. -
Page 90: Element Reporting
NEO S-Series User Guide 4U Unit with FH & HH drives (1 logical library) SCSI Element Slot 6.5.4 Element reporting The SCSI specification does not allow gaps in the SCSI element addressing. There is a special handling needed for drive slots, which are empty to fulfill the specification. Also drives which are temporary removed needs to be handled correct to not confuse the attached host and host application. - Page 91 NEO S-Series User Guide In case of installing a drive in a gap, the SCSI elements will be renumbered in contiguous order without a gap. 4U Unit with 3 HH drives SCSI Element Slot 6.5.4.3 Removed Drives Removed drives will report a SCSI element, which is not accessible until one of the following conditions occurs:: •...
-
Page 92: Default Settings
NEO S-Series User Guide Default settings Setting Default for the library Initial admin password adm001 Host name Test88 Domain name TestXXX.de IPv4 Enabled IPv6 Disabled DHCP Disabled Mail slot configuration Disabled Configure reserved slots Reserved slots = 0 SCSI master drive The lowest physical drive is initially the LUN master drive. -
Page 93: Acronyms And Abbreviations
NEO S-Series User Guide Acronyms and Abbreviations Fibre Channel Full Height Host Bus Adapter Half Height Logical Unit Number Operator Control Panel Remote Management Interface Storage Area Network Serial Attached SCSI SNMP Simple Network Management Protocol Secure Shell Secure Socket Layer... -
Page 94: Technical Specifications
NEO S-Series User Guide Technical specifications Hardware specifications Form factor Height Product alone: Product alone: Product alone: 45.6 mm 87.6 mm 175,2 mm Packaged: Packaged: Packaged: 235 mm 248 mm 330 mm Width Product alone: Product alone: Product alone: 444.5 mm 447.5 mm... -
Page 95: Operating Environment
-22 to 33000 feet (-7 m to 10000 m) Table 5 Operating environment Maximum storage capacity and data transfer rate Characteristics Specification NEO S-Series tape library with LTO4 drive(s) Maximum storage capacity Native: 6,4/19,2/38,4TB (8/24/48/96 data cartridges) Compressed: 12,8/38,4/76,8TB (assuming 2:1 compression) 10400645-001 ©... - Page 96 Compressed: 240 MB/s (864 GB/h) (assuming 2:1 compression) Interface 3 GB/s SAS (drive dependent) 4 GB/s FC NEO S-Series tape library with LTO5 drive(s) Maximum storage capacity Native 12/36/72 TB (8/24/48/96 data cartridges) Compressed: 24/72/144 TB (assuming 2:1 compression) Maximum data transfer rate...
-
Page 97: Electrostatic Discharge
NEO S-Series User Guide Electrostatic discharge To prevent damaging the system, be aware of the precautions you need to follow when setting up the system or handling parts. A discharge of static electricity from a finger or other conductor may damage system boards or other static-sensitive devices. -
Page 98: Regulatory Information
NEO S-Series User Guide Regulatory Information NOTE To comply with the following regulations and standards, the library must be properly installed in an office or industrial environment with shielded cables and adequate grounding of the SCSI bus and the input power. -
Page 99: Device Standards
NEO S-Series User Guide 10.2 Device standards • ANSI Small Computer System Interface-2 (SCSI-2), X3.131 – 1994 • ANSI SCSI-3 Primary Commands, X3.301 - 1997 • ANSI Information and Technology. SCSI-3 Medium Changer Commands (SMC), NCITS.314:1998 • ANSI SCSI Parallel Interface-2 (SIP-2), X3.302:1998 •... -
Page 100: Fcc (United States)
NEO S-Series User Guide 10.5 FCC (United States) The computer equipment described in this manual generates and uses radio frequency (RF) energy. If the equipment is not installed and operated in strict accordance with the manufacturer’s instructions, interference to radio and television reception might result.
Need help?
Do you have a question about the NEO S-Series and is the answer not in the manual?
Questions and answers