Table of Contents

Subscribe to Our Youtube Channel
Related Manuals for EOS ECON S2


Summary of Contents for EOS ECON S2
- Page 1 I N N O V A T I V E S A U N A T E C H N O L O G Y ECON S2 control unit for steam generator SteamRock Basic Installation and operating manual Made in Germany Firmware <...
-
Page 2: Table Of Contents
Fan connection ............................. 12 Dosing pump connection ......................... 12 Installation diagram ..........................13 Terminal layout ............................. 13 Connection example for Econ S2 and SteamRock Basic ............14 Heating time limitation ..........................15 Protection fuses in the control unit ..................... 15 Operation ..............................16 General .............................. - Page 3 Start time pre-selection / timer....................28 Enabling start time pre-selection ..................... 29 Disabling start time pre-selection ................... 29 Holiday home mode / holiday park mode ..................32 Error messages ............................33-34 “Switch-off” unit switch..........................35 Service address ............................36 General Terms and Conditions of Service ..................37...
-
Page 4: Scope Of Delivery
Delivery scope Please verify that you have got all components which belong to the standard delivery. Contol unit Econ S2 Temperature sensor Ø15 x 65 mm including separate 5 m connection cable 3 mounting screws 4 x 25 mm. 5 rubber grommets for connection cables... -
Page 5: Specifications
Specifications Power supply: 230 V 1 N AC 50 Hz Switching capacity: 3 kW resistive load (AC1 operation) with 16 A protection Heating time limitation: 6 h / 12 h / unlimited (via jumper setting) Temperature control range: 30°C to 50°C Temperature sensor: KTY type in metal housing Ø15 x 65 mm Hysteresis:... -
Page 6: General Information About Steam Rooms
General information for steam baths Dear customer, On purchasing this control unit, you have ac- quired a high-quality device that was devel- oped and manufactured in compliance with the latest standards and quality guidelines. Please note that perfect interaction of the steam bath cabin, the steam generator and control unit must be guaranteed to achieve the typical pleasant steam bath atmosphere in your... -
Page 7: General Safety Advices
General Safety Regulations this device can be used by children aged correctly, and there is a very low tempera- • 8 upwards and by persons with physical, ture fluctuation in the steam cabin. sensory, or mental disabilities, or persons the unit may only be used as intended as •... - Page 8 caution! Dear customer, in compliance with the current regulations, only a qualified electrician may connect the electrical elements of the steam generator or the steam bath control unit. we would like to remind you that, in case of a warranty claim, you will need to pro- vide a copy of the authorised electronics company's invoice.
-
Page 9: Installation
Installation of the control unit Fasten the housing bottom at the two bot- tom openings (Fig. 4) firmly to the cabin wall. Installation location The control unit may be only mounted outside steam room on a suitable wall surface. Please follow the instructions for installation: Fig. -
Page 10: Semi-Recessed Installation
Recessed installation 1. Cut out a wall section that is at least 3.5 cm deep according to the dimension in Fig. 5. 21 cm Fig.5 Insert the supplied rubber grommets into the openings at the rear wall of the housing and insert the connecting cables through these openings. -
Page 11: Sensor Connection
Temperature sensor installation Do not install sensor and power supply lines together, or lead them through the same duct. Install- ing these together may lead to malfunctions in the electronics, e.g. error messages. Any cable shielding (if any) must be connected to the earth in the control unit. Please note that the following information about sensor position provides only a guideline for the optimal climate and temperature regulation in a standard cabin. -
Page 12: Electrical Connections
Electrical connections Cabin light connection Connect the cabin lamp as per wiring diagram. ! Attention! Do not attempt to install or repair the unit The lamp should have at least IPX6 pro- tection class and should be suitable to the by yourselves. -
Page 13: Installation Diagram
Connections overview SteamRock Basic optional ECON 230 V 1 N AC 50 Hz 400 V 3 N AC 50 Hz Main board overview 6 Std 12 Std unendlich 12 24 12 24 12 24 Jumper JP5 for hea- ting time limitation sensor connector connector for re- mote essence dos-... -
Page 14: Connection Example For Econ S2 And Steamrock Basic
ECON S2 connection to SteamRock Basic steam generator ECON S2 optional remote switch for essence dosing ST1 N essence ST2 L N dosing pump light S1 Wb ST1 A2 (Gr) Fragrance SteamRock Basic 230 V AC 50 Hz essence container... -
Page 15: Heating Time Limitation
Heating time limitation The heating time limitation can be adjusted with the JP5 jumper position on the main board of the control unit. You can set the limitation to 6 hours, 12 hours or set the heating time to unlimited (manual) mode. -
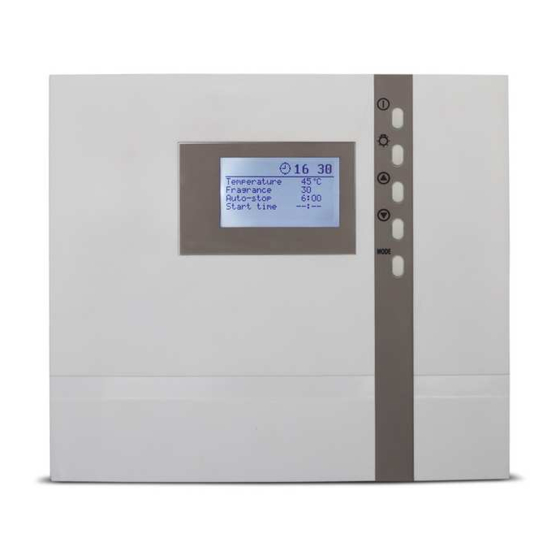
Page 16: Operation
Operation Once the control unit has been installed with all components and all covers have been fixed, you can put your sauna unit into operation. The following pages provide the detailed explanation, how to operate your control panel and make all necessary settings. General Details Operation elements MODE... -
Page 17: Basic Display In „Stand By
Interface in stand by is shown if the control unit is in stand-by model 12:00 The display will automatically switch this in- Temperature 30°C Fragrance terface from any state if no button has been Auto-Stop 6:00 pressed within >15 sec. Start time - - : - - Interface during active heating... -
Page 18: Cabin Lighting
In order to adjust the individual values to the particular preference, briefly press the MODE 12:00 -button out of Stand-by. Temperature 30°C Fragrance The first parameter will then be highlighted in Auto-Stop 6:00 inverted colour. and You can then select the de- Start time - - : - - sired parameter with the... -
Page 19: First Switching / Commissioning
Initial commissioning Language selection Unit setup starts with language setting. You 12:00 can choose from 12 languages. Use up/down button to select language, press “mode” for 3 sec to confirm. 12:00 > 3 Sec MODE Time setting Set the time of day. 00:00 Time of day First set hours. -
Page 20: Navigation Language Selection
Fan setting 12:00 range 0 - 2 Set the fan operation mode by selecting the setting value from 0 to 2. 0 = fan disabled during heating, fan will run only af- ter the heating (cabin dry cycle) 1 = fan is on during steam off intervals (active heat- ing) + fan runs after heating (cabin dry program) 12:00 2 = fan is always on if heating is on, + fan runs after... -
Page 21: Enabling / Disabling Child Lock
Operation Language and time adjustment The navigation menu language and time setting may be adjusted at any time after the initial com- missioning. Press “mode” + “down” button to launch setting menu and proceed with adjustments. Press „mode“ Press „mode“ 12:00 12:00 „down“... -
Page 22: Switching The Heating On
Fan mode adjustment Adjustment of fragrance dosing & & MODE MODE 00:00 00:00 Time of day Time of day : 00 : 00 12:15 12:00 MODE MODE 12:15 12:00 12:15 12:00 MODE > 3 Sec MODE > 3 Sec Possible settings: 0 = fan disabled (cabin-dry mode enabled) 1 = fan on during steam production intervals 2 = fan on during active heating... - Page 23 Child lock (hotel mode) Switching the heating on If the child lock is activated (the key symbol is 12:00 visible in the top section of the display) only the Temperature 30°C cabin lighting can be switched. All other but- Fragrance Auto-Stop 6:00 tons are without function.
-
Page 24: Personal Settings
Individual settings You can adjust all parameters to suit your individual requirements. The parameters may be adjust- ed in stand-by and in active heating state, all changes will be saved in the memory. All adjustments made during active heating are applied immediately. Temperature setting Temperature control range: 30 - 50°C... - Page 25 Auto-Stop 6:00 Start time - - : - - *For EOS dosing pump, depending on the position of the rotation rolls Injection duration per cycle is set during initial setup of the control unit (see page 19). > 3 sec.
-
Page 26: Heating Time Setting (Auto-Stop)
Essence dosing with an external manual dosing switch Alternatively to the automatic essence dosing you can switch the essence dosing manually through an optional remote switch button. For connection see page 14. Upon connection of the button the automat- ic dosing is as before possible. The switch will enable or disable the automatic dosing if the dosing interval is set to a value 1 - 30. - Page 27 Auto-Stop / Heating time limitation Auto-Stop is the heating time duration. After NOTICE: Auto-Stop time is the heating time duration, not the stop time in real time! the heating time pre-set with this function ex- pires the heating will automatically stop. Default setting is 6 hours.
-
Page 28: Start Time Pre-Selection / Timer
During active heating 12:00 Temperature 30°C Fragrance 12:00 Auto-Stop 3:30 Start time - - : - - Temperature 30°C Fragrance Auto-Stop 6:00 MODE > 3 sec Start time - - : - - 12:00 MODE Temperature 30°C Fragrance 12:00 Auto-Stop 3:30 Start time - - : - -... -
Page 29: Enabling Start Time Pre-Selection
Time pre-selection Start time pre-selection allows you to program the automatic start time up to 24 hours in advance or to get the heating switched on automatically at the given time on every day. This setting can be made in stand-by and during active heating. If you wish to switch your sauna on manually make sure that the Start Time paramater is set to „--:--“. - Page 30 Start time 1 7 : 1 0 Single Event Timer / Recurring Switching Timer Econ S2 features two possible time pre-selec- switched on only once. By recurrent switching tion timers - a single event timer and an auto- timer the steam room will be switched on matic recurring switching timer.
- Page 31 Deactivating the timer Active timer mode is indicated by a bell symbol (con- 12:00 tinuous or flashing) and by a flashing start time. Temperature 45°C Fragrance Auto-Stop 5:59 Start time 17:10 The “bell” symbol shall disappear. The timer is now 12:00 deactivated.
-
Page 32: Holiday Home Mode / Holiday Park Mode
Holiday Home mode Holiday Park mode Symbol flashes In “Holiday Home” mode the control unit is By “Holiday Park” all functions and settings locked so that a user will have a only few essen- except for heating on/off and light on/off are tial settings and functions at this disposal. -
Page 33: Error Messages
Error Messages & Troubleshooting The control continuously monitors the temperature sensor as well as the connected steam gener- ator (Steamtec II Basic only). Following are the possible error messages: Error message Possible fault Remedy = interrupted room sensor circuit. Arrange for a specialist to 12:00 The temperature sensor (KTY) is check the lines and sensor. - Page 34 = Descaler container empty Refill the descaler (cleaner) con- 12:00 tainer of the steam generator. Other symbols / special modes Symbol flashes = pending descaling / cleaning Steam generator waits for pending 12:00 descaling / cleaning cycle. Temperature 45°C Fragrance Auto-Stop 6 : 0 0 Start time...
-
Page 35: Switch-Off" Unit Switch
The device „Switch-off“ switch The control unit is equipped with a “Switch-off” rocker switch. You will find this switch on the top side of the housing by Econ series control units and on the left side of the main relay box by control units of Emotec, EmoStyle and EmoTouch series. -
Page 36: Service Address
2012/19/EU. Do not dispose it with the normal household waste. Service Address: EOS Saunatechnik GmbH Schneiderstriesch 1 35759 Driedorf, Germany Tel: +49 (0)2775 82-514 Fax: +49 (0)2775 82-431 servicecenter@eos-sauna.de www.eos-sauna.de... -
Page 37: General Terms And Conditions Of Service
General Terms and Conditions of Service shipments via parcel post. The manufacturer shall accept no liability for damage incurred as a result of improper I. Scope packaging in an individual shipment. Unless otherwise agreed in writing in a specific case, VI.
Need help?
Do you have a question about the ECON S2 and is the answer not in the manual?
Questions and answers