EOS EMOTEC DC 9000 User Manual
Hide thumbs
Also See for EMOTEC DC 9000:
- Assembly and operating instructions manual (39 pages) ,
- User manual (26 pages)
Table of Contents
Advertisement
Advertisement
Table of Contents

Related Manuals for EOS EMOTEC DC 9000


Summary of Contents for EOS EMOTEC DC 9000
- Page 1 User's Guide EMOTEC DC 9000 IP x4 Druck Nr. 29343180en / - 44.06...
-
Page 2: Table Of Contents
Table of Contents General information concerning sauna bathing ............... 3 Package contents ......................4 General safety precautions ....................4 Assembly of the control unit ....................4 Wall mounting ......................4 Electrical connection ......................6 Connecting the sauna oven ................... 6 Connecting the vaporizer .................. -
Page 3: General Information Concerning Sauna Bathing
General information concerning sauna bathing Dear customer, with purchase of this sauna control unit you For the cabin light use only light bulbs. Do opted for a superior quality, high-tech not use fluorescent lamps, energy saving electronic device which was developed and lamps and gas discharge lamps. -
Page 4: Package Contents
Package contents assembly instructions, especially when (subject to change) installing the temperature sensor. The Included with the control unit are: temperature above the oven is critical for temperature setting. 1. An heater-sensor board with overheat temperature can be held within operating shutoff protection, KTY-sensors with parameters and a minimal temperature sensor housing , two 3x25 mm... - Page 5 1. Remove the cover of the control unit. To ca. 34 cm do this press the fastening tab inwards with a flat screwdriver and remove the housing top by pivoting it upwards (Illust.1). Drill the threaded holes for the included 4 x 20 mm wood screws according to Illust.
-
Page 6: Electrical Connection
Electrical connection All electrical installations and connector cables inside the cabin must be able to The electrical connection may only withstand temperatures up to 140°C. Please be done by a qualified electrical use the table below to determine the required technician under authority of the cable diameters for this task. -
Page 7: Connecting The Sauna Lamp
Connecting the sauna lamp Mounting the oven sensor 1. Mount the oven sensor in cabins up to The sauna lamp must be splashproof (by 2 x 2m according to Illust. 7 and 8, in Standard IPx4) and resistant to ambient larger cabins according to Illust. -
Page 8: Operation
Sensor 5. After you are finished installing and have board made sure the control unit is functioning properly, check the line for overheat shutoff protection for short circuits. To do this, release one of the white lines in the sensor housing. The safety relay of the control unit should now fall;... -
Page 9: Switching On The Device For The First Time
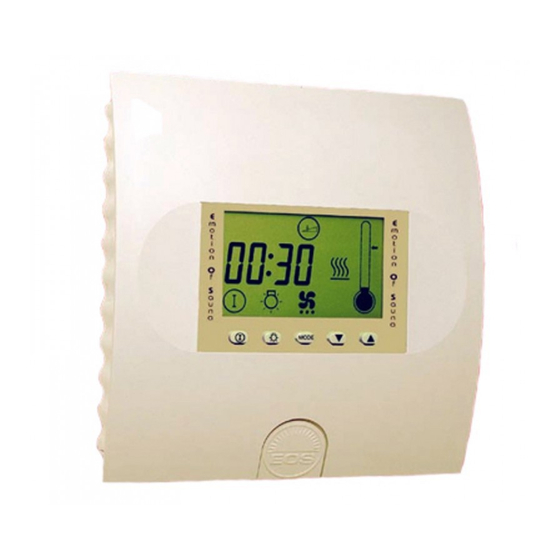
Switching on the device for the first time After checking all the connections once again, connect the device to the mains by switching on the fuses or mains switch. On the display appears the flashing notification. 12:03 Please chose the wished value with the " " and "... -
Page 10: Default Parameters
Default parameters Finnish sauna operation After switching on the screen displays the 20:03 current time and remaining heating time alternately. 05:58 Temperature indicator The temperature is indicated on the right side of the screen above the thermometer icon. Here the pre-selected temperature is Pre-selected indicated by an arrow to the right of the temperature... -
Page 11: Important Information For Programming
The sauna switches off automatically at the end of the selected heating time. 20:03 If you want to end your sauna before this time, press the " " button. The sauna is switched off. The screen indicates the current time. Please note the following when programming the unit The buttons to be used are shown in the text as follows. -
Page 12: Specialist Sections
Specialist section F1 Setting the current time For clock time adjustment please press "Mode" and " “ button synchron. (In the display appears "F1“ and the clock symbol.) Please confirm with the "Mode" button. 20:03 Please chose the wished value with the "... -
Page 13: Programming Sections
Programming section P1 Start with preset time You can use the time pre-selection to start your sauna within the next 24 hours. Always ensure that no objects are located on the sauna heater at the start of the heating process. Risk of fire! For the heating adjustment please press "Mode"button. -
Page 14: P2 Heating Time Limit
P2 Preset time mode The heating time limiter is fixed at 6 hours. After these time the sauna will automatic shut-off. the heating time limiter adjustment please press "Mode" button. Afterwards the " " button until in the display the the heating time symbol and "P2"... -
Page 15: P5 Temperature Setting
P5 Temperature setting The temperature is fixed on 95C for Finnish operation and 60C for Humidity operation. For temperature adjustment please press "Mode" button. Afterwards the " " button until in the display the heating symbol and "P5" appears. Please confirm with the "Mode" button. Please chose the wished value with the "... -
Page 16: P6 Programming Fan Mode
P6 Programming fan operation This control unit gives you the option of switching on a fan (max. 100W) and setting the fan speed individually to one of 3 stages. The default setting is „no fan mode“. Only in post heating operation after operation humidity the fan is default on the maximum step. -
Page 17: P7 Ability To Dim The Cubicle Lights
P7 Ability to dim the cubicle lights Please note that this function may only be programmed combination with incandescent bulbs. No phosphorous, energy-saving or gas discharge bulbs may be used. The default light setting is maximum. You can dim the cubicle lighting of your sauna as you wish. -
Page 18: Coloured Light (Optional)
Coloured light (optional) This programming option is only available if the coloured light module (item number 942761) has been installed. Switch off all power to the system before installing the coloured light module. You have the option of operating a coloured light device in your sauna using the HCS 9003 control unit. - Page 19 If coloured light mode is to be switched off use the previous instructions and set the value to „0“. IjIt goes without saying that the sauna lights can also be switched on and off in coloured light mode. To do so press the light switch as usual.
-
Page 20: P9 Setting The Time Interval For The Coloured Light
P9 Setting the time interval for the coloured light This programming option gives you the option of automatically setting the length of time each collour is on. The fefault is one minute. You can set on-time to between 1 and maximum 10 minutes.. For shining period adjustment please press "Mode"... -
Page 21: The Control Unit Switch
Control unit switch The control unit switch = unit The control unit switch can be found on the switched top end of the unit. Using this switch, you can isolate the electronics from the mains supply in case of a breakdown. In case of breakdown, press the control = unit unit switch on the left part of the rocker to... -
Page 22: Error Display
Error display In order to provide an immediate diagnosis for any errors that may occur, the following errors can be determined via on-screen error codes. Error code Error E 100 Temperature sensor paused E 101 Temperature sensor short circuit E 211 Excess temperature fuse paused Other error options that are not displayed and their causes: Screen is blank –... -
Page 23: Connection Diagram
Connection diagram Attention! Dear customer, according to the valid regulations, the electrical connection of the sauna heater and the control box has to be carried out through the specialist of an authorized electric shop We would like to mention to the fact that in case of a warrenty claim, you are kindly requested to present a copy of the invoice of the executive electric shop. -
Page 24: Guarantee
Equipment start-up date: Stamp and signature of the authorized electrician: Service address: EOS-Werke Günther GmbH Adolf-Weiß-Straße 43 35759 Driedorf, Germany Tel. +49 (0)2775 82-240 Fax +49 (0)2775 82-455 servicecenter@eos-werke.de...
Need help?
Do you have a question about the EMOTEC DC 9000 and is the answer not in the manual?
Questions and answers