Advertisement
Quick Links
Owner's Manual
Media Manager Elite Lectern
55258
Important
Before using this product:
• Read this manual
• Comply with all safety and operating instructions
• Ensure all parts and correct quantities are included
Any parts damaged during shipment must be reported within 5
days of receipt. To report information regarding missing parts or
damage, to purchase parts or accessories, or if you have any
questions, please contact us.
Thank you for purchasing Spectrum products!
??
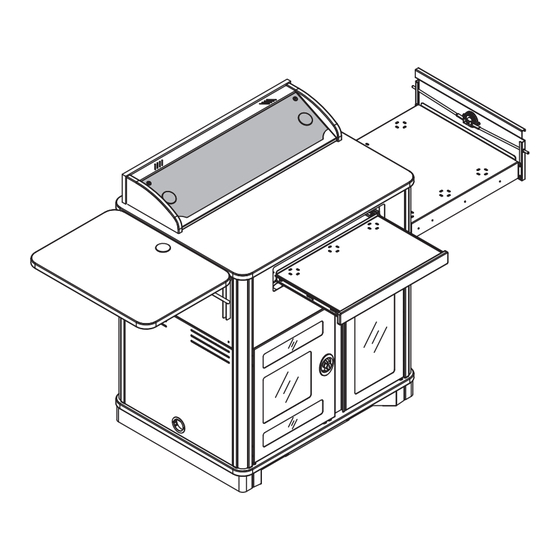
Media Manager Elite with surround,
left drawer, rack cube installed on right,
flip-up shelf on right
Avant d'utiliser ce produit:
• Veillez à lire ce guide
• Respectez les consignes de sécurité et d'utilisation
• Vérifiez que vous disposez de toutes les pièces
nécessaires à l'installation
Les pièces endommagées pendant le transport doivent faire
l'objet d'un rapport dans les 5 jours de leur réception. Veuillez
prendre contact avec nous si des pièces manquent ou sont
abîmées, si vous avez des questions, ou encore pour acheter
des pièces ou des accessoires.
Merci pour votre achat d'un produit Spectrum!
www.spectrumfurniture.com
Owner's Manual
Le manuel du propriétaire
El manual del propietario
™
Important
Specs
Spécifications
Especificaciones
Media Manager Elite with overbridge,
right drawer, rack cube installed on left,
and toe kick, flip-up shelf on left
Importante
Antes de utilizar este producto:
• Lea este manual
• Cumpla con todas las instrucciones de prevención de
accidentes y operativas
• Revise que todas las partes y las cantidades correctas
estén incluidas
Si alguna parte se dañó durante el embarque, deberá reportarla
en un lapso de 5 días a partir de la recepción. Para reportar
cualquier información sobre partes faltantes o dañadas, para
adquirirlas o comprar accesorios, o bien, si tiene alguna duda,
póngase en contacto con nosotros.
¡Gracias por adquirir productos Spectrum!
Video
Vidéo
Vídeo
0118738R9 Page 1 of 17
800-235-1262
Advertisement

Related Manuals for Spectrum Industries Elite Lectern 55258


Summary of Contents for Spectrum Industries Elite Lectern 55258
- Page 1 Owner’s Manual ™ Media Manager Elite Lectern 55258 Media Manager Elite with surround, Media Manager Elite with overbridge, left drawer, rack cube installed on right, right drawer, rack cube installed on left, flip-up shelf on right and toe kick, flip-up shelf on left Important Important Importante...
- Page 2 Hardware (6) 053310 (4) 0100167 1/4-20 x 40mm 8-32 x 1/2” PH JC bolts Thread-cutting screw (4) 052605 (1) 025039 1/4-20 x 15mm 4mm Hex (2) 0118608 (1) 0118607 JC bolts wrench Side skirt Audience-side skirt Toe Kick (included with select configurations) (1) 0118613 Toe Kick (1) 0118614...
- Page 3 Assembly / Setup 1. Install 3-piece skirt 1. Attach the two side skirts to the audience-side skirt with (4) 8-32 x 1/2” PH Thread-cutting screws. Figure 1A. 2. Move lectern into position over the assembled skirt as shown. Figure 1B. Side skirt Audience-side skirt 8-32 x 1/2”...
- Page 4 Audience-side Panel The audience-side panel can be removed to access the rear portion of the rack cube and lectern. 1. To remove the panel, open the document camera drawer fully. Figure 2A. 2. Unscrew the (2) knobs inside the lectern behind the audience-side panel and remove.
- Page 5 Quick-release Doors The doors can easily be removed for easier access using the quick- release hinge lever located on the upper hinge pin of each door. Figure 3A. To remove, lift the lever while lifting out the door. The doors can be switched to be hinged from the left or right-side. To switch the hinge side: Quick-release 1.
- Page 6 Keyboard Tray / Drawer Keyboard Tray Note: Can be used as a keyboard tray, or flipped and used as a drawer. Push here on both slides to release 1. To flip, pull the tray out fully and locate the black plastic lever on each slide.
- Page 7 Optional Flip-up Shelf installation Installation video available See www.spectrumfurniture.com (1) Flip-up shelf assembly 19.25”W [48.9 cm] (1) 039622 2” Grommet 7.5”H 26”D [19 cm] [66 cm] For metal side panels For laminate side panels (8) 0100167 (8) 051696 8-32 x 1/2” PH 8-32 x 1”...
- Page 8 2. Attach shelf brackets to lectern: Metal side panel fasteners (4) 8-32 x 1/2” PH Thread-cutting screws 1. Extend and lock each folding shelf bracket into the horizontal position. 2. Select the fasteners needed (Metal or laminate side panels) 3. Install the (4) lower screws into the side panel at the preferred height leaving about 1/4”...
- Page 9 Optional Overbridge Insert Panel Cutouts 1. Before you begin, refer to the panel dimensions in Figure 7B for Drill Drill bit Jigsaw or router maximum recommended cutout sizes. 2. Identify the size and position (left, centered, or right) of each cutout needed.
- Page 10 2” Grommet 2” Grommet Max cutout area Note: The max cutout areas shown are general recommendations only. Figure 7B The final location of the cutout(s) on the panel will be determined by: • The size of the cutout(s) • The vertical depth of the installed device •...
- Page 11 Optional Toe Kick 1. Position the toe kick panel on the floor in the preferred final lectern location. Figure 8A. 2. Mark the (4) mounting hole locations onto the floor. (The toe kick mounting holes are 1/2” dia.) 3. Drill suitable holes into the floor and anchor the toe kick with appropriate fasteners.
- Page 12 Caster Operation 1. Lock the brake levers to lock movement of the casters. (Two instructor-side casters only). Figure 9. 2. To resume operation, lift up on brake levers. Skirt Brake lever Moving and Parking the Lectern Figure 9 • Before moving, unplug and secure all power cords. •...
- Page 13 Accessories (Customer-installed when purchased separately) 12RU Rack Cube - 55197 • One rack cube can be installed • Can be secured to base panel on the left or right side of the • Cooling fan compatible Media Manager Elite Lectern •...
- Page 14 Insert panels are available to customers needing a replace- ment panel or different cutouts for technology upgrades. Overbridge Insert Panel-Large 96507 - Blank panel-Large 96507mod - Panel with cutout(s) • Panel for overbridge version only (overbridge not available separately) • Contact Spectrum to specify cutout size(s) and position(s) •...
- Page 15 Cooling Fan for Media Manager Series Lecterns - 99051 • Exhausts hot air from inside lectern • Installs inside lectern at top of rack cabinet • Mounts to side panel vent slots with two screws • Customer-installed Electric Fan: • Voltage: 115VAC •...
- Page 16 Si une maintenance est requise, communiquer avec Spectrum Industries pour obtenir de l’aide. Avertissement - Un enfant qui grimpe sur un meuble d’équipement Avertissement - Reloger un équipement audio ou vidéo sur un meuble non audio ou vidéo pourrait subir des blessures graves ou mortelles.
-
Page 17: Warranty
Product Registration Product Number: Dear customer, Spectrum Industries would like to thank you for your purchase. Please take a moment to register your product for valuable warranty and product information. Locate the product and serial numbers on the label located either on the inside of the front door, or under the main worksurface.
Need help?
Do you have a question about the Elite Lectern 55258 and is the answer not in the manual?
Questions and answers