Advertisement
Quick Links
Installation Instructions
Ground Fixed
TUTTI
Page 1 of 3
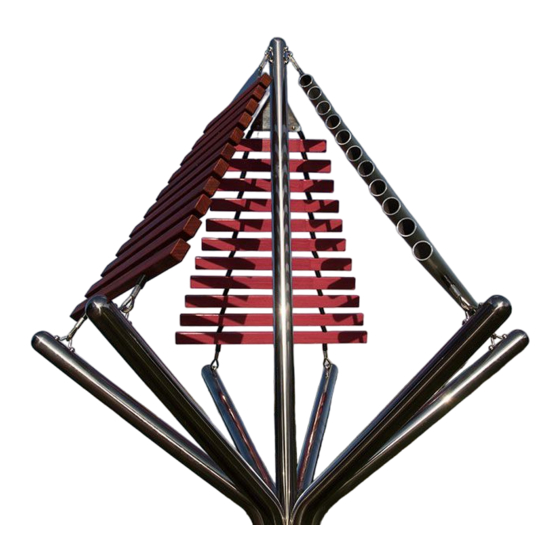
Instrument
Components:
M10 Nut
x18
x2
M6x20 Security Screw
x9
M6 Saddle Strap
x2
Metric Conversion:
300mm/ 12"
x2
500mm/ 1 ft 7
11
/
"
16
1555mm/ 61"
1.5m/ 59"
Weight of heaviest part (TUTTI Frame)
BS EN 1176
1. Unpack frame 7no.
2. Lay packaging out on floor
or assemble on non-abrasive
surface to prevent marking of
polished stainless steel.
3. Align holes on legs
(opposite end to polished
domes) and secure in place
using 3no. M10 x 200mm
threaded bar and 6no. M10
nuts provided. Colour Coded
Tools required 2no. 17mm
metric spanner/wrench (
inch or alternatively using
adjustable wrench) (See
Assembly Guide Sheet)
4. Invert assembled frame so
domed ends face upwards.
5. Insert 6no. M8x60mm
Screws into pre drilled holes
in frame using TX40 bit.
6. Attach 3No. Notes Panels to
Frame and beater to each arm.
x3
(See Assembly Guide Sheet)
3.Excavate 1 hole for the
Steel leg 300mm diameter by
minimum 500mm deep, in
desired location upon
decision from customer.
Ground Fix
Pair Small Red
Beaters X3
Components:
M10x200 Bolt
8. Locate (lower) legs into
hole making sure they are
vertical and level prior to
concreting in place.
5. Once happy with location
of the Instrument, fill hole
using rapid hardening
concrete. Be sure to compact
concrete around legs and
leave to dry according to
manufactures guidelines.
/
11
16
x3
x6
x6
M10 Nut
M8x60 Security Screw
Install Instrument
with 1.5m free space
1.5m
1.5m
(from widest point)
around it.
CAUTION: TUTTI
surface can get hot
in direct sunlight, if
possible install in
shaded areas.
1555mm
Ground Surface
Can be
installed
deeper if
500mm
required
Spares available from
percussionplay.com
or from your
local distributor
55 Kg
Advertisement

Related Manuals for Percussion Play TUTTI


Summary of Contents for Percussion Play TUTTI
-
Page 1: Installation Instructions
500mm deep, in 1555mm/ 61” deeper if 500mm 1.5m/ 59” required desired location upon decision from customer. Weight of heaviest part (TUTTI Frame) Spares available from Ground Fix Pair Small Red 55 Kg percussionplay.com or from your Beaters X3... - Page 2 TX 40 Driver Bit saddle straps on the Frame with the Ground Fixed M6x20mm Screws TX 30 Driver Bit provided TUTTI Page 2 of 3 (1.1) Components: M10x200 Threaded Bar M10 BZP Nut Attach one Red M8x60 Security Screw...
- Page 3 Foundations should not present a hazard. These foundations are recommended as a guide, for more information on foundation details for various surface see Part 7 of BS EN 1176. Ground Fixed Metric Conversion: 50mm/ 2” TUTTI 300mm/ 12” Page 3 of 3 500mm/ 20” 550mm/ 22” (1.1)
Need help?
Do you have a question about the TUTTI and is the answer not in the manual?
Questions and answers