Advertisement
Quick Links
moUnt Wall traCK to Wall
Using a Phillips
drive, remove
plastic cap on
one end of track.
Save this cap to
put back on when
track installation
is complete.
attaCh traCK adaPters
Attach 4 track adapters
to back of wall plate
by threading socket
head screws from
front of wall plate
into track adapters.
Loosely tighten
with 3/16" hex key.
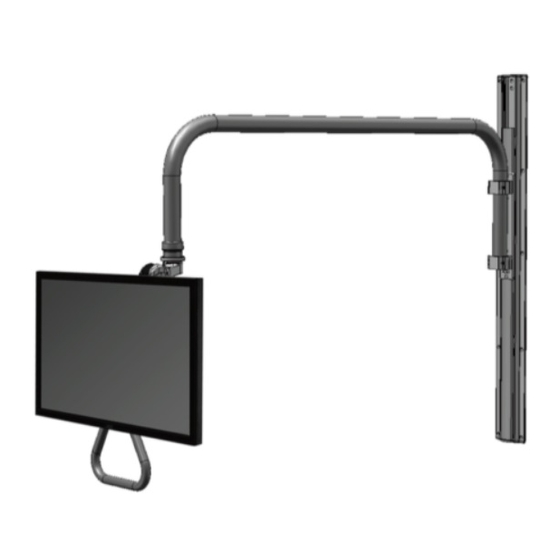
moUnt overhead arm
Slide overhead arm into
wall plate clamps. Firmly
tighten clamp screws on
left side with 3/16" hex key.
To adjust rotation tension
of arm, tighten or loosen
screws on right side of
clamps.
Page 1
Page 1 of 4
overhead arm installation
Ul182-ohat
Wall track mount
MAXIMUM LOAD CAPACITY:
Locate the wall stud and mark the top center hole of
the Wall Track. Drill a 11/64 pilot hole, insert a #14
screw and tighten slightly. Using a level, mark the 9
lower holes in the center of the track, drill pilot holes
and then insert the #14 screws. Use all 10 screws.
NOTE: #14 Wood screws are supplied with unit. If
installing into metal studs, you will need to replace
these with proper metal stud fasteners. All hardware
used to secure track mount must have a proper
countersunk head.
Track
Wall
adapters
plate
Insert screws
from front
Wall plate
clamps
28 Lbs (12.7 kg)
attaCh Wall Plate to traCK
Slide track adapters
into track from
either top or bottom.
Position wall plate to
desired location on
track. Firmly tighten
wall plate screws
with 3/16" hex key.
Clamp
screws
Tension
screws
OVERHEAD ARM INSTALLATION 01/20/16 pjm
Ul182 ohaP
Wall Plate mount
Wall Plate instructions on p.3
attaCh vesa to monitor
Attach VESA to monitor using
the four 4mm screws provided.
Advertisement

Subscribe to Our Youtube Channel
Related Manuals for ICW UL182 OHAP


Summary of Contents for ICW UL182 OHAP
- Page 1 Ul182-ohat Wall track mount Ul182 ohaP Wall Plate mount MAXIMUM LOAD CAPACITY: 28 Lbs (12.7 kg) Wall Plate instructions on p.3 moUnt Wall traCK to Wall Locate the wall stud and mark the top center hole of the Wall Track.
- Page 2 overhead arm installation overhead arm installation attaCh vesa With monitor PUll Wires throUGh arm to arm NOTE: Monitor is Pull wires through arm at this end not shown in order to illustrate mounting detail. Use cord provided inside overhead arm to pull wires through to the monitor.
- Page 3 overhead arm installation Ul182-ohaP Wall Plate mount MAXIMUM LOAD CAPACITY: 28 Lbs (12.7 kg) moUnt Wall Plate to Wall CENTEr MOUNTED ON ONE sTUD (16” or 24” spaced studs) Locate a stud in the wall where wall plate will be mounted, determine desired height, and mark the top (center) hole.
- Page 4 overhead arm installation moUnt overhead arm attaCh Cover Plate Slide overhead arm Snap cover plate onto into wall plate clamps. wall plate. Attach using 10- 24x3/8” Phillips head Firmly tighten clamp machine screws. screws on left side of Wall clamp with 3/16” hex plate clamps key.
Need help?
Do you have a question about the UL182 OHAP and is the answer not in the manual?
Questions and answers