Table of Contents
Advertisement
Advertisement
Table of Contents

Related Manuals for Rosslare AY-B9350


Summary of Contents for Rosslare AY-B9350
- Page 1 AY-B9350 Professional Fingerprint Reader User Manual...
- Page 2 ROSSLARE. ROSSLARE reserves the right to revise and change this document at any time, without being obliged to announce such revisions or changes beforehand or after the fact.
-
Page 3: Table Of Contents
AY-B9350 User Manual Table of Contents Table of Contents ..................... 3 1. Checking Before Use .................... 5 1.1. Safety Precautions ....................5 1.2. Reader Layout ......................7 1.3. Screen Information during Operation ..............8 1.3.1. Icon Information ....................8 1.3.2. Message Information ..................9 1.4. - Page 4 AY-B9350 User Manual 3.7. Terminal Setting ..................... 46 3.7.1. Sound ......................46 3.7.2. Terminal Option ....................47 3.7.3. Input setting ....................48 3.7.4. Lock Setting ....................49 3.7.5. External Terminal Setup ................. 50 3.8. Display Setting ....................... 51 3.8.1. Theme ......................51 3.8.2.
-
Page 5: Checking Before Use
AY-B9350 User Manual 1. Checking Before Use 1.1. Safety Precautions l Warning Do not operate the device with a wet hand. Do not allow liquid such as water device heat into the device source near the device. -> It can cause fire. - Page 6 AY-B9350 User Manual l How to use touch screen To select the function you want, touch lightly with your fingertip. When the touch is recognized, the color of button or icon will be temporarily reversed and return to the original color.
-
Page 7: Reader Layout
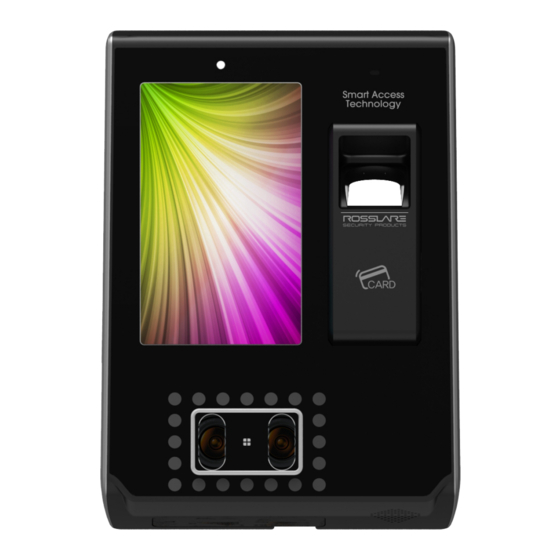
AY-B9350 User Manual 1.2. Reader Layout Illuminance Microphone sensor Touch LCD Fingerprint sensor Card input IR LED Dual camera SD card input Speaker... -
Page 8: Screen Information During Operation
AY-B9350 User Manual 1.3. Screen Information during Operation ① Connection state with the server ② Current state of the entrance ③ Warning signals such as terminal separation ④ Fire sensor Menu button Current time ID input button Entrance mode selection... -
Page 9: Message Information
AY-B9350 User Manual 1.3.2. Message Information - Main screen - Authentication is successful - Authentication failed - Unregistered user ID is input - Unregistered card is input... - Page 10 AY-B9350 User Manual - Pass back error occurred when anti-pass back function is used. - No response from the server while trying authentication. - Network to the server is disconnected while trying authentication. - Registered but no authentication authorization, or...
-
Page 11: Voice Information During Operation
AY-B9350 User Manual - Waiting for password input - Waiting for fingerprint input - Waiting for card input - Upgrading terminal program (Do not turn OFF terminal power when this message is displayed.) 1.4. Voice Information during Operation Division Voice information When authentication is successful You are authenticated. -
Page 12: Buzzer Sound Information During Operation
AY-B9350 User Manual 1.5. Buzzer Sound Information during Operation Reading Fingerprint A card is read. Beep or card fingerprint is input in the fingerprint window Beep, beep Verification failed Authentication is failed Verification Long beep Authentication is succeeded successful 1.6. Correct Face Registration and Authentication Method Face registration method - Maintain distance between terminal and face to be about 50 cm. -
Page 13: How To Register And Input Correct Fingerprint
AY-B9350 User Manual - Make sure the terminal is installed indoor. - Do not install the device under lighting with incandescent lamp. - It is not recommended that installation in environment exposed to backlight or direct rays of the sun. - Page 14 AY-B9350 User Manual Ø If hands are too dry, blow user’s breaths on the fingerprint for easy use. Ø In case of children, If fingerprint is too small or too tender, sometimes use is difficult or impossible. It is needed to newly register fingerprint every 6 months.
-
Page 15: Introduction
AY-B9350 User Manual 2. Introduction 2.1. Features l Multi-Modal product which can use both of face and fingerprint authentication functions. l Tilting camera automatically trace face position. l Since an illuminance sensor and a Dual Camera (Color & IR) are installed, face recognition is impossible even in a dark place. -
Page 16: Connection With Pc Server (Access, Time & Attendance)
AY-B9350 User Manual 2.2.2. Connection with PC Server (Access, Time & Attendance) TCP/IP TCP/IP Fingerprint authentication TCP/IP server (Static IP) database (MSSQL) Internet / WAN / LAN Remote admin program TCP/IP (Management of user and terminal setting) -
Page 17: Product Specification
AY-B9350 User Manual 2.3. Product Specification Division SPEC REMARK 1GHz Quad Core CPU 5.0 inch Touch LCD (480*800) 4G + 8G Flash MEMORY 2GB RAM External SD Card data backup / FW upgrade support Camera Tilted Dual Camera (Color & IR) -
Page 18: Configuration
AY-B9350 User Manual 3. Configuration 3.1. Check Points before Configuration 3.1.1. Entering Menu Press [ ] icon in the main screen to access into the main menu screen below. Press the relevant button to move to each sub menu. 3.1.2. Administrator Authentication If an administrator is registered, the following administrator authorization screen will be displayed first. -
Page 19: Enter Menu Without Administrator Authorization
AY-B9350 User Manual 3.1.3. Enter Menu without Administrator Authorization The method is to enter the menu when an administrator lost registered administrator card which is registered at the terminal or when fingerprint or face verification is impossible because there is no administrator. -
Page 20: User Management
AY-B9350 User Manual User 1. Add management 2. Change 3. Delete 4. Delete All 5. Search 2. Network Terminal IP address Static IP / DHCP ▶ Terminal IP address ▶ Subnet Mask ▶ Gateway DNS server ▶ DNS server1 ▶ DNS server2 Server IP address ▶... -
Page 21: Database
AY-B9350 User Manual ▶ Set Date ▶ Set Time 5. Database 1. Delete all users 2. Delete setting 3. Delete Log 4. Delete image log 5. Factory Init Terminal 1. Sound ▶ Voice volume setting ▶ Buzzer volume □ User Voice 2. -
Page 22: Terminal Information
AY-B9350 User Manual Terminal 1. System ▶ System information information ▶ Disk ▶ RAM 2. Terminal ▶ Terminal information Terminal ID Application Language 3. Network ▶ Network info <Ethernet> 4. User ▶ User 5. Log ▶ Log 6. About ▶ About 8. - Page 23 AY-B9350 User Manual Input user ID to be registered and press [OK] button. In this case, ID which can be registered is automatically displayed in the screen. Hence, registration is easy and convenient. To change ID, Press [ ] button to delete the existing value and to input a new one.
- Page 24 AY-B9350 User Manual 3.3.1.1. Registering Picture Press [ ] button in [Add user] screen to register a picture. Press [Save] button to register current camera image as a picture. To cancel registration and move out, press [Cancel] or [BACK] button.
- Page 25 AY-B9350 User Manual 3.3.1.3. Registering Fingerprint ① Press [Fingerprint] button in [Add user] screen to register. To cancel registration and move out, press [ ] button. When the left screen is displayed, select a finger to be registered. ※ In case of registering many fingers, already...
- Page 26 AY-B9350 User Manual ④ Message on the left will be displayed when input is completed. Press [OK] button to complete registration and move to the upper menu. To register fingerprint again, press [Retry] button to start it again from the process of ② above. To cancel it, press [ ] button to move to upper menu.
- Page 27 AY-B9350 User Manual 3.3.1.4. Registering Face Register face referring to ‘1.6 Correct face registration and authentication method‘. Press [Face] button in [Add user] screen to select [Regular Registration] or [Quick Registration]. To cancel registration, press [BACK] button. * In case of general registration, register face through 5 steps after fixing face and pose according to the guideline.
- Page 28 AY-B9350 User Manual ③ As shown in the left screen, if face is normally recognized, guide line will be changed into green to start registering face. At this point, do not move face and stand still for easy registration. ④ Move face to front/up/down little by little whenever information message is displayed in the screen.
- Page 29 AY-B9350 User Manual 3.3.1.5. Registering Password Input 4~8 digit password in password input window and press [OK] button to move input focus to ‘password check’ window below. Input the same password again and press [OK] button. To cancel and move out, press [ ] button.
-
Page 30: Authentication Option
AY-B9350 User Manual 3.3.1.7. Authentication Option ▶ ’Fingerprint verification level’ (Default setting: ‘0’) This item is to decide fingerprint verification level for each user. Authentication level for each registered user can be changed by change this value. If it is set to ‘0’, authentication will be done using 1 to 1 fingerprint verification level at the terminal. - Page 31 AY-B9350 User Manual 3.3.1.9. Saving After completing all registering processes, press [Save] button. At this point, if [Cancel] or [BACK] button is pressed without pressing [Save] button, the user won’t be saved. The following shows LCD messages which can be displayed during registering processes.
- Page 32 AY-B9350 User Manual During [Register Fingerprint] Not same fingerprint but different fingerprint is input during fingerprint registration During [Register Fingerprint] Already registered fingerprint is tried to be registered again (However, same fingerprint input with same user ID is possible.) ※ To register same fingerprint with another different ID, ‘System à...
- Page 33 AY-B9350 User Manual 3.3.2. Deleting Select [User management] à [Delete] in the main menu to display the screen below Input user ID to be deleted and press [OK] button. Press [BACK] button to cancel and move out. Failure message of “unregistered user” will be displayed in the screen when unregistered ID is input, and success message of “deleted”...
- Page 34 AY-B9350 User Manual Operation is under Network mode but the terminal is not connected to the server. 3.3.3. Changing Select [User management] à [Modify] in the main menu to display the screen below. Input user ID to be changed and press [OK] button.
- Page 35 AY-B9350 User Manual Since the method to change each item is same with that for user add, refer to ‘3.3.1. Add’. 3.3.4. Deleting All Select [User] à [Delete All] in the main menu to display the screen below To really delete all users, press [Yes]. To cancel it, press [No] ※...
- Page 36 AY-B9350 User Manual 3.3.5. Searching Select [User] à [View] in the main menu to search the list of all registered users as below. User list will be displayed in the order of ID. Scroll down screen to search following user lists.
- Page 37 AY-B9350 User Manual ▶ [Name]: Press the button and input user name to display registered user list with the name in which input character string is included. Press [BACK] button in this screen to move to ‘3.3. User management’ menu.
- Page 38 AY-B9350 User Manual Touch a desired item to be changed to display keypad. After completing input for the relevant item using the keypad, touch [ ] button or the next input window to continue input. After completing input, touch not input window but background to close the keypad.
- Page 39 AY-B9350 User Manual 3.6. System 3.6.1. System Select [System] à [System] in the main menu to display the screen below. ▶ Default setting: same with the setting in the left screen ▶ Length of user ID This part is to set the length of user ID. It can be...
- Page 40 AY-B9350 User Manual 3.6.2. Fingerprint Recognition Select [System] à [Fingerprint recognition] in the main menu to display the screen below. ▶ Default setting: same with the setting in the left screen ▶ 1 to N level (3~9) This authentication level is used for 1 to N fingerprint verification.
- Page 41 AY-B9350 User Manual 3.6.3. Face Recognition ▶ Default setting: same with the setting in the left screen ▶ Face Authentication Press the check box to enable the function. ▶ Matching Level Level used for face authentication. It is set to 1~4...
- Page 42 AY-B9350 User Manual 3.6.4. Setting Current Time Select [System] à [Date/time] in the main menu to display the screen below. ▶ Default setting: same with the setting in the left screen ▶ Display format This is to set the method to display the current time of the terminal.
- Page 43 AY-B9350 User Manual 3.6.6. Database Select [System] à [Database] in the main menu to display the screen below. To delete all users, press [Delete all users] button. To reset the setting value, press [Delete setting] button. To reset authentication record, press [Delete Log] button.
-
Page 44: Setting Delete
AY-B9350 User Manual after deleting. 3.6.6.2. Setting Delete Select [System] à [Database] à [Delete setting] in the main menu to display the screen below. To reset all setting values, press [Yes] button, or press [No] or [ ] button to cancel it. -
Page 45: Image Log Delete
AY-B9350 User Manual 3.6.6.4. Image Log Delete Select [System] à [Database] à [Delete Image log] in the main menu to display the screen below. To delete all image logs saved at the terminal, press [Yes] button, or press [No] or [ ] button to cancel it. - Page 46 AY-B9350 User Manual 3.7. Terminal Setting 3.7.1. Sound Select [Terminal] à [Sound] in the main menu to display the screen below. ▶ Default setting: same with the setting in the left screen ▶ Voice volume Scroll to the left/right in 0~15 steps to set voice size.
- Page 47 AY-B9350 User Manual 3.7.2. Terminal Option Select [Terminal] à [Option] in the main menu to display the screen below. ▶ Default setting: same with the setting in the left screen ▶ Read Card number Touch a card on this screen to display card No on the LCD.
- Page 48 AY-B9350 User Manual 3.7.3. Input setting Select [Terminal] à [Input] in the main menu to display the screen below. ▶ Default setting: same with the setting in the left screen ▶ M0: Set this to connect an external contact to DM0.
- Page 49 AY-B9350 User Manual and monitoring pin of the Lock must be also connected to M0. In addition, M0 must be set to [door open status NO] or [door open status NC] as well. ▶ Tamper Alarm If this is checked ( ), warning sound will be made when the terminal is disassembled.
- Page 50 AY-B9350 User Manual To apply the setting value, press [OK] button or press [BACK] button to cancel and to move to the upper menu. 3.7.5. External Terminal Setup If you select the [Terminal]->[External device] in the main menu, the following window appears.
- Page 51 AY-B9350 User Manual User It is set by the user definition, which only can be set in the server, and definition the setting type only can be inquired in the terminal. Click [OK] button to apply the set value, and click [BACK] button to cancel and return.
- Page 52 AY-B9350 User Manual ▶ Default setting: same with the setting in the left screen ▶ Display option This is to select image displayed in authentication success message window. - None - Registered photo ▶ Save success log If this is checked (...
- Page 53 AY-B9350 User Manual 3.8.4. LCD Option Select [Display] à [Option] in the main menu to display the screen below. ▶ Default setting: same with the setting in the left screen ▶ Screen saver (5 seconds ~ 10 minutes) If nothing is input for the setting time, the screen will be automatically OFF.
-
Page 54: Terminal Information
AY-B9350 User Manual To apply the setting value, press [OK] button or press [BACK] button to cancel and to move to the upper menu. 3.9. Terminal Information 3.9.1. System Information Select [Terminal info] à [System] in the main menu to display the screen below. -
Page 55: Network Information
AY-B9350 User Manual 3.9.2. Terminal Information Select [Terminal info] à [Terminal] in the main menu to display the screen below. ▶ Terminal info This is to display option setting value of the terminal. To move to upper menu after searching, press [Close] or [BACK] button. -
Page 56: User Information
AY-B9350 User Manual 3.9.4. User Information Select [Terminal info] à [User] in the main menu to display the screen below. ▶ User information - User: number of registered user (including administrator) - Admin: number of registered administrator - FP: number of all registered fingerprint... - Page 57 AY-B9350 User Manual ▶ Log search Press [Terminal info] à [Log] -> [View Log] -> [Log Search] button to set start date, end date, event condition and press [OK] button to search log. ▶ Search result Log search result is to check information of date, time, ID, authentication result (successful or failed).
-
Page 58: About
AY-B9350 User Manual 3.9.6. About Select [Terminal info] à [About] in the main menu to display the screen below. ▶ About License information of Korean font applied to the terminal will be displayed. To move to upper menu after searching, press [Close] or [BACK] button. - Page 59 AY-B9350 User Manual card must be over side down. (Only SD card with capacity below 32G can be used.) This function is to backup data of the terminal using [EXPORT]. Data backed up by [IMPORT] can be copied back to the terminal.
- Page 60 AY-B9350 User Manual This is to copy the relevant data from a SD card to the terminal - User data: Copy user data of *.ndb file name from ‘eNBioAccessT9/user’ folder in the SD card to the terminal. - System option: Copy option setting values of the terminal saved in the SD card (‘eNBioAccessT9/config’...
-
Page 61: How To Use Terminal
AY-B9350 User Manual 4. How to use Terminal Background image and configuration in the main screen can be changed according to the setting by an administrator. In addition, if screen saver time is set by the administrator, LCD screen will be automatically OFF if nothing is operated at the terminal for the designated time. -
Page 62: Id Input
AY-B9350 User Manual Press desired access mode button in access mode selection screen in the left to close selection screen and to convert mode in the main screen into the relevant mode. 4.2. ID Input Press [Input ID] button in the main screen to display the following ID input window. -
Page 63: Authentication
AY-B9350 User Manual 4.3. Authentication 4.3.1. Face Authentication ▶ 1 to N identification Set face position until guide line is changed to green, look at the camera when the guide line becomes green and then stop movement for a moment to proceed with authentication. - Page 64 AY-B9350 User Manual à à ▶ Authentication while loading fingerprint data The saved fingerprint data of all users will be loaded to the memory for 1 to N identification during terminal booting. Progress will be displayed during loading in the top left of the screen as below.
-
Page 65: Card Authentication
AY-B9350 User Manual 4.3.3. Card Authentication Put the card on the card input part in <Figure 4-1>. 4.3.4. Password Authentication As shown in the figure below, press [Input ID] button to input ID first and then input password when password input window is displayed. -
Page 66: Appendix 1 Glossary
AY-B9350 User Manual Appendix 1 Glossary l Admin, Administrator - A user can enter terminal menu mode. Administrator means a person who can register/modify/delete user and can change the setting of terminal. - If there is no a registered administrator for the terminal, anybody can access to terminal menu and change the setting. -
Page 67: Appendix 2 Declaration Of Conformity
AY-B9350 User Manual Appendix 2 Declaration of Conformity l This device complies with Part 15 of the FCC Rules. Operation is subject to the following two conditions: - This device may not cause harmful interference. - This device must accept any interference received, including interference that may cause undesired operation. -
Page 68: Appendix 3 Radio Equipment Directive (Red)
AY-B9350 User Manual Appendix 3 Radio Equipment Directive (RED) Rosslare hereby declares that the AY-B9350 is in compliance with essential requirements and other relevant provisions of Directive 2014/53/EU. -
Page 69: Appendix 4 Rohs Directive
AY-B9350 User Manual Appendix 4 RoHS Directive Under our sole responsibility that the following labeled AY-B9350 is tested to conform to the Restriction of Hazardous Substances (RoHS) directive – 2011/65/EU – in electrical and electronic equipment. - Page 70 +86 755 8610 6101 Toll Free: +1-866-632-1101 support.cn@rosslaresecurity.com Local: +1-817-305-0006 India Fax: +1-817-305-0069 support.na@rosslaresecurity.com Rosslare Electronics India Pvt Ltd. Tel/Fax: +91 20 40147830 Europe Mobile: +91 9975768824 Rosslare Israel Ltd. sales.in@rosslaresecurity.com 22 Ha'Melacha St., P.O.B. 11407 Rosh HaAyin, Israel Tel:...
Need help?
Do you have a question about the AY-B9350 and is the answer not in the manual?
Questions and answers