Table of Contents
Advertisement
UL6500/RL350/LU-U500/SL550/FL-440/
F1P1702/UL5530/RL153/LU-U400/
SL450/FL-423/F1P1706/UL5510/RL150/
LU-U300/SL350/FL-420/F1P1710/
UL6300W/RL320/LU-W500/SL530/
FL-340/FWX1703/UL5330W/RL123/
LU-W400/SL430/FL-323/FWX1707/
UL5310W/RL120/LU-W300/SL330/
FL-320/FWX1711/UL6200/RL310/
LU-X500/SL510/FL-140/FNX1704/
UL5230/RL113/LU-X400/SL410/FL-123/
FNX1708/UL5210/RL110/LU-X300/
SL310/FL-120/FNX1712 Series
Laser Projector
User's Guide
Advertisement
Table of Contents

Subscribe to Our Youtube Channel
Related Manuals for Acer UL6500


Summary of Contents for Acer UL6500
- Page 1 UL6500/RL350/LU-U500/SL550/FL-440/ F1P1702/UL5530/RL153/LU-U400/ SL450/FL-423/F1P1706/UL5510/RL150/ LU-U300/SL350/FL-420/F1P1710/ UL6300W/RL320/LU-W500/SL530/ FL-340/FWX1703/UL5330W/RL123/ LU-W400/SL430/FL-323/FWX1707/ UL5310W/RL120/LU-W300/SL330/ FL-320/FWX1711/UL6200/RL310/ LU-X500/SL510/FL-140/FNX1704/ UL5230/RL113/LU-X400/SL410/FL-123/ FNX1708/UL5210/RL110/LU-X300/ SL310/FL-120/FNX1712 Series Laser Projector User's Guide...
- Page 2 Safety instructions Read all of these instructions before you operate your projector and save for future reference. 1. Read instructions All the safety and operating instructions should be read before the appliance is operated. 2. Notes and warnings All notes and warnings in the operating instructions should be adhered to. 3.
-
Page 3: Table Of Contents
Table of Contents Introduction ................... 3 Projector feature ............................ 3 Package contents ..........................4 Product overview ........................... 5 Getting Started ..................9 Connecting the Projector ........................9 Powering on/off the projector ....................... 10 Adjusting the Projected Image ......................11 User Controls ..................14 On-screen display menus ........................ -
Page 4: Introduction
Introduction Projector feature The projector offers the following features: • UL6500/RL350/LU-U500/SL550/FL-440/F1P1702/UL5530/RL153/LU-U400/ SL450/FL-423/F1P1706/UL5510/RL150/LU-U300/SL350/FL-420/F1P1710 series: Native1920 x 1080 1080p resolution • UL6300W/RL320/LU-W500/SL530/FL-340/FWX1703/UL5330W/RL123/LU-W400/ SL430/FL-323/FWX1707/UL5310W/RL120/LU-W300/SL330/FL-320/FWX1711 series: Native 1280 x 800 WXGA resolution • UL6200/RL310/LU-X500/SL510/FL-140/FNX1704/UL5230/RL113/LU-X400/SL410/ FL-123/FNX1708/UL5210/RL110/LU-X300/SL310/FL-120/FNX1712 series: Native 1024 x 768 XGA resolution • Laser-phosphor light source free from replacement •... -
Page 5: Package Contents
Package contents When you unpack the projector, make sure you have all these components: RESYNC RATIO SOURCE MENU ENTER MODE KEYSTONE BACK ZOOM HIDE FREEZE FUNCTION Remote control (IR) & Projector AC power cord batteries (AAA *2 PCS) VGA cable (D-SUB to D-SUB) Quick start guide Note •... -
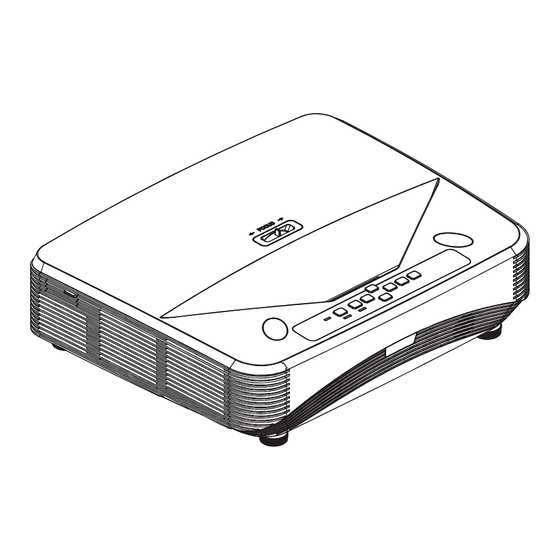
Page 6: Product Overview
Product overview Projector outlook Front and top 1. Focus switch 2. Projection window 3. Control pane 4. IR remote control sensor 5. Speaker Bottom and side 1. Adjuster feet 2. Ceiling mount holes 3. Ventilation holes (airflow out) 4. Ventilation holes (airflow in) - Page 7 Rear 23 4 5 6 7 8 9 10 12 13 1. Kensington anti-theft lock slot 2. 5V output for power charging 3. Audio input jack 4. Audio output jack 5. Audio (L/R) input jack 6. S-Video input jack 7. Video input jack 8.
- Page 8 Control panel 1. Power LED indicator 2. Power button 3. Menu button 4. Adjustment buttons ( / / / ) 5. Enter button 6. Source button 7. Temperature LED indicator 8. Light LED indicator...
- Page 9 Remote control RESYNC RATIO SOURCE MENU ENTER MODE KEYSTONE BACK ZOOM FREEZE HIDE FUNCTION 2. STANDBY button 1. ON button For putting the projector into the For turning the power on. Standby mode. 3. SOURCE buttons 4. Adjustment buttons ( / / / ) For switching Input mode.
-
Page 10: Getting Started
Getting Started Connecting the Projector 1. Power cord 2. USB cable for charging device 3. 3.5mm Audio cable 4. Audio cable jack/RCA 5. S-Video cable 6. Composite video cable 8. VGA cable 7. Component Video to VGA (DSub) adapter cable 9. -
Page 11: Powering On/Off The Projector
Powering on/off the projector Powering on the projector: Note that the connections to external equipment and power outlet should be done before performing the operations written below. Press Power on the projector or ON on the remote control. • The power indicator illuminates green. Warning •... -
Page 12: Adjusting The Projected Image
Adjusting the Projected Image Adjusting the Height of Projected Image Adjuster feet The height of the projector can be adjusted using the adjuster feet. When the screen is above the projector, the projection image can be made higher by adjusting the projector. 1. - Page 13 Screen Size and Projection Distance Projector bottom Screen side of Center of projection window projector • UL6500/RL350/LU-U500/SL550/FL-440/F1P1702/UL5530/RL153/LU-U400/SL450/ FL-423/F1P1706/UL5510/RL150/LU-U300/SL350/FL-420/F1P1710 16:9 Signal Input (Normal Mode) Picture (Screen) size Projection distance [L] Diag. [x] Width Height 150" (381 cm) 332.1 cm 186.8 cm 44.8 cm...
- Page 14 • UL6200/RL310/LU-X500/SL510/FL-140/FNX1704/UL5230/RL113/LU-X400/SL410/ FL-123/FNX1708/UL5210/RL110/LU-X300/SL310/FL-120/FNX1712 4:3 Signal Input (Normal Mode) Picture (Screen) size Projection distance [L] Diag. [x] Width Height 125" (318 cm) 254.0 cm 190.5 cm 45.1 cm 76.1 cm 43.2 cm 100" (254 cm) 203.2 cm 152.4 cm 29.1 cm 60.1 cm 36.5 cm 80"...
-
Page 15: User Controls
User Controls On-screen display menus The projector has multilingual on-screen display menus that allow you to make image adjustments and change a variety of settings. How to operate 1. Press MENU to display the OSD menu. 2. Press and select main menu item. 3. -
Page 16: Menu Items
Menu items Main Menu Sub Menu Settings Blackboard Wall Color Green Whiteboard Auto 4 : 3 Aspect Ratio 16 : 9 16 : 10 DISPLAY H./V. Keystone 4 Corner Correction Position Phase Frequency Digital Zoom... - Page 17 Standard Presentation Picture Mode Movie Bright Brightness Contrast Normal Color Cool Temperature Warm R Gain Color G Gain Temperature B Gain R Offset G Offset B Offset Overscan Auto Signal Type PICTURE YPbPr HDMI Settings Auto HDMI Color Full Range Range Limited Range Tint...
- Page 18 Manual Source Selection Auto Auto Top and Bottom SOURCE 3D Mode Frame Sequential Frame Packing Side By Side Disable 3D L/R Invert Invert...
- Page 19 English Deutsch Español Nederlands Français Italiano Svenska Language Português Русскоий polski Magyar Türkçe 汉语 한국어 日本語 Front Rear Projection Mode Rear Ceiling Ceiling 5 sec 10 sec SYSTEM Menu display 15 sec SETUP : Basic time 20 sec 25 sec 30 sec Menu Settings Center...
- Page 20 High Altitude Mode Volume Audio Settings Power On/Off Volume Closed Caption Enable Closed Caption Caption Version Eco Mode Light Source Settings Light Source Hours Disable 10Min Auto Power Off 20Min SYSTEM 30Min SETUP : Advanced Quick Cooling Standby Settings LAN Control DHCP Client IP Address Network Settings...
- Page 21 DISPLAY Wall Color This function allows you to project the image to a colored (white or dark green) surface or wall without using a screen. • Off£½The Wall Color function is not activated°£ • Blackboard£½Projects images onto a blackboard (dark green). •...
- Page 22 4 Corner Correction For correcting an image designating the corner of the projected image. 1. Press KEYSTONE on the remote control. Select to “4 Corner Correction” and then press Enter. 2. Press to select one of the four corners / / / and then press ENTER.
- Page 23 Digital Zoom Graphs, tables and other portions of projected images can be enlarged. This is helpful when providing more detailed explanations. 1. Press ZOOM on the remote control. MODE KEYSTONE BACK • Enlarges the image. • Pressing ZOOM enlarges or ZOOM buttons ZOOM reduces the projected image.
- Page 24 PICTURE Picture Mode • Standard: For standard image • Presentation: Brightens portions of image for more enhanced presentations. • Movie: Gives natural tint to the projected image. • Bright: Use in bright places. Brightness Press for less brightness, press for more brightness. Contrast Press for less contrast, press...
- Page 25 This function allows you to select the input signal type RGB or Component for HDMI 1 or 2. • Auto: Input signals are automatically recognized as RGB or component. • RGB: Set when RGB signals are received. • YPbPr: Set when Component signals are received. HDMI Color Range An optimum picture may not be displayed if an HDMI-capable device°¶s output signal type and the projector°¶s input signal type do not match.
- Page 26 SOURCE Source Selection • Manual: “Source Selection” is not activated. • Auto: Automatically searches for and switches to the appropriate Input mode, when the projector turn on, or no input signal is detected. 3D Mode • Auto: When a 3D identification signal is detected, the format is selected automatically.
- Page 27 SYSTEM SETUP : Basic Language Select the language used by the on-screen menu. Projection Mode • Front: Normal image (Projected from the front of the screen). • Rear: Reversed image (Projected from the rear of the screen or with a mirror) •...
- Page 28 • Off: The reminder message (input signal,during input search or etc.information) is not displayed. • On: The reminder message is displayed.
- Page 29 SYSTEM SETUP : Advanced High Altitude Mode This function changes the fan rotation speed. • Off: Suitable for normal environments. • On: Set when using the projector at altitudes of approximately 1,500 meters (4,900 feet) or more.When “High Altitude Mode” is set to “On”, the fan rotation speeds up, and the fan noise becomes louder.
- Page 30 • On: Approx. 80% Note • When “Eco Mode” is set to “On”, the fan sound and power consumption are lower than they are when “Off” is selected. (Projection brightness decreases.) Light Source Hours You can confirm the cumulative usage time. Auto Power Off •...
- Page 31 Set the subnet mask to the same as that of the computer and equipment on the network. Default Gateway Factory default setting: 0. 0. 0. 0 * When not in use, set to "0. 0. 0. 0". DNS Server˜ Factory default setting: 0. 0. 0. 0 Enter a DNS Server address appropriate for the network.
- Page 32 Use this function to lock the operation buttons on the projector. Setting with the Menu Screen • On: All buttons on the projector, except Power, are locked. • Off: Turns off the Keylock function. Taking the Keylock Off Hold down on the projector for about 3 seconds while the projector is being turned •...
- Page 33 INFORMATION SOURCE The Input Mode of the projector is displayed. Picture Mode The Picture Mode of the projector is displayed. Signal Info This function allows you to check the current input signal information. Signal Type The Signal Type of the projector is displayed. Light Source Hours The Light source usage time of the projector is displayed.
-
Page 34: Setting Up The Projector Network Environment
Setting up the Projector Network Environment This section describes the basic procedure for using the projector via the network. If the network is already constructed, the projector's network settings may need to be changed. Please consult your network administrator for assistance with these settings. -
Page 35: Controlling The Projector Via Lan
Controlling the Projector via LAN After connecting the projector to your network, enter the projector IP address in "Address" on Internet Explorer (version 11 or later) using a computer on the network to start a setup screen that will enable control of the projector via the network. Controlling the Projector Using Internet Explorer (Version 11 or later) Complete connections to external equipment... - Page 36 Setting the Network Network Settings The Network Setting screen appears, ready for network settings for the projector. Items Setting example / Remarks Select "ON" or "OFF" to determine whether to use DHCP DHCP Client. You can set this item when "DHCP Client" is set to "OFF". IP Address Factory default setting: 0.0.0.0 Enter an IP address appropriate for the network.
- Page 37 Setting for Sending E-mail when an Error Occurs Email Alert On this screen, you can make settings for sending e-mail to report when the projector has generated an error. Email Setting Items Description Set addresses to which error notification e-mail is sent. (within 40 characters) Setting of Subject for error e-mail.
-
Page 38: Controlling The Projector Using Crestron Roomview
® Controlling the Projector Using Crestron RoomView ® Regarding Crestron Roomview Crestron RoomView is the consolidated control systems provided by Crestron Company, able to control and monitor the multiple of projectors which connected to a network. This projector supports the protocol for this control system, so that it supports the systems offered by Crestron RoomView. - Page 39 How to use the control menu Operate below functions by clicking on each buttons. Buttons Functions For turning the power on and putting the projector into Standby Power mode. Vol – /Vol+ For adjusting the speaker sound level. For temporarily displaying a black screen and turning off the AV Mute sound.
- Page 40 Info Show the information of the projector which is connected. Change the setting of the projector which is connected. Refer Tools the next section.
- Page 41 How to use the Tool menu Click on the Tool Tab on the control menu and the below will be displayed. It can change the settings for the projector which is connected. Crestron Control Settings for the Crestron central control. Projector Setting for the projector.
- Page 42 Admin Password To lock the Tool menu with a password, check on “Enable”. Setting for the below items: Items Functions Enter new password to change the password for the Tool menu. New Password (within 15 characters) Enter the password you have set on the "New Password". The Confirm error will show if not equal.
-
Page 43: Maintenance
Maintenance The projector needs proper maintenance. You should keep the lens clean as dust, dirt or spots will project on the screen and diminish image quality. If any other parts need replacing, contact your dealer or qualified service personnel. When cleaning any part of the projector, always switch off and unplug the projector first. -
Page 44: Specifications
Specifications UL6500/RL350/LU-U500/ UL6300W/RL320/LU-W500/ UL6200/RL310/LU-X500/ SL550/FL-440/F1P1702/ SL530/FL-340/FWX1703/ SL510/FL-140/FNX1704/ UL5530/RL153/LU-U400/ UL5330W/RL123/LU-W400/ UL5230/RL113/LU-X400/ Name of product type SL450/FL-423/F1P1706/ SL430/FL-323/FWX1707/ SL410/FL-123/FNX1708/ UL5510/RL150/LU-U300/ UL5310W/RL120/LU-W300/ UL5210/RL110/LU-X300/ SL350/FL-420/F1P1710 SL330/FL-320/FWX1711 SL310/FL-120/FNX1712 ® Display system Chip Effective display 0.65" x1 , 0.65" x1 , 0.55" x1 , Display device... - Page 45 UL6200/RL310/LU-X500/ UL6500/RL350/LU-U500/ UL6300W/RL320/LU-W500/ SL510/FL-140/FNX1704: SL550/FL-440/F1P1702: SL530/FL-340/FWX1703/ 480W 480W UL5330W/RL123/LU-W400/ UL5230/RL113/LU-X400/ UL5530/RL153/LU-U400/ SL430/FL-323/FWX1707: Maximum power consumption SL410/FL-123/FNX1708: SL450/FL-423/F1P1706/ 250W 250W UL5510/RL150/LU-U300/ UL5310W/RL120/LU-W300/ UL5210/RL110/LU-X300/ SL350/FL-420/F1P1710: SL330/FL-320/FWX1711: SL310/FL-120/FNX1712: 370W 280W 280W Standby mode power consumption < 0.5W (LAN Control is off.) Dimensions (W x D x H)
-
Page 46: Dimensions
Dimensions 509 mm (W) x 390 mm (D) x 138 mm (H) Ceiling mount installation Ceiling mount screws: 184.3 Max. M4 x 10 Unit: mm... -
Page 47: Appendices
Appendices LED indicator messages Orange on Normal (Standby) Green on Normal (Power on) Power indicator Green blinks Normal (Warm up) Orange blinks Normal (Cooling) Orange blinks (faster) Abnormal (Refer to the table below) Normal Light source indicator Red on The light source is shut down abnormally. Normal Temperature indicator Red blinks... - Page 48 Power indicator Green on/ Orange Projector • Cooling fan • Disconnect the Green blinks blinks shutdown stops power cord from the Orange on/ (faster) AC outlet, and then Orange connect it again. blinks • Take the projector to your nearest Authorized Projector Dealer or Service Center for...
-
Page 49: Compatibility Chart
Compatibility Chart Computer Horizontal Frequency: 15-90 kHz, Vertical Frequency: 50-85 Hz, Pixel Clock: 12-165 MHz 3D Mode Horizontal Vertical Analog Top And Frame Frame Side By Digital Mode Resolution frequency frequency Auto Support Bottom Sequential Packing Side Support (Hz) (kHz) 60.0 31.47 ... -
Page 50: Troubleshooting
Troubleshooting Refer to the symptoms and measures listed below before sending the projector for repairs. If the problem persists, contact your local reseller or service center. Please refer to "LED Indicator Messages" as well. Problem Solution • Projector power cord is not plugged into the wall outlet. •... - Page 51 • Cables are incorrectly connected to the projector. • Volume is set to minimum. Picture appears but no sound is • When the projector is connected to an external device heard. and the volume is set to minimum, the sound is not output even if you turn up the volume of the external device.
- Page 52 • Check that you are using 3D LCD shutter glasses that ® support the DLP Link™ system. - Be sure to use 3D LCD shutter glasses that support the ® Link™ system. • Check that the shutters on the 3D LCD shutter glasses are working properly.
-
Page 53: Rs-232C Specifications And Commands
A connection for Web Browser • Initialize the settings. cannot be made because you • After the initialization, carry out setting again. have forgotten your user name or your password. • How to start the Internet Explorer in Windows 10. Can not start the Internet Explorer 1. - Page 54 B K _ OK or ERR AV Mute B K _ OK or ERR State B K ? 0: Off, 1: On E Z _ OK or ERR Freeze E Z _ OK or ERR State E Z ? 0: Off, 1: On...
Need help?
Do you have a question about the UL6500 and is the answer not in the manual?
Questions and answers