
Subscribe to Our Youtube Channel
Related Manuals for Acer U5313W Series


Summary of Contents for Acer U5313W Series
- Page 1 Acer Projector U5313W/U5213/U5310W Series User's Guide Downloaded From projector-manual.com Acer Manuals...
-
Page 2: Table Of Contents
Using the Remote Control ....18 Remote Control Battery Installation . 18 On-screen Display Menus ....20 How to operate ........ 20 Structure .......... 21 Picture ..........23 Screen ..........25 Setting ..........27 ... English Downloaded From projector-manual.com Acer Manuals... -
Page 3: Usage Notice
▀■ Warning- Do not block the light path between the light source and the lens with any objects. Doing so could cause the object to catch on fire. English ... Downloaded From projector-manual.com Acer Manuals... - Page 4 Relative Humidity is 5 - 40°C, 80% (Max.), non-condensing. - In areas susceptible to excessive dust and dirt. - Near any appliance generating a strong magnetic field. - In direct sunlight..English Downloaded From projector-manual.com Acer Manuals...
-
Page 5: Regulation & Safety Notices
FCC regulations. Caution Changes or modifications not expressly approved by the manufacturer could void the user’s authority, which is granted by the Federal Communications Commission, to operate this projector. English ... Downloaded From projector-manual.com Acer Manuals... -
Page 6: Operation Conditions
• R & TTE Directive 1999/5/EC (if product has RF function) Disposal instructions Do not throw this electronic device into the trash when discarding. To minimize pollution and ensure utmost protection of the global environment, please recycle it..English Downloaded From projector-manual.com Acer Manuals... -
Page 7: Introduction
If something is missing, please contact our customer service. CR2025 Projector Remote Control Battery AC Power Cord VGA Cable Documentation: User’s Guide (CD) Due to different applications in each Country, some regions may have different accessories. English ... Downloaded From projector-manual.com Acer Manuals... -
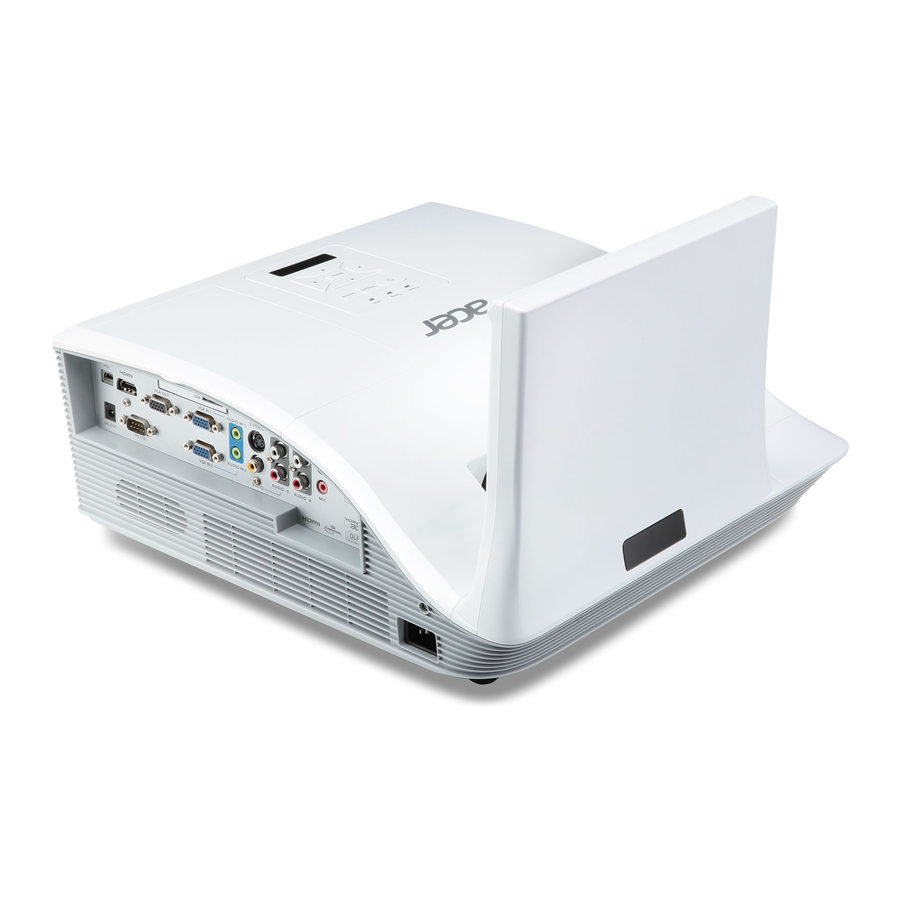
Page 8: Product Overview
Product Overview Main Unit (Front View) (Rear View) (Bottom View) Focus Ring Input / Output Connection Ports Lens Power Socket IR Receiver Elevator Feet Control Panel Elevator Feet Lamp Cover Elevator Feet Spacer ... English Downloaded From projector-manual.com Acer Manuals... -
Page 9: Control Panel
Control Panel POWER TEMP LAMP RESYNC SOURCE MENU Power LED Power Menu / Exit Lamp LED Temp (Temperature) LED Source Resync Four Directional Select Keys IR Receiver English ... Downloaded From projector-manual.com Acer Manuals... -
Page 10: Connection Ports
VGA In 2 Connector Audio In 2 Connector (For VGA In 2 Connector) Composite Video Input Connector Left/Right RCA Audio Input Connector (For Composite Video Input Connector) 3.5mm Microphone Input Connector Power Socket ... English Downloaded From projector-manual.com Acer Manuals... -
Page 11: Remote Control
Four Directional Select Keys Freeze Blank Mute Power Keystone Aspect Volume +/- Before using the remote control for the first time, remove the transparent insulation tape. See page 18 for battery installation. English ... Downloaded From projector-manual.com Acer Manuals... -
Page 12: Installation
HDMI Cable * Network Cable * RS232 Cable * Power Cord VGA Cable Due to the difference in applications for each country, some regions may have different accessories. * Optional accessory ... English Downloaded From projector-manual.com Acer Manuals... -
Page 13: Connecting To Video Sources
VGA to HDTV (RCA) Cable * Power Cord Audio Cable * Composite Video Cable * S-Video Cable * Due to the difference in applications for each country, some regions may have different accessories. * Optional accessory English ... Downloaded From projector-manual.com Acer Manuals... -
Page 14: Powering On/Off The Projector
The projector will detect the source automatically and will display on the screen. If you connected multiple sources at the same time, press the “Source” button on the remote control to switch between inputs. POWER TEMP LAMP RESYNC SOURCE MENU ... English Downloaded From projector-manual.com Acer Manuals... -
Page 15: Powering Off The Projector
2. Make sure the environment temperature is under 40 degree C. 0.5 second H(On), Fan lock error, OSD showing as below: 0.5 second L(Off) The projector will switch off automatically. flashing Lamp error (Lamp, Lamp driver, Color wheel) English ... Downloaded From projector-manual.com Acer Manuals... -
Page 16: Adjusting The Projected Image
To lower the image: Use screw in feet to lower the image to the desired height angle and fine-tune the display angle. Elevator Feet Elevator Feet Elevator Feet Spacer ... English Downloaded From projector-manual.com Acer Manuals... -
Page 17: Adjusting The Projector's Focus
13.7 2032 28.0 14.9 2286 31.6 18.4 Projection Distance A(mm)=Screen size(mm) x 0.296, Tolerance is around 3.1% Ex: Projection Distance (655mm)=Screen size(2215mm) x 0.296 This table is for user’s reference only. English ... Downloaded From projector-manual.com Acer Manuals... -
Page 18: User Controls
Select an input signal. Four Directional Use ▲▼◄► to select items or make adjustments to your Select Keys selection. Lamp LED Indicate the projector’s lamp status. Temp LED Indicate the projector’s temperature status..English Downloaded From projector-manual.com Acer Manuals... -
Page 19: Using The Remote Control
If the battery has leaked in the remote control, carefully wipe the case clean and install new battery. Risk of an explosion if battery is replaced by an incorrect type. Dispose of used battery according to the instructions. English ... Downloaded From projector-manual.com Acer Manuals... - Page 20 Switch to VGA 1/VGA2 source. 13 Keystone Adjust image until the sides are vertical. 14 Aspect Use this function to choose your desired aspect ratio. 15 Volume +/- Increase / decrease audio volume..English Downloaded From projector-manual.com Acer Manuals...
-
Page 21: On-Screen Display Menus
To exit, press the “Menu” button again. The OSD menu will be closed and the projector will automatically save the new settings. Picture Color Mode Bright Wall Color White Brightness Contrast Sharpness Saturation Gamma Color Temp Color Space Auto Select Enter Exit Main Menu Sub Menu Settings English ... Downloaded From projector-manual.com Acer Manuals... -
Page 22: Structure
Off / On Dust Filter Reminder Filters Remind (Hour) Cleaning Up Reminder No / Yes Information Model Name / SNID / Source / Resolution / Software Version / Color Space / Aspect Ratio ... English Downloaded From projector-manual.com Acer Manuals... - Page 23 Frame Packing / Side-by-Side(Half) / Top and Bottom / Frame Sequential / Field Sequential 1080p @ 24 96Hz / 144Hz LAN Settings DHCP Off / On IP Address Subnet Mask Gateway Store No / Yes Reset No / Yes English ... Downloaded From projector-manual.com Acer Manuals...
-
Page 24: Picture
The Contrast controls the difference between the lightest and darkest parts of the picture. Adjusting the contrast changes the amount of black and white in the image. Press the ◄ button to decrease the contrast. Press the ► button to increase the contrast..English Downloaded From projector-manual.com Acer Manuals... - Page 25 Color Temp. Adjust the color temperature. At higher temperature, the screen looks colder; at lower temperature, the screen looks warmer. Color Space Select an appropriate color matrix type from Auto, RGB or YUV. English ... Downloaded From projector-manual.com Acer Manuals...
-
Page 26: Screen
Press the ► button to move the image right. V. Position Press the ◄ button to move the image down. Press the ► button to move the image up. “H. Position” and “V. Position” ranges will depend on input source. ... English Downloaded From projector-manual.com Acer Manuals... - Page 27 Front Ceiling: This is the default selection. When selected, the image will turn upside down. Rear: When selected, the image will appear reversed. Rear Ceiling: When selected, the image will appear reversed in upside down position. English ... Downloaded From projector-manual.com Acer Manuals...
-
Page 28: Setting
Use this function to enable close caption menu. Select an appropriate closed captions option: Off, CC1, CC2, CC3, CC4. LAN (Standby) Choose “On” to enable LAN connection. Choose “Off” to disable LAN connection. VGA OUT (Standby) Choose “On” to enable VGA OUT connection..English Downloaded From projector-manual.com Acer Manuals... - Page 29 Choose “On”, the down/up move of electronic screen will be related with power on/ off of Projector. Test Pattern Display a test pattern. Security Refer next page. Reset Choose “Yes” to return the parameters on all menus to the factory default settings. English ... Downloaded From projector-manual.com Acer Manuals...
-
Page 30: Setting | Security
Enter the new password again and press “Enter” to confirm it. If the incorrect password is entered for 3 times, the projector will automatically shut down. If you have forgotten your password, please contact your local office for support..English Downloaded From projector-manual.com Acer Manuals... - Page 31 Password default value is “000000” (first time). Securtiy Enter Security Code (6 digits) Incorrect security code Re-enter again Select Enter Exit English ... Downloaded From projector-manual.com Acer Manuals...
-
Page 32: Volume
Press the ◄ button to decrease the volume. Press the ► button to increase the volume. Microphone Volume Press the ◄ button to decrease the microphone Volume. Press the ► button to increase the microphone Volume..English Downloaded From projector-manual.com Acer Manuals... -
Page 33: Options
On: The projector will search for other signals if the current input signal is lost. Off: The projector will only search current input connection. Input Press ► button to enable/disable input sources. The projector will not search for inputs that are not selected. English ... Downloaded From projector-manual.com Acer Manuals... -
Page 34: Lamp Setting
Cleaning Up Reminder: Select “Yes” to reset the dust filter hour counter after replacing or cleaning the dust filter. Information Display the projector information for model name, SNID, source, resolution, software version, color space and aspect ratio on the screen..English Downloaded From projector-manual.com Acer Manuals... -
Page 35: Options | Lamp Settings
ECO: Use this function to dim the projector lamp which will lower power consumption and extend the lamp life. Clear Lamp Hours Choose “Yes” to reset the lamp hour counter after replacing the lamp. English ... Downloaded From projector-manual.com Acer Manuals... - Page 36 “Frame Packing” / “Side-by-Side(Half)” / “Top and Bottom” are supported from HDMI 1.4a 3D input signals. 1080p @24 Use this feature to select 96 or 144Hz refresh rate as using 3D glasses in the1080p @ 24 frame packing..English Downloaded From projector-manual.com Acer Manuals...
-
Page 37: Lan
Store: Choose “Yes” to save the changes made in network configuration settings. Reset: Choose “Yes” to return the display parameters on all menus to the factory default settings. English ... Downloaded From projector-manual.com Acer Manuals... -
Page 38: Web Management
Note: The characters allowed to be input are 0-9, and a-Z. Use Internet Explore 7/8/9 or Safari version 5.0.3 to enter the IP address. You can now ac- cess Web Management and manage the projector from a remote location..English Downloaded From projector-manual.com Acer Manuals... - Page 39 192.168.10.100 in the URL then press “Enter” key. Subnet mask: 255.255.255.0 Step 5: To open Internet Options, click IE web browser, click Internet Options, click the Connections tab and click “LAN Settings...” English ... Downloaded From projector-manual.com Acer Manuals...
- Page 40 Choose DHCP to assign an IP address to the projector from a DHCP server automatically, or Manual to assign an IP address manually. Set up the IP Address, Device ID and Port information on the Crestron function..English Downloaded From projector-manual.com Acer Manuals...
- Page 41 Microphone Volume: Select the value (0~32) for the Microphone Volume. Click the Auto Adjust button to adjust the settings automatically. Click the Factory Reset button to restore the factory default settings. English ... Downloaded From projector-manual.com Acer Manuals...
- Page 42 Step 2. New Password: Enter the new password. Step 3. Confirm Password: Confirm the new password then Submit Step 4. Password: Click Enable then Submit. Login page of Web Management: Contact Service Center if you forget your administrator password. ... English Downloaded From projector-manual.com Acer Manuals...
- Page 43 Welcome to Web Management. Administrator Password: Login Projector Information Projector Name: D21211 IP Address: 192.168.0.100 Administrator Password: Enter the Administrator Password and click Login button. Crestron For more information, please visit http://www.crestron.com & www.crestron.com/ getroomview/ English ... Downloaded From projector-manual.com Acer Manuals...
-
Page 44: Appendices
For Windows Vista: From the “My Computer” icon, open the “Control Panel” folder, and double click the “Appearance and Personalization” Select “Personalization”. Click “Adjust screen resolution” to display “Display Settings”. Click on the “Advanced Settings”..English Downloaded From projector-manual.com Acer Manuals... - Page 45 Each has a different way to be reactivated. Refer to your com- puter’s documentation for detailed information. Image is unstable or flickering Adjust the “Phase” to correct it. Refer to the “Screen” section for more information. Change the monitor color setting from your computer. English ... Downloaded From projector-manual.com Acer Manuals...
- Page 46 Use “Screen” --> “V Keystone” from the OSD to make an adjustment. Image is reversed Select “Screen” --> “Ceiling Mount” from the OSD and adjust the projection direction..English Downloaded From projector-manual.com Acer Manuals...
-
Page 47: Projector Problems
Make sure the “Volume --> Mute” function is set to “Off”. 3D Problems Blurry double image Select “3D” --> “3D” from OSD and choose “Off” to avoid normal 2D image is blurry double image. English ... Downloaded From projector-manual.com Acer Manuals... -
Page 48: On Screen Messages
Out of display range Out of display range Over temperature Warning! TEMPERATURE TOO HIGH Please: 1. Make sure air in and outlets are not blocked. 2. Make sure the environment temperature is under 40 degree C..English Downloaded From projector-manual.com Acer Manuals... -
Page 49: Compatibility Modes
1024x768 48.4 1024x768 56.5 1024x768 60.0 1024x768 68.7 1024x768 99.0 Apple, MAC II 1152x870 68.7 1280x1024 64.0 SXGA 1280x1024 77.0 1280x1024 80.0 1280x960 60.0 QuadVGA 1280x960 75.2 SXGA+ 1400x1050 65.3 UXGA 1600x1200 75.0 English ... Downloaded From projector-manual.com Acer Manuals... - Page 50 50(25) 15.6 480p 720x480 59.94 31.5 576p 720x576 31.3 720p 1280x720 45.0 720p 1280x720 37.5 1080i 1920x1080 60(30) 33.8 1080i 1920x1080 50(25) 28.1 1080p 1920x1080 23.98/24 27.0 1080p 1920x1080 67.5 1080p 1920x1080 56.3 ... English Downloaded From projector-manual.com Acer Manuals...
- Page 51 1024x768 48.4 1024x768 56.5 1024x768 60.0 1024x768 68.7 1024x768 99.0 Apple, MAC II 1152x870 68.7 1280x1024 64.0 SXGA 1280x1024 77.0 1280x1024 80.0 1280x960 60.0 QuadVGA 1280x960 75.2 SXGA+ 1400x1050 65.3 UXGA 1600x1200 75.0 English ... Downloaded From projector-manual.com Acer Manuals...
- Page 52 V. Frequency [Hz] H. Frequency [Hz] 720p 31.5 Frame Packing 720p 59.94/60 15.7 1080p 23.98/24 15.6 1080i 31.5 Side-by-Side(Half) 1080i 59.94/60 31.3 720p 45.0 Top and Bottom 720p 59.94/60 37.5 1080p 23.98/24 33.8 ... English Downloaded From projector-manual.com Acer Manuals...
-
Page 53: Replacing The Lamp
7. Pull up the lamp handle and remove the lamp module slowly and carefully. To replace the lamp module, reverse the previous steps. Turn on the projector and use “Lamp Reset” after the lamp module is replaced. English ... Downloaded From projector-manual.com Acer Manuals... -
Page 54: Replacing And Cleaning The Optional Dust Filter
5. Clean or replace the dust filter. To install the dust filter, reverse the previous steps. 6. Turn on the projector and use “Reset Dust Filter” after the dust filter is re- placed..English Downloaded From projector-manual.com Acer Manuals... -
Page 55: Ceiling Mount Installation
Screw type: M4x4 Diameter: 4 mm Length: 11 mm Please note that damage resulting from incorrect installation will invalidate the warranty. 357.00 85.50 137.49 Lens Center Unit: mm English ... Downloaded From projector-manual.com Acer Manuals... -
Page 56: Specifications
Normal mode: 350W ±10% @ 110Vac (Bright mode @ full power) ECO mode: 290W ±10% @ 110Vac (Video mode @ eco power) Standby < 0.5 W Operating temperature 5ºC to 40ºC / 41ºF to 104ºF ... English Downloaded From projector-manual.com Acer Manuals... - Page 57 Standard package contents AC power cord x 1 VGA cable x 1 Remote control x 1 CR2025 x1 User’s guide (CD) x 1 Design and specifications are subject to change without prior notice. English ... Downloaded From projector-manual.com Acer Manuals...
Need help?
Do you have a question about the U5313W Series and is the answer not in the manual?
Questions and answers