Advertisement
Quick Links
Download this manual
See also:
Maintenance Manual
M M V V 3 3 ™ ™ B B a a r r i i a a t t r r i i c c B B e e d d
O O p p e e r r a a t t i i o o n n s s M M a a n n u u a a l l
5900
EN
5900-009-001 Rev A.4
2019/08
Advertisement

Related Manuals for Stryker MV3 5900


Summary of Contents for Stryker MV3 5900
- Page 1 M M V V 3 3 ™ ™ B B a a r r i i a a t t r r i i c c B B e e d d O O p p e e r r a a t t i i o o n n s s M M a a n n u u a a l l 5900 5900-009-001 Rev A.4 2019/08...
- Page 3 General warning Caution Warning; electricity Fuse rating Do not drill Hydraulic oil pressure Pinch/crush hazard Non-ionizing radiation Catalogue number Serial number European medical device CE mark Authorized representative in the European Community For US Patents see www.stryker.com/patents Manufacturer 5900-009-001 Rev A.4...
- Page 4 Safe working load Mass of equipment Maximum patient weight Adult patient biometrics Alternating current Direct current Duty cycle of product ≤2m ≥18m Unit provides terminal for connection of a potential equalization conductor. The potential equalization conductor provides direct connection between the unit and potential equalization busbar of the electrical installation.
-
Page 5: Table Of Contents
T T a a b b l l e e o o f f C C o o n n t t e e n n t t s s Warning/Caution/Note Definition ..........................3 Summary of safety precautions ..........................4 Introduction ................................7 Product description ..............................7 Indications for use..............................7 Clinical benefits ..............................7... - Page 6 Cleaning and disinfecting with wipes ........................42 Cleaning ..................................43 Disinfecting ................................44 Preventive maintenance ............................45 EMC information ..............................47 0039-254-000 ................................1 5900400037, 5900400040 ............................2 5900400038 ................................3 5900470017 ................................4 5900470018, 5900470019 ............................5 5900-009-001 Rev A.4...
- Page 7 W W a a r r n n i i n n g g / / C C a a u u t t i i o o n n / / N N o o t t e e D D e e f f i i n n i i t t i i o o n n The words W W A A R R N N I I N N G G , C C A A U U T T I I O O N N , and N N O O T T E E carry special meanings and should be carefully reviewed.
-
Page 8: Expected Service Life
This product is equipped with a hospital-grade plug for protection against electric shock hazard. • Always use a Stryker supplied interface cable. Use of any other cable may cause the product to not function as intended, which may result in patient or user injury. - Page 9 • Only use hospital grade electric equipment consuming 6A (120 VAC)/3A (230 VAC) or less with the hospital grade GFCI auxiliary outlet. The use of standard electric equipment may bring the current leakage to a level unacceptable for hospital equipment. •...
- Page 10 • Do not load the IV pole above the safe working load of 40 lb (18 kg). • Do not load an individual IV pole hook above the safe working load of 20 lb (9 kg). • Always secure the lifting pole in the mounting bracket before you adjust the patient helper. •...
-
Page 11: Specifications
P P r r o o d d u u c c t t d d e e s s c c r r i i p p t t i i o o n n The Stryker model 5900 M M V V 3 3 ™ ™ bariatric hospital bed is an AC-powered adjustable hospital bed designed to be utilized with a patient support surface matching the deck size of the bed frame. - Page 12 S S p p e e c c i i f f i i c c a a t t i i o o n n s s W W A A R R N N I I N N G G - - Always use Stryker approved mattresses that have been tested for compatibility with the product frame to avoid the risk of patient entrapment.
- Page 13 Battery voltage 12 VDC (x2) (Stryker part number: 5900280025) N N o o t t e e - - Always replace with Stryker approved batteries. Duty cycle 2 minutes ON, 18 minutes OFF Application environments 1, 2, 3, and 5 per IEC 60601-2-52 Maximum acoustic sound pressure <...
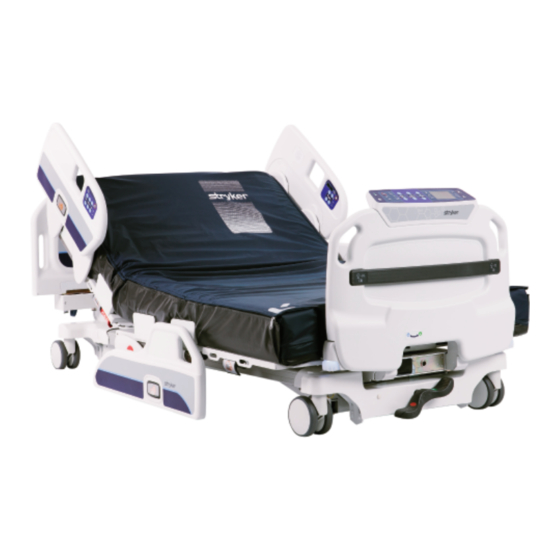
- Page 14 P P r r o o d d u u c c t t i i l l l l u u s s t t r r a a t t i i o o n n F F i i g g u u r r e e 1 1 – – M M o o d d e e l l 5 5 9 9 0 0 0 0 M M V V 3 3 b b a a r r i i a a t t r r i i c c b b e e d d 120/230 VAC hospital grade GFCI outlet Mattress deck expansion handle Brake/steer pedal...
- Page 15 Competent authority of the European Member State where the user and/or patient is established. To view your operations or maintenance manual online, see https://techweb.stryker.com/. Have the serial number (A) of your Stryker product available when calling Stryker Customer Service or Technical Support. Include the serial number in all written communication.
- Page 16 F F i i g g u u r r e e 3 3 – – S S e e r r i i a a l l n n u u m m b b e e r r l l o o c c a a t t i i o o n n - - o o p p e e r r a a t t o o r r v v i i e e w w 5900-009-001 Rev A.4...
-
Page 17: Setup
S S e e t t t t i i n n g g u u p p n n u u r r s s e e c c a a l l l l c c o o m m m m u u n n i i c c a a t t i i o o n n W W A A R R N N I I N N G G - - Always use a Stryker supplied interface cable. Use of any other cable may cause the product to not function as intended, which may result in patient or user injury. - Page 18 N N o o t t e e • Only connect the 37-pin connector or 1/4” jack to the head wall output configuration or product Communications Tester (sold separately). • Make sure that you insert the 1/4” jack dummy plug (C) into the 1/4” jack when not in use. 2.
- Page 19 O O p p e e r r a a t t i i o o n n P P l l u u g g g g i i n n g g o o r r u u n n p p l l u u g g g g i i n n g g t t h h e e p p r r o o d d u u c c t t W W A A R R N N I I N N G G •...
- Page 20 S S t t o o r r i i n n g g t t h h e e p p o o w w e e r r c c o o r r d d W W A A R R N N I I N N G G •...
- Page 21 6. Raise and lock the siderails in the full up position (see Raising the siderails (page 22)). 7. Release the brakes (see Applying or releasing the brakes (page 17)). 8. Push the product from the headboard or footboard. A A p p p p l l y y i i n n g g o o r r r r e e l l e e a a s s i i n n g g t t h h e e b b r r a a k k e e s s W W A A R R N N I I N N G G •...
- Page 22 N N o o t t e e - - To move the product in any direction, including laterally, release the steer lock pedal. F F i i g g u u r r e e 9 9 – – R R e e l l e e a a s s i i n n g g s s t t e e e e r r l l o o c c k k / / n n e e u u t t r r a a l l p p o o s s i i t t i i o o n n F F i i g g u u r r e e 8 8 –...
- Page 23 F F i i g g u u r r e e 1 1 0 0 – – A A c c t t i i v v a a t t i i n n g g t t h h e e C C P P R R r r e e l l e e a a s s e e E E x x p p a a n n d d i i n n g g o o r r r r e e t t r r a a c c t t i i n n g g t t h h e e l l i i t t t t e e r r C C A A U U T T I I O O N N •...
-
Page 24: Operation
F F i i g g u u r r e e 1 1 1 1 – – D D e e c c k k l l e e v v e e r r l l o o c c a a t t i i o o n n s s 2. - Page 25 R R e e m m o o v v i i n n g g o o r r r r e e p p l l a a c c i i n n g g t t h h e e h h e e a a d d b b o o a a r r d d W W A A R R N N I I N N G G •...
- Page 26 F F i i g g u u r r e e 1 1 3 3 – – R R e e p p l l a a c c i i n n g g t t h h e e h h e e a a d d b b o o a a r r d d R R e e m m o o v v i i n n g g o o r r r r e e p p l l a a c c i i n n g g t t h h e e f f o o o o t t b b o o a a r r d d You can remove the footboard for patient accessibility and cleaning.
- Page 27 • To raise the siderail to the highest position, grasp and rotate the siderail upward from either the lowest position or intermediate position (Figure 15). F F i i g g u u r r e e 1 1 5 5 – – S S i i d d e e r r a a i i l l h h i i g g h h e e s s t t p p o o s s i i t t i i o o n n •...
- Page 28 • Always make sure that cables, wires, and tubing from other equipment are routed so that they are not pinched by parts of the product. N N o o t t e e - - Do not use siderails as a patient restraint device. To lower the siderail to the intermediate position, press the release button and rotate the siderail forward until it stops at the intermediate position (Figure 16).
- Page 29 F F i i g g u u r r e e 1 1 8 8 – – R R e e s s t t r r a a i i n n t t s s t t r r a a p p t t i i e e - - i i n n l l o o c c a a t t i i o o n n s s S S e e c c u u r r i i n n g g a a F F o o l l e e y y b b a a g g t t o o t t h h e e F F o o l l e e y y b b a a g g h h o o o o k k N N o o t t e e •...
- Page 30 F F i i g g u u r r e e 1 1 9 9 – – F F o o l l e e y y b b a a g g h h o o o o k k A A c c t t i i v v a a t t i i n n g g n n u u r r s s e e c c a a l l l l c c o o m m m m u u n n i i c c a a t t i i o o n n Nurse call allows the patient or health care professional to send a signal to the nurse station for assistance.
- Page 31 C C A A U U T T I I O O N N - - Always make sure that the product is clear of obstacles before you use motion functions. Foot up Raises the foot section Foot down Lowers the foot section Knee Gatch up Raises the knee Gatch Knee Gatch down...
- Page 32 • Always make sure that cables, wires, and tubing from other equipment are routed so that they are not pinched by parts of the product. C C A A U U T T I I O O N N - - Always make sure that the product is clear of obstacles before you use motion functions. Healthcare professionals must instruct patients how to operate the patient control panel.
- Page 33 • Always make sure that cables, wires, and tubing from other equipment are routed so that they are not pinched by parts of the product. C C A A U U T T I I O O N N - - Always make sure that the product is clear of obstacles before you use motion functions. Places the product into the CPR position Places the product into the Trendelenburg position (head down with foot Trendelenburg...
- Page 34 Lockouts can lock out motion control input from the operator control panel and patient control panel. N N o o t t e e • The corresponding lock LED illuminates when you lock a motion control. • Bed exit, scale, and nurse call features are still available. For m m a a s s t t e e r r l l o o c c k k o o u u t t , press all three lock buttons (A, B, C) at the same time to lock all button functions on the operator control panel, patient control panel, and footboard control panel.
- Page 35 F F o o o o t t b b o o a a r r d d c c o o n n t t r r o o l l p p a a n n e e l l - - m m e e n n u u c c o o n n t t r r o o l l s s Displays menu functions Screen N N o o t t e e - - The screen is not a touchscreen display.
- Page 36 F F o o o o t t b b o o a a r r d d c c o o n n t t r r o o l l p p a a n n e e l l - - h h o o m m e e d d i i s s p p l l a a y y The home display is the default screen of the footboard control panel.
- Page 37 F F o o o o t t b b o o a a r r d d c c o o n n t t r r o o l l p p a a n n e e l l - - s s c c a a l l e e Press to weigh the pa t and add an entry...
- Page 38 W W e e i i g g h h i i n n g g a a p p a a t t i i e e n n t t W W A A R R N N I I N N G G •...
- Page 39 F F o o o o t t b b o o a a r r d d c c o o n n t t r r o o l l p p a a n n e e l l - - B B e e d d e e x x i i t t Press to arm/disarm the bed exit alarm Alarm State...
- Page 40 P P a a u u s s i i n n g g b b e e d d e e x x i i t t While armed, you may pause bed exit to allow the patient to exit the product for set periods of time. To pause bed exit: 1.
- Page 41 P P a a g g e e o o n n e e P P a a g g e e t t w w o o Press to change nightlight brightness Press to display hospital or ward se Night light Policy se t exit light...
- Page 42 A A c c c c e e s s s s o o r r i i e e s s a a n n d d p p a a r r t t s s These accessories and parts may be available for use with your product. Confirm availability for your configuration or region.
-
Page 43: Transporting The Product
F F i i g g u u r r e e 2 2 1 1 – – T T w w o o - - s s t t a a g g e e I I V V p p o o l l e e A A t t t t a a c c h h i i n n g g o o r r r r e e m m o o v v i i n n g g t t h h e e p p a a t t i i e e n n t t h h e e l l p p e e r r ( ( o o p p t t i i o o n n ) ) W W A A R R N N I I N N G G - - Always use two people to attach or remove the patient helper. - Page 44 F F i i g g u u r r e e 2 2 2 2 – – A A t t t t a a c c h h i i n n g g o o r r r r e e m m o o v v i i n n g g t t h h e e p p a a t t i i e e n n t t h h e e l l p p e e r r Reverse steps to remove the patient helper.
-
Page 45: Lowering The Siderails
F F i i g g u u r r e e 2 2 3 3 – – A A d d j j u u s s t t i i n n g g t t h h e e p p a a t t i i e e n n t t h h e e l l p p e e r r A A t t t t a a c c h h i i n n g g t t h h e e o o x x y y g g e e n n b b o o t t t t l l e e h h o o l l d d e e r r C C A A U U T T I I O O N N •... - Page 46 For United States only. Confirm availability for your configuration or region. Call Stryker Customer Service: 1-800-327- 0770. Stryker’s preferred wipes (2060-000-001 6'' x 10'' or 2060-000-002 9'' x 12'') include the following active ingredients: • n-Alkyl (60% C14, 30% C16, 5% C12, 5% C18) dimethyl benzyl ammonium chloride - 0.154% •...
-
Page 47: Cleaning
C C l l e e a a n n i i n n g g C C A A U U T T I I O O N N • Do not clean, disinfect, service, or perform maintenance while the product is in use. •... -
Page 48: Disinfecting
D D i i s s i i n n f f e e c c t t i i n n g g C C A A U U T T I I O O N N • Do not clean, disinfect, service, or perform maintenance while the product is in use. •... -
Page 49: Preventive Maintenance
Remove the product from service before you perform the preventive maintenance inspection. Make sure that all items listed during annual preventive maintenance for all Stryker Medical products. You may need to perform preventive maintenance checks more often based on your level of product usage. Service only by qualified personnel. - Page 50 Inspect hi-lo actuators for oil leaks Inspect footboard connector housing for cracks or damage All motions function Nurse call functions Auxiliary outlets function (test ground fault interrupter) Replace batteries (one year expected service life) Set clock to local date and time Product serial number: Completed by: Date:...
- Page 51 E E M M C C i i n n f f o o r r m m a a t t i i o o n n W W A A R R N N I I N N G G - - The use of accessories, transducers, and cables, other than those specified or provided by the manufacturer, could result in increased electromagnetic emissions or decreased electromagnetic immunity and result in improper operation.
- Page 52 G G u u i i d d a a n n c c e e a a n n d d m m a a n n u u f f a a c c t t u u r r e e r r ’ ’ s s d d e e c c l l a a r r a a t t i i o o n n - - e e l l e e c c t t r r o o m m a a g g n n e e t t i i c c i i m m m m u u n n i i t t y y Main power quality should Electrostatic fast transient/ +2 kV for power supply lines...
- Page 53 Portable and mobile RF communications equipment should be used no closer to any part of the 5900 M M V V 3 3 Bariatric bed, including cables, than the recommended separation distance calculated from the equation appropriate for the frequency of the transmitter. Recommended separation distance D=(1.2) (√...
- Page 54 W W A A R R N N I I N N G G • Portable RF communications equipment, including peripherals such as antenna cables and external antennas, should be no closer than 12 inches (30 cm) to any part of M M V V 3 3 , including cables specified by the manufacturer. •...
- Page 55 L L e e n n g g t t h h ( ( m m ) ) C C a a b b l l e e Nurse call (DB-37) Nurse call (1/4 in.) 5900-009-001 Rev A.4...
- Page 56 0 0 0 0 3 3 9 9 - - 2 2 5 5 4 4 - - 0 0 0 0 0 0 0039-254-000 5900-009-001 Rev A.4...
- Page 57 5 5 9 9 0 0 0 0 4 4 0 0 0 0 0 0 3 3 7 7 , , 5 5 9 9 0 0 0 0 4 4 0 0 0 0 0 0 4 4 0 0 5900400037 5900400040 5900-009-001 Rev A.4...
- Page 58 5 5 9 9 0 0 0 0 4 4 0 0 0 0 0 0 3 3 8 8 5900400038 5900-009-001 Rev A.4...
- Page 59 5 5 9 9 0 0 0 0 4 4 7 7 0 0 0 0 1 1 7 7 5900470017 5900-009-001 Rev A.4...
- Page 60 5 5 9 9 0 0 0 0 4 4 7 7 0 0 0 0 1 1 8 8 , , 5 5 9 9 0 0 0 0 4 4 7 7 0 0 0 0 1 1 9 9 5900470018 5900470019 5900-009-001 Rev A.4...
- Page 62 Stryker Medical 3800 E. Centre Avenue Portage, MI 49002 5900-009-001 Rev A.4 2019/08 WCR: AA.38...
Need help?
Do you have a question about the MV3 5900 and is the answer not in the manual?
Questions and answers
Do you have a quick step guide to using stryker mv3.
No, the provided context does not include a quick step guide for using the Stryker MV3 5900.
This answer is automatically generated