Table of Contents
Advertisement
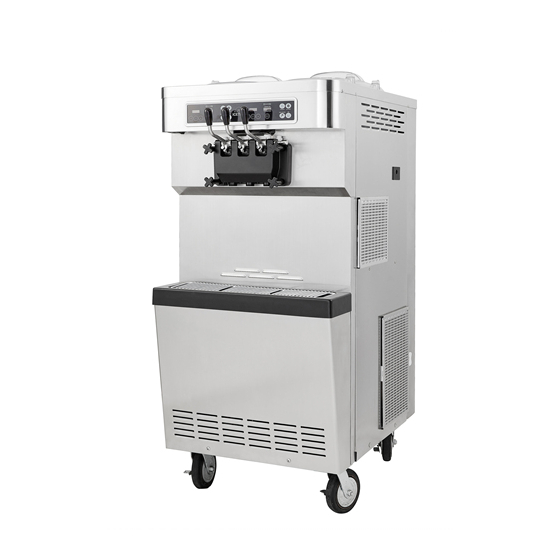
SSI(ISI)-303SN
SSI(ISI)-203S, SN, SNP
This product is for indoors, so do not use it outdoors.
Before using the product, be fully familiar with the contents in the manual.
Please store this manual in a place where you can reach it easily for
future reference.
This user manual contains a product warranty.
Advertisement
Table of Contents

Related Manuals for icetro SSI-303SN


Summary of Contents for icetro SSI-303SN
- Page 1 SSI(ISI)-303SN SSI(ISI)-203S, SN, SNP This product is for indoors, so do not use it outdoors. Before using the product, be fully familiar with the contents in the manual. Please store this manual in a place where you can reach it easily for future reference.
- Page 2 Our soft ice cream freezer offers the following advantages. 1. Minimum noise and refreshing cooling system With a high efficiency and low noise motor, we can achieve minimal noise from the refreshing cooling system. 2. MICOM control method Use of an artificial intelligence control type achieves an optimal cooling system.
-
Page 3: Table Of Contents
Dear customers; Thank you very much for purchasing a soft ice cream maker made by ICETRO. For correct use of the product and its maintenance, please read this manual carefully. If a problem occurs while using the product, you can refer to this manual for troubleshooting. This manual contains a product warranty, so... -
Page 4: Cautions For Your Safety
Cautions for your safety These are safety related items. So, comply with them at all times! They are meant to protect the safety of users and prevent property damages. Please, read the cautionary items carefully for correct use. If violated, it can cause death If violated, it can cause sever If violated, it can cause or severe injury. -
Page 5: Installation Related Items
Cautions for your safety Installation related items Do not install it near a heating Do not install it near dust, moisture device. or rainwater (water) popping. It can cause fires. It can cause electrical shocks or fires. Do not use or store inflammable Do not install it on a tilt. -
Page 6: Part Names And Controller
Part names and controller BUTTON DISPLAY COVER FOOD FAN DRAINBOX UP FILTER CONDENSOR DRAIN BOX POWER DASHER LEVER SWITCH COVER FRONT PANEL... - Page 7 Part names and controller DRAIN DASER SLUG COVER BOLT...
-
Page 8: Check Prior To Use
Check prior to use Make sure to check them prior to use. Install it independently with an earth leakage circuit breaker with more than 50A and provide anexternal grounding. 203 : 130A, 320A More than 303 : 150A, 330A More than Do not block the air vent. -
Page 9: Button Display Names And Functions
Button display names and functions "Insufficient Ingredients" lamp "Left Status Display Window" It blinks when there are insufficient AUTO: Displays the operational status. ingredients. Defrost: Display the defrost condition. Revive: Displays the revival condition. "No Ingredient" lamp Sterilization: Displays the sterilization status. It blinks when there is no ingredient. -
Page 10: Functional Description Of The Buttons 10~12
Functional description of the buttons Change the setting If you press the "Set" button lightly, you can enter the mode to check the setting as below. Use the " " and " " buttons to see the settings. 1-1: Check ice cream level settings You can check the current setting for the ice cream. - Page 11 Functional description of the buttons Check the temperature and the record Press the "Select" button to check the different temperature settings mentioned below. The item number and the temperature will be displayed in turns. 2-1: Temperature of the mixing tank 2-2: Temperature of the mixing tank sensor 2-3: Condenser suction temperature (neighboring temperature) 2-1: Temperature of the mixing tank...
-
Page 12: Functional Description Of The Buttons
Functional description of the buttons Change the setting Press the "Set" button for three seconds to enter the setting change mode as follows. Use the " " and " " to enter the password and use the "Set" button to move to each item. When the display blinks, use " " and " " to change the value and use the "Set"... -
Page 13: Explanation Of The Function Button 13~18
Explanation of the function button (set by an expert) Model selection: Only experts that have been designated by the main office or by those who received professional education and received approval from the main office shall adjust this category. A service charge will be applied if problems occur due to unapproved alterations. - Page 14 Explanation of the function button (set by an expert) 4-4: Standby off temperature setting This sets the cylinder’s raw material storage temperature in the standby mode. When the temperature of this category is too low, the raw material inside the cylinder freezer and soft freezer can become like porridge 4-5: Standby management temperature setting This sets the management temperature to refrigerate the raw...
- Page 15 Explanation of the function button (set by an expert) 4-11: Environmental temperature detect function setting The function to detect the environmental temperature can be turned ON/OFF. Environmental temperature is the temperature of the air coming into the compressor. Therefore, the temperature for this category can be high and a warning message can be given if the place of installation is small and has no ventilation.
- Page 16 Explanation of the function button (set by an expert) 2: Operation time setting after sales Set the operation delay time of the air pump sales. After the motor operation is stopped, the air pump is additionally operated according to the time set for this category. 3: Operation time set after button input Set the time that the air pump operates every time the button is pushed.
- Page 17 Explanation of the function button (set by an expert) compensation will be used This category is used to compensate for the surrounding temperature (located at the suction side of the compressor) 1: Temperature compensation value setting for 10 or lower This sets the temperature compensation value of the ambient temperature to the environmental temperature of 10 or lower.
-
Page 18: Explanation Of The Function Button
Explanation of the function button (set by an expert) 4-30: MIX OUT function selection When this category is activated, all operations are stopped in case there is no raw material. 4-31: MIX LOW function selection 4-32: Frequency standard value setting Setthe frequency standard of the supply power. - Page 19 How to make soft ice cream How to make soft cream 1. Pour 2.0 of ingredients in the mixing tank. The raw material must has been stored in a cooler at a temperature 10 or below. 2. Plug in the caburator and block the hole. 3.
-
Page 20: Soft Ice Cream Out-Speed Control
cream out-speed Soft ice control the out-speed of the soft ice cream. reduce the out-speed of the soft ice cream. position and maintain constant dispensing volume. ingredients in the mixing tank will be supplied to the cylinder relatively slowly. Suddenly, For your the vending speed for one cup every 6 to 8 seconds. -
Page 21: Caburator Control
Caburator control The carburetor is consisted of two parts. The part that is inserted into the hole of the mixing tank is called the body and a tube is inserted into this.The tube has a hole at the top and at the bottom. It can't be inserted in the reverse direction. If you align the no hole of the upper area of the caburator body with the area having no hole in the upper area of the tube, then the hole in the lower area of the caburator body will be blocked. -
Page 22: Cleaning Method 22~24
Cleaning method Wash mode 1. Press the wash button on the control panel. (Wait until the soft cream in the cylinder is melted. About 10 minutes.) 2. Take out the caburator (tube+body). Tube Body 3. Remove the soft cream liquid in the mixing tank and pour faucet water into it. - Page 23 Cleaning method Wash mode 7. Separate the dasher cover from the main body. Separate the dasher from the cylinder. 8. Brush off the inner area of the cylinder and wipe it off with a soft cloth. 9. Remove the dasher brush and clean the blade hole with a brush and wipe out moisture with a soft cloth.
-
Page 24: Washing Of Each Parts
Cleaning method Washing of each parts 13. Disassemble the mixing shaft and wipe it off with a brush. mixing shaft 14. Brush the piston holes of the dasher cover. 15. After cleaning off all parts, dry them and reassemble them in the reverse order. 16.Clean the drain slug and drain box(drain box up). -
Page 25: Dasher And Dasher Cover Assembly Method
Dasher and dasher cover assembly method Dasher assembly 1. Assemble the dasher lug pom by turning it onto the dasher blade. 2. Apply food grade grease on the shaft and insert it into the dasher. 3. Check the direction of the packing javara and push it as deep as possible to prevent from coming off. -
Page 26: Dasher Cover Assembly Method
Dasher cover assembly method Dasher cover assembly 1. Apply edible vegetable oil to the ring inserted into the piston. 2. Insert the piston in the middle of the dasher cover. Pay attention to the locations of the left/right pistons and the center piston. 3. -
Page 27: Icetro' Air Pump A
; so, within certain limits, it allows overrun regulation depending on mix used. ICETRO pump regulator should be set to the middle position. If, after dispensing a significant number of cones, ice cream is too heavy and wet, you may move ICETRO pump regulator a notch at a time towards the right. -
Page 28: Pump Cleaning
Pump Cleaning 1. Fill a clean sink with detergent and hot water(50~60℃) 2. Wash the disassembled parts with the solution and scrub them thoroughly with the brushes provided with the machine. As you proceed, rinse with hot water. Make sure all lubricant and mix film is removed from the parts. -
Page 29: Disassembling Mix Pump
DISASSEMBLING MIX PUMP 1. Take the connection pipes out from the pumps and compression pipes position. Disassembling compression pipes lift them while taking them out from their seats inside the tanks. 2. Remove the pumps by turning them 45 clockwise and pulling backwards. 3. -
Page 30: Priming The Mix Pump
PRIMING THE MIX PUMP Tank filling: Take 1 bag of mix from the refrigerator. Pour one bag of mix into the each tank allowing it to drain into the freezing cylinders. Lower the distribution handles and wait till only full strength mix(not mix and sanitizer) will come out from front lid;... -
Page 31: How To Upgrade The Program -Download Kit Product 31~33
How to upgrade the program (Download kit Product) performing any work. In this case, do not power off. Remove the fixing bolts from the left/right/ bottom/top of the product. 2. While pulling out the lever shaft, separate the sales lever. At this time, please be careful not to drop thesales lever. -
Page 32: How To Upgrade The Program
How to upgrade the program (Download kit Product) 7. Press the right button on the download kit. The red and green LED will blink and then the green LED will blink alone when downloading starts. When downloading iscompleted, the green LED will stay on. - Page 33 How to upgrade the program (Download kit Product) 13. If the new program is downloaded, the no load value Heating (1- 2) could have been initialized. Therefore if the operating Month Time Heating Wash (To “Defrost”, block the mix valve hole.) Select Defrost Auto...
-
Page 34: Pc Download Kit 34~36
How to upgrade the program (PC Download kit) 1. The picture on the left shows the components of the software download kit: 1 download kit, 1 AC power adapter, 1 RS-232C (or USB) serial cable. As SSI-203S comes in two parts - main and display - you will need 2 sets of download kit. -
Page 35: How To Upgrade The Program
How to upgrade the program (PC Download kit) 7. Click "FIND" and a pop-up window will open, as shown below. × SendTo4480 V.090130.01.Eng Go to the folder where the most recent software is stored and >> (Downloder Usage) 1. Push 3 buttons at the same time 2. -
Page 36: How To Upgrade The Program
How to upgrade the program (PC Download kit) 10. Click "Start downloading" and you will see the progress × SendTo4480 V.090130.01.Eng >> (Downloder Usage) window will appear upon completion of downloading. 1. Push 3 buttons at the same time Please apply the above mentioned procedures to 2. -
Page 37: Installation Method
Installation method Electrical connection 1.Install a leakage current breaker, capacity of 20A or larger, in each distribution panel of the relevant model. AC 1 220V AC 3 220V AC 3 220V 2. Remove the front panel at the front bottom, and remove the control box cover. -
Page 38: Before Requesting Service
Before requesting service The soft ice cream machine can operate abnormally because you are not familiar with the method for use or due to another insignificant reason. It does not necessarily mean a malfunction. In this case, check the following items to resolve a simple problem on your own without the help from the service center. -
Page 39: Error Code Types
Error code types Error Release Error code Display Error details occurrence condition Er 1 hoPn Cooling temperature sensor is bad.(Open) Stop Auto release Continuous display Er 2 Cooling temperature sensor is bad.(Short) Stop Auto release Continuous display hSht Er 3 Stop Auto release Continuous display... -
Page 40: Circuit Diagram
Circuit diagram... - Page 41 Circuit diagram...
- Page 42 Circuit diagram...
- Page 43 Product specification Classification Specs Product name Soft Ice Cream Freezer Model name 203S 203SN 203SNP 303SN Rated voltage and frequency 220V 50/60Hz, 3 220V 50/60Hz, 3 380V 50/60Hz Power consumption 4.5KW 7.4KW Product size Height 1520 1510 1510 1540 (including the wheel Width excluding the cap) Length...
-
Page 44: Product Warranty
11. Product damages or functional failures caused by external impacts during installation or use. 12. Product malfunction caused by consumable parts or parts which are not the authentic ICETRO. 13. Malfunctions caused by neglecting the installation standard in the user manual. -
Page 45: Part List 45~51
PART LIST 203S, SN [OUTSIDE ASS'Y] GRIP HA NDLE FRONT COVER UP... - Page 46 PART LIST 203S, SN [CONDENSER FAN MOTOR ASS'Y] SOLENO CONDENSER COVER DISCHA SUCTION...
- Page 47 PART LIST 303S [EXTERNAL ITEMS] BASKET DRAIN SLUG FRONT COVER UP BACK...
- Page 48 PART LIST 303S [CONDENSER FAN MOTOR ASS'Y] CAPILLAR COND E.P.R SSOR CHARGE SSOR CONDENSER FAN MOTOR ASS'Y...
- Page 49 PART LIST [CONTROL BOX PART] RELA EOCR...
- Page 50 PART LIST 203, 303 [DASHER ASS'Y] SHER [DISPLAY PANEL ASS'Y]...
-
Page 51: Part List
PART LIST 203, 303 [ MOVING PART] SSI(ISI)-203SN,SNP SSI(ISI)-203S, 303SN, SNP V-BELT...
Need help?
Do you have a question about the SSI-303SN and is the answer not in the manual?
Questions and answers
303 SN ssi (well spriner ) machine we need some parts where we can order it