Table of Contents
Advertisement
Soft Ice Cream Maker
ISI-163TT
Read this manual carefully before using the product.
●
Keep the booklet in a safe place after reading.
The product is to be used indoors.
●
Be sure to install it inside a building.
Appearances, design, color, or parts may be changed
●
without prior notice for the most effective manufacturing process.
User Manual
Advertisement
Table of Contents

Subscribe to Our Youtube Channel
Related Manuals for icetro ISI-163TT


Summary of Contents for icetro ISI-163TT
- Page 1 Soft Ice Cream Maker User Manual ISI-163TT Read this manual carefully before using the product. ● Keep the booklet in a safe place after reading. The product is to be used indoors. ● Be sure to install it inside a building.
- Page 2 This Soft Ice Cream Maker has the following benefits: 1. Minimum noise and refreshing cooling system With a high efficiency and low noise motor, we can achieve minimal noise from the refreshing cooling system 2. MICOM control method Use of an artificial intelligence control type achieves an optimal cooling system. 3.
-
Page 3: Table Of Contents
Dear customers; Thank you very much for purchasing a soft ice cream maker made by ICETRO. For correct use of the product and its maintenance, please read this manual carefully. If a problem occurs while using the product, you can refer to this manual for troubleshooting. This manual contains a product warranty, so keep it safely for future reference. -
Page 4: Cautions For Your Safety 04~06
Cautions for your safety These are safety related items. So, comply with them at all times! They are meant to protect the safety of users and prevent property damages. Please, read the cautionary items carefully for correct use. If violated, it can cause If violated, it can cause sever If violated, it can cause deathor severe injury. -
Page 5: Installation Related Items
Cautions for your safety Installation related items Do not install it near a heating Do not install it near dust, moisture device. or rainwater (water) popping. Itcan cause fires. Itcan cause electrical shocks or fires. Do not use or store inflammable Do not install it on a tilt. - Page 6 Cautions for your safety This appliance is not intended for use by persons (including children) with reduced physical, sensory or mental capabilities, or lack of experience and knowledge, unless they have been given supervision or instruction concerning use of the appliance by a person responsible for their safety. Children should be supervised to ensure that they do not play with the appliance.
-
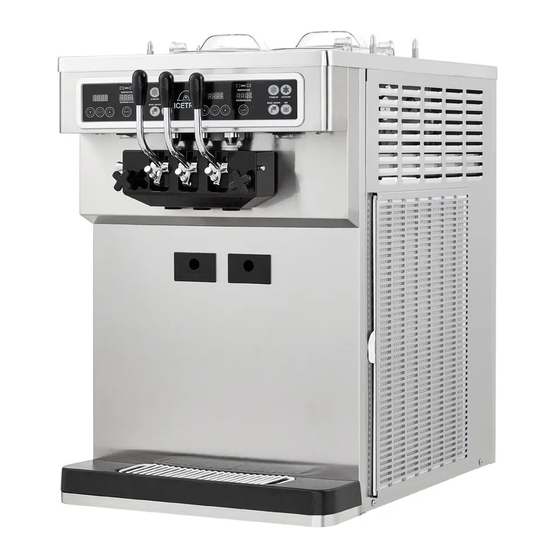
Page 7: Part Names And Controller 07~08
Part names and controller FRONT Cover basket Button display Lever Dasher cover Filter condenser (Air cooled type only) Drain slug Right power switch Left power switch Drain box Rubber foot LEFT RIGHT... - Page 8 Part names and controller Included accessories CARBURETOR TUBE CARBURETOR TUBE BRUSH BODY MANUAL BRUSH 3 BEARING DASHER DASHER COVER PACKING BRUSH 143 PATITION FOOD PACKING CARBURETOR DASHER LUG FOAM PACKING DOWN 143 HINES PACKING PISTON PACKING REMOVE HANDLE 1 EA...
-
Page 9: Check Prior To Use
Check prior to use 【 The following must be checked before using the product! 】 Please check the rating of the product before starting installation. Install it independently with an earth leakage circuit breaker with more than 20A and provide anexternal grounding. (Ask a qualified electrical technician for the installation.) The power cable should be connected before the product can operate normally. -
Page 10: Button Display Description And Functions
Button display description and functions "Left Status Display Window" "Insufficient Ingredients" lamp It blinks when there are insufficient ingredients. Each mode number and values are shown. AUTO : Displays the operational status. ● "No Ingredients" lamp WASH : It displays motor current during wash. ●... -
Page 11: Functional Description Of The Buttons 11~13
Functional description of the buttons If you press the "Set" button lightly, you can enter the mode to check the setting as below. Use the“ ▼ ” and“ ▲ ” buttons to see the settings. 1-1: Check ice cream level settings You can check the current setting for the ice cream. - Page 12 Functional description of the buttons Check the temperature and the record Press the "Select" button to check the different temperaturesettings mentioned below. The item number and the temperature will be displayed in turns. 2-1 : Temperature of the mixing tank 2-2 : Temperature of the mixing tank sensor 2-3 : Condenser suction temperature (neighboring temperature) 2-1 : Temperature of the mixing tank...
- Page 13 Functional description of the buttons Change the setting Press the "Set" button for three seconds to enter the setting change mode as follows. Use the "▼" and "▲" to enter the password and use the "Set" button to move to each item. When the display blinks, use "▼" and "▲" to change the value and use the "Set"...
-
Page 14: How To Make Soft Ice Cream
How to make soft ice cream 1. Open the top cover and pour ingredient into the hopper tank. ※ Fill the ingredient bellow max level. 2. After pouring the mix, please insert the carburetor body and carburetor tube into the hole in the hopper. Carburetor tube Carburetor body 3. -
Page 15: How To Adjust The Carburetor
How to adjust the carburetor The carburetor has two components. The one inserted into the hopper is“BODY”with a“TUBE”going Carburetor tube body into the body. The tube is open on both sides and cannot be inserted in the wrong direction. Carburetor tube The carburetor hole is opened. -
Page 16: Cleaning Method 16~18
Cleaning method 【 Wash mode 】 1. Press the wash button on the control panel. (Wait until the soft cream in the cylinder is melted, About 10 minutes.) 2. Remove the cover basket and Take out the carburetor (tube+body) Carburetor Please do not let water or ice cream mix get into the agitator shaft. - Page 17 Cleaning method 【 Wash mode 】 7. Separate the dasher cover from the main body. Disassemble parts of dasher assay. 8. Brush off the inner area of the cylinder and wipe it off with a soft cloth. 9. Disassemble the dasher assembly, wash all the parts using neutral detergent and wipe them with soft cloth.
-
Page 18: Washing Of Each Parts
Cleaning method 【 Washing of each parts 】 13. Disassemble the mixing shaft and wipe it off with a brush. Mixing shaft 14. Take out the piston of the dasher cover and clean the edge of the piston with a soft towel. 15. -
Page 19: Dasher Cover Assembly Method 19~20
Dasher and dasher cover assembly method 【 Dasher assembly 】 1. Please assemble the blades (LUG POM) on the dasher ass'y. Dasher lug pom 2. Please insert the assembled dasher into cylinder. -
Page 20: Dasher Cover Assembly
Dasher and dasher cover assembly method 【 Dasher cover assembly 】 1. Apply edible vegetable oil to the ring inserted into the piston. 2. Insert the piston in the dasher cover. ※Please make sure not to switch the middle piston with left and the right piston. ※... -
Page 21: Installation Method
Installation method 【 Electrical connection 】 1. Please set up the earth leakage circuit breaker box for only the machine (above AC 20A for 1phase) and connect electricity. Front panel ● 2. They should match the voltage displayed in 1-3. If not,then using a straight headed driver, adjust the PCB variable resistance located in the control box at the front of the product as shown in the figure. -
Page 22: Before Requesting Service
Before requesting service The soft ice cream maker can operate abnormally because you are not familiar with the method for use or due to another insignificant reason. It does not necessarily mean a malfunction. In this case, check the following items to resolve a simple problem on your own without the help from the service center. If you still can’t resolve it after checking the following items, please contact our service center. -
Page 23: Error Code Types
Error code types The soft ice cream maker may malfunction due to incorrect operation procedure or a trivial cause other than machine defect or failure. If the following corrective actions fail to correct the problem, or the error code is not presented below, or the same error persists, contact the nearest After Service Center. -
Page 24: Circuit Diagram
Wiring diagram... -
Page 25: Service For Refrigerant Lines 25~27
Service for Refrigerant Lines... - Page 26 Service for Refrigerant Lines...
- Page 27 Service for Refrigerant Lines...
-
Page 28: Removal And Replacement
Removal and Replacement of Compressor... -
Page 29: Removal And Replacement
Removal and Replacement of Capillary Tube... - Page 30 Removal and Replacement of Condenser'...
-
Page 31: Replacement Of Fan Motor
Replacement of Fan motor... -
Page 32: Refrigerant Circuit
Refrigerant circuit Mix tank Capillary Dryer E.P.R Thermostat Suction pipe MANIFOLD For keeping in the refrigerator Comperssor Freezer Automatic Expansion Valve Thermostat Service Port Condenser Vacuum R404A Pump Moter For keeping Scales H.P S/W in the freeze Compressor Discharge pipe Charging Refrigerant ① Leak Test When the refrigeration system is opened to repair or service the refrigerant system, conduct leak test before vacuum work, at the expanded and welded tube joints. -
Page 33: Product Specification
Product specification CLASSIFICATION SPECIFICATION Product name Soft Ice Cream Maker Model name ISI-163TT Rated voltage and frequency 220V, 60Hz 230 V~, 50 Hz Rated current 15.6 A 12.7 A HEIGHT Product size (foot inclusion, WIDTH cover excluded) (mm) DEPTH 745 (Lever excluded) Cylinder capacity(L) 1.4 X 2... -
Page 34: Part List 34~37
Part list 【 MOVING PART 】... - Page 35 Part list 【 DASHER ASS'Y 】...
- Page 36 Part list 【 COMPRESSOR AND CONDENSER 】...
- Page 37 Part list 【 FRONT COVER ASS'Y 】 【 SIDE & BACK PANEL ASS'Y 】...
-
Page 38: What To Watch Out For
What to watch out for Overcooling may give rise to issues such as unintended stopping of operation, damage to the product itself or any part, or malfunction of the power delivery axis. There may be excessive noise or smell due to abrasion. Any issue inside the product may result in the formation of foreign object in the ice cream. -
Page 39: Warranty
Warranty If no receipt or warranty certificate is received, the receipt/warranty certificate is lost, or the date of purchase cannot be confirmed for reasons other than the foregoing, the warranty expires within 6 months of the manufacturing date. [ Free repair ] 1. - Page 40 온라인 인터넷 서비스 http://www.icetro.com 3 2 4 0 3 4 5 - 0 2...
Need help?
Do you have a question about the ISI-163TT and is the answer not in the manual?
Questions and answers