
Subscribe to Our Youtube Channel
Related Manuals for icetro ISI-161TH


Summary of Contents for icetro ISI-161TH
- Page 1 Ice Cream Machines User's Manual ISI-161TH * This product is designed for indoor use. * Make sure to install it indoors. * The appearance, design, color, and parts of the product are subjected to change without prior notice.
- Page 2 Ice Cream Machines offers the following advantages 1. Slim line soft Ice Cream Machines Easy to install thanks to the compact form factor in Korea and slim body. 2. Minimised noise & Vibration cooling system With a high efficiency and low noise motor, we can achieve minimal noise from the refreshing cooling system.
-
Page 3: Table Of Contents
This product can be installed only by someone qualified for installation. If use of parts and accessories not provided or approved by ICETRO or any part or accessories made by ICETRO but remodeled by other person causes a problem, we are not responsible for if financially. -
Page 4: Cautions For Your Safety
Cautions for your safety The caution/warning details for safety are intended to prevent accident or danger through safe and proper use. Therefore please follow the details accordingly. The precaution details are categorized into warning and caution, and the respective meanings are as follows. If you neglect this symbol and wrongly use the product, Danger it may cause a fire, serious injury or death. - Page 5 For relocation of the product, call an expert. The product may cause such hazards as Do not disassemble or falling down unless properly installed. alter the product. It should be installed in accordance with related Electric shock, fire or injury may occur. regulations such as the road and traffic act, the fire fighting act and the food sanitation act.
- Page 6 Do not touch the power cable or any elctric part Do not touch any moving part with wet hands. inside the product. Explosion, fire or injury may You may get injured. occur. Stop operating the product if you hear any unusual noise or smell or if you see smoke Do not climb onto the product coming out from the product.
- Page 7 Please do not press“WASH”button Do not place any obstacle at during empty condition which the cylinder the entrance of the air vent. doesn’t contain any ingredients or water. It may cause the degradation The bearing of drum can be frayed of functionality.
- Page 8 If you want to leave it unused Do not connect many electrical for a long time, then close the products to the earth water supply valve and leakage circuit breaker. turn off the earth leakage Use it individually. circuit breaker. It can cause fire.
-
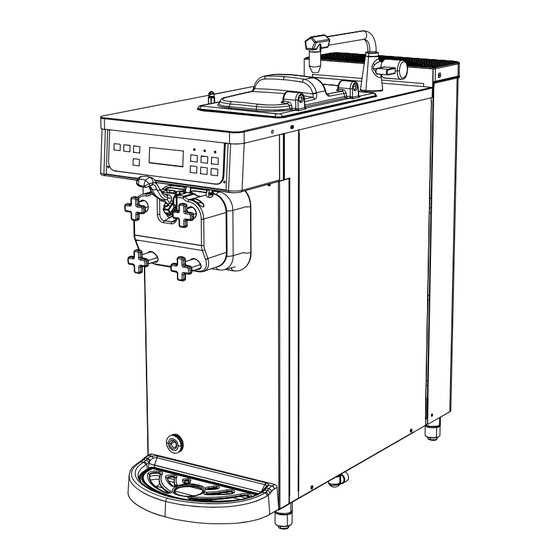
Page 9: Name Of Each Part
Name of each part FRONT AIR VENT A WATER FAUCET MIX TANK COVER BUTTON DISPLAY LEVER DASHER COVER DASHER COVER BOLT USB PORT AIR FILTER DRAIN BOX LEF T SIDE RIGHT SIDE (854) - Page 10 ATTACHMENTS MANUAL BRUSH DRUM DASHER LUG POM PACKING DASHER COVER BRUSH COVER PACKING CARBURETOR CARBURETOR TUBE PACKING PISTION BRUSH 3 BEARING DASHER BRUSH CARBURETOR OUT CARBURETOR HINES TUBE BODY HOSE PACKING REMOVE HANDLE UNION 1/2 1 EA...
-
Page 11: Product Specification
Product specification CLASSIFICATION SPECIFICATION Product name Ice Cream Machines Model name ISI-161TH Rated power 220V, 60Hz Power consumption 1286 W Current consumption Product size WIDTH(W) 300 mm (Applicable to rubber feet / DEPTH(D) 775 mm Not applicable to tap, cover,... -
Page 12: Check Prior To Use
Check prior to use 【 Make sure to check them prior to use ! 】 Install it independently in an earth leakage circuit breaker with more than 20A and provide an external grounding. (Ask a qualified electrical technician for the installation.) The power cable should be connected before the product can be operated normally. -
Page 13: Button Display Names And Functions
Button display names and functions DISPLAY WINDOW ‘ ’ Displays the degree of soft ice ● cream formation in operation. [ A u t o ] I c e c r e a m L e v e l 6 0 % B r e a k T i m e 8 . -
Page 14: Description Of The Functional Buttons
Description of the functional buttons 【 】 Detail description of each mode Pour the raw material in the mixing tank and press the Making soft ice cream in‘AUTO’mode ‘AUTO’button. The following status display will be shown. [ A u t o ] I c e c r e a m L e v e l ①... - Page 15 【 】 Detail description of each mode If the soft ice cream is not used for a long time, then its shape “REGENERATION” mode will be degraded. In this case, you can use the‘Regeneration’ function to make it look better. [ R e g n r .
- Page 16 【 】 Detailed description of each mode “PASTEURIZE” mode If pasteurization is not done every day, and the ingredients [ H e a t ] H o p p e r T e m p are stored at a temperature below 5℃, after 2 or 3 days, 3 0 / 3 0 : 56 .
- Page 17 【 】 Check the setting Press the‘SET’button lightly to enter the mode where DEC. INC. set-up value can be confirmed, as shown below. In the confirmation mode, Press the‘SET’button to see the setting values in the following order. SELECT The temperature setting in the hopper [ T e m p e r a t u r e ] and the cylinder is displayed.
- Page 18 【 】 Check the record DEC. INC. Press the ‘SELECT’ button for three seconds to check the records in the order of Sterilization, Washing, and Error, as shown in the right. Display items can be changed with the‘DEC.’,‘INC.’ buttons. SELECT To check the date, there has to be at least one record.
-
Page 19: Explanation Of The Button Function
Explanation of the button function 【 Change the setting 】 Press the‘SET’button for three seconds to enter the setting change mode as follows. DEC. INC. Move to other items using the ‘DEC.’ and ‘INC.’ buttons. Press the‘SET’button. While the setting value is flashing, change the value using the‘DEC.’and‘INC.’buttons. -
Page 20: Making Soft Ice Cream
Making soft ice cream 1. Open mix tank cover and put in sufficient amount of ingredients. 2. Insert the carburetor body and carburetor tube into the mix tank. CARBURETOR TUBE When you move to 'AUTO' mode after 'STAND-BY' mode, please make sure to insert the carburetor in CARBURETOR BODY fullface, so that you can see the carburetor hole to prevent clogging. -
Page 21: How To Pasteurize The Soft Ice Cream
How to pasteurize the soft ice cream 1. Cover the carburetor hole inside the mix tank cover. 2. Press the‘PASTEURIZE’button. PASTEURIZE STAND-BY MIX-LOW This function is used to suppress the growth of micro organisms and maintain the ingredients fresh for a long time PASTEURIZE WASH STAND-BY... -
Page 22: How To Make The Soft Ice Cream Look Better
How to make the soft ice cream look better 1. Remove the carburetor from the mix tank. 2. Press 'STOP' and 'DEFROST' on the control panel. PASTEURIZE STAND-BY MIX-LOW PASTEURIZE WASH STAND-BY BOILING DEFROST AUTO STOP REGENERATION 3. Insert the carburetor back after defrosting is complete and cover the hole. -
Page 23: Soft Ice Cream Discharging Speed Control
Soft ice cream discharge control 1. By adjusting 'Screw Adjust' at the bottom of the lever (out lever), you can adjust the discharging speed of the soft ice cream. As shown in the figure on the right, release the 'Screw Adjust' to reduce the discharging speed of the soft ice cream. -
Page 24: Adjustment Method For Carburetor
Adjustment method for carburetor The carburetor is made up of two parts. The part that is inserted into the hole of the mixing tank is called the body and a tube is inserted into this. The tube has a hole CARBURETOR TUBE BODY at the top and at the bottom. -
Page 25: Cleaning Method
Cleaning method 1. Press STOP’button, and then‘DEFROST’ PASTEURIZE STAND-BY MIX-LOW on the operation panel. PASTEURIZE WASH STAND-BY (Wait about ten minutes until soft ice-cream is melted in the cylinder.) BOILIN G DEFROST AUTO STOP REGENER ATION 2. Open the cover of the mix tank, and then remove and clean the carburetor CARBURETOR (the body), Impeller. - Page 26 7. Stop the product by pressing stop button(do not turn off the power switch) and loose the dasher cover bolts diagonally by the order shown in the picture and separate the dasher cover from the soft ice cream freezer. 8. Draw the dasher and separate it DASHER LUG POM from the cylinder.
-
Page 27: Cleaning Method
13. Clean carburetor body and tube with brush. 14. After cleaning, dry and reassemble the parts in reverse order. 【 Condenser and filter cleaning method 】 1. Filter Decomposition method ① Lift and pull the drain box to remove it. ②... -
Page 28: Unpacking And Installation
Unpacking and Installation The Ice Cream Machines has been fully inspected and tested at the factory prior to shipping. If you detect damage to the wooden package or apparent distortion of the shape of the system after unpacking the product, immediately inform your distributor or manufacturer. Find the serial number marked on the packing and the machine before starting installation. -
Page 29: Installation
Installation ● The raw water supply valve may vary depending on the installation environment of the system. Consult with the engineers of the company for the details of installation of the system to ensure ● optimal performance of the system (change of the installation site of the system also requires consultation with the engineer of the company). -
Page 30: Dasher And Dasher Cover Assembly Method
Dasher and dasher cover assembly method 【 Dasher assembly 】 1. Assemble the dasher lug fom(blades) DASHER LUG POM by rotating it on the wing of the dasher. 2. Insert the assembled dash bundle into the cylinder. 【 Dasher cover assembly 】 1. -
Page 31: How To Upgrade The Program
4. Wait for approximately 5~10 minutes until the front LCD screen lights up. 5. Remove the USB memory stick and select a model to reset the product (Item no. 4). ex) ISI-161TH 6. Power off the product and restart it. -
Page 32: How To Use Usb Downloader
How to use USB downloader 1. How to write programs on main PCB, control PCB. 1-1. Follow the steps as described below with USB downloader connected to main PCB, control PCB: 1-2. Turn off the power. 1-3-1). Copy the main PCB program on the USB memory root folder in name of“MINI_Main.hex” ×... -
Page 33: Wiring Diagram
Wiring diagram... -
Page 34: Refrigeration Circuit Diagram
Refrigeration circuit diagram Normal operation Sterilization operation... -
Page 35: Cautions For Operation Of Soft Ice Cream Machine
Cautions for operation of Ice Cream Machines If the temperature is too low (overfreezing) while operating the product, issues may arise such as interrupted operation or damage on a part or the power delivery axis. Some issues may involve too much noise or burning smell due to friction, and foreign substance may come out with the ice cream due to damage of a part inside the product. -
Page 36: Before Requesting Service
Before requesting service The Ice Cream Machines can operate abnormally because you are not familiar with the method for use or due to another insignificant reason. It does not necessarily mean a malfunction. In this case, check the following items to resolve a simple problem on your own without the help from your distributor. If you still can’t resolve it after checking the following items, please contact your distributor. -
Page 37: Replacement Cycle Of Consumable Parts
State Please check There are lumps 1. If the ingredient has too much milk fat, lumps may be formed in proportion. of milk fat in the The carburetor hole needs to be smaller if you happen to serve fewer cups of ice cream ice cream. -
Page 38: Error Codes And Corrective Actions
Error Codes and Corrective Actions The Ice Cream Machines may malfunction due to incorrect operation procedure or a trivial cause other than machine defect or failure. If the following corrective actions fail to correct the problem, or the error code is not presented below, or the same error persists, contact the nearest After Service Center. -
Page 39: Part List
Part list... - Page 40 Part list...
- Page 41 Part list...
- Page 42 Part list...
- Page 43 Part list...
-
Page 44: Part List
Part list... -
Page 45: Warranty
Warranty If the warranty policy or receipt has not been kept or is lost, or if it is hard to determine the date of purchase due to other reasons, warranty is applied after 6 months from the manufacturing date. [ Free repair ] 1. - Page 46 MEMO...
- Page 47 MEMO...
- Page 48 Online Internet Service http://www.icetro.com 3 2 4 0 3 8 5 - 0 1...
Need help?
Do you have a question about the ISI-161TH and is the answer not in the manual?
Questions and answers