Advertisement
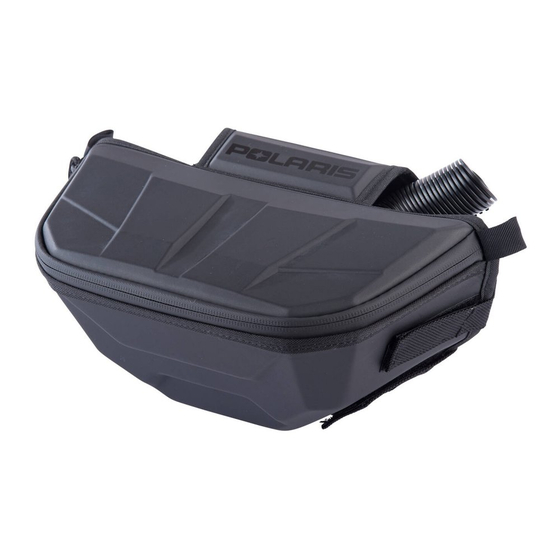
HANDLEBAR BAG WITH PHONE CHARGER
KIT
P/N 2883687; 2883786
APPLICATION
Verify accessory fitment at Polaris.com.
BEFORE YOU BEGIN
Read these instructions and check to be sure all parts and tools are accounted for. Please retain these
installation instructions for future reference and parts ordering information.
KIT CONTENTS
This Kit includes:
REF
QTY
PART DESCRIPTION
1
1
Harness - 850
2
1
Harness - Titan
3
1
Harness - 600/800
4
1
Bag - HB USB Charge
1
Instructions
Instr 9928802
Rev 01 2018-06
KIT PN
2883687
2414491
-
2414585
2688874
-
9928802
Page 1 of 8
KIT PN
2883786
2414491
2414584
2414585
-
2688951
9928802
Advertisement
Table of Contents

Subscribe to Our Youtube Channel
Related Manuals for Polaris 2883687


Summary of Contents for Polaris 2883687
- Page 1 HANDLEBAR BAG WITH PHONE CHARGER P/N 2883687; 2883786 APPLICATION Verify accessory fitment at Polaris.com. BEFORE YOU BEGIN Read these instructions and check to be sure all parts and tools are accounted for. Please retain these installation instructions for future reference and parts ordering information.
-
Page 2: Tools Required
TOOLS REQUIRED • Safety Glasses • Socket Set, Torx ® • Pliers, Push Pin Rivet • Torque Wrench • Pliers, Side Cutting • Wrench Set, Metric • Socket Set, Metric IMPORTANT Your HANDLEBAR BAG WITH PHONE CHARGER KIT is exclusively designed for your vehicle. Please read the installation instructions thoroughly before beginning. - Page 3 3. REMOVE UPPER INTAKE PLENUM. c. Remove the two screws that attach the upper intake plenum to the over-structure a. To do so, first remove the two dart clips along with the two dart clips as shown. Once cable tie that fasten the intermediate intake complete, remove upper intake plenum tube...
- Page 4 4. REMOVE CONSOLE. 5. SELECT HARNESS. a. Remove two dart clips on right side along a. For 850 models use harness . See detailed with clutch tool and dart clip from left side image. and slide the console rearward leaving the •...
- Page 5 c. For 600/800 models use harness b. Place bag over top of handlebars being sure wires are routed downward along the • Connector (3a) will get connected to the chassis handlebar post. harness. • Connector (3b) is a spare connector for use with additional accessories.
- Page 6 7. ROUTE AND CONNECT HARNESS WIRES. b. Titan Model NOTE i. Route USB harness wires down along steering post to the electrical connections Electrical connections and routing vary slightly located under the console. Open between models. Follow steps for you specific model bag and connect USB harness connection for proper installation.
- Page 7 8. REINSTALL CONSOLE. 9. REINSTALL UPPER INTAKE PLENUM. a. Place console into original position and install a. Carefully install upper intake plenum back previously removed dart clips on right side into original position. Ensure the console tabs along with the clutch tool and dart clip are fully engaged into the slots on the...
-
Page 8: Feedback Form
c. Place intake tube back into position and 10. REINSTALL HOOD. secure with previously removed dart clip a. Install hood being sure to connect the hood fasteners . Replace cable tie to secure harness and chassis harness connection. lower portion of intake tube. Replace cable tie if applicable.
Need help?
Do you have a question about the 2883687 and is the answer not in the manual?
Questions and answers