Polaris RIDE COMMAND User Manual
Hide thumbs
Also See for RIDE COMMAND:
- User manual (60 pages) ,
- User manual (59 pages) ,
- User manual (66 pages)
Table of Contents
Advertisement
Quick Links
Advertisement
Chapters
Table of Contents

Related Manuals for Polaris RIDE COMMAND


Summary of Contents for Polaris RIDE COMMAND
- Page 1 USER’S GUIDE RIDE COMMAND...
- Page 2 For more information go to www.P65Warnings.ca.gov/passenger-vehicle. For videos and more information about a safe riding experience with your Polaris vehicle, scan this QR code® with your smartphone.
- Page 3 Ride Command User’s Guide...
-
Page 4: Copyright Info
Unless noted, Polaris and Ride Command are trademarks of Polaris Inc. Bluetooth® is a registered trademark of Bluetooth SIG, Inc. iPhone® is registered trademarks of Apple Inc. iOS® is a registered trademark of Cisco Systems, Inc. Android® is a registered trademark of Google LLC. Kingston®... -
Page 5: Welcome Page
WELCOME Thank you for purchasing a POLARIS vehicle, and welcome to our world-wide family of POLARIS enthusiasts. Be sure to visit us online at www.polaris.com for the latest news, new product introductions, upcoming events, career opportunities and more. Here at POLARIS we proudly produce an exciting line of utility and recreational products. -
Page 6: Safety Symbols
SAFETY SYMBOLS AND SIGNAL WORDS The following signal words and symbols appear throughout this manual and on your vehicle. Your safety is involved when these words and symbols are used. Become familiar with their meanings before reading the manual. DANGER DANGER indicates a hazardous situation which, if not avoided, WILL result in death or serious injury. - Page 7 TABLE OF CONTENTS Introduction ....7 Features and Controls ....11 Operation .
-
Page 9: Introduction
INTRODUCTION INTRODUCTION OVERVIEW Welcome to Polaris Ride Command. This intuitive software includes a variety of interactive features and access to your snowmobile’s custom information. For a safe and enjoyable riding experience with your new display, be sure to read your vehicle’s owner’s manual and this user’s guide. Should you need additional assistance with display operation or software updates, please see your Polaris dealer or visit ridecommand.polaris.com. -
Page 10: Device Compliance Statements
MANUFACTURER 9200 Series Display RC-7W Polaris Industries Inc. This device complies with part 15 of the FCC Rules. Operation is subject to the following two conditions: (1) This device may not cause harmful interference, and (2) this device must accept any interference received, including interference that may cause undesired operation. - Page 11 100 mW * Other transmitting radio frequencies may exist outside of EU markets. Hereby, Polaris Industries Inc. declares that the above radio equipment is in compliance with Directive 2014/53/EU. The full text of the EU declaration of conformity is available at the following internet address: https://www.polaris.com/en-us/radio-conformity/...
-
Page 13: Features And Controls
Be aware of all applicable local laws that may affect the use of electronic devices while riding. For the latest information about your Ride Command display, including software, maps, and trails updates, please visit: https://ridecommand.polaris.com. -
Page 14: Ride Command Buttons
FEATURES AND CONTROLS RIDE COMMAND BUTTONS BUTTON DESCRIPTION FUNCTION Moves the cursor and pans the focus 5-Way User on the map screen. Interface (UI) Control Zooms in when using the map and Up Button scrolls up through lists of features. -
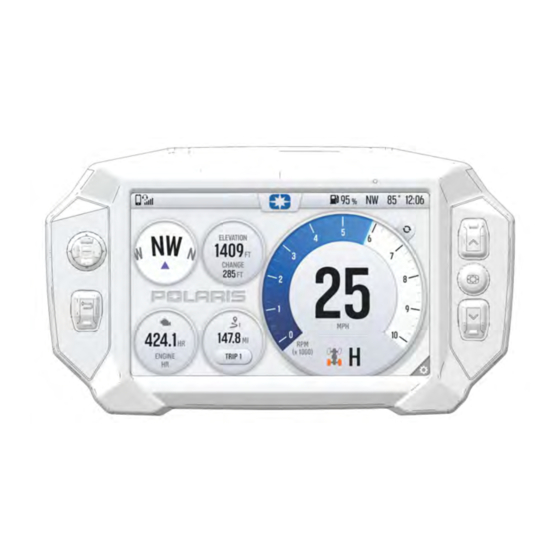
Page 15: Gauge Screen
FEATURES AND CONTROLS GAUGE SCREEN The Gauge Screen displays upon start-up and will serve as your primary interface when operating the vehicle. The Gauge Screen is fully customizable and can be configured to display as much, or as little, vehicle information as you like. - Page 16 FEATURES AND CONTROLS 3. In the left side panel, choose a gauge layout from the three provided options. ICON DESCRIPTION Two circular widgets and up to three linear widgets. Up to five linear widgets. Four circular widgets. 4. Select the Data tab .
-
Page 17: Gauge View Mode
FEATURES AND CONTROLS 5. Reorder the widgets by pressing and holding down on the widget and sliding the widget up or down into the desired position. 6. Click the green check mark or Done to close the configuration panel. GAUGE VIEW MODE Press to toggle between the two available gauge view modes, analog and digital. -
Page 18: Icon Bar
FEATURES AND CONTROLS ICON BAR The Icon Bar is located across the top of the touchscreen and displays cell phone, headset, and wireless internet connectivity, fuel level, compass heading and local time. NOTICE The Icon Bar will not appear when the Badge Panel is open. ICON DESCRIPTION FUNCTION... -
Page 19: Badge Panel
Day/Night Display Mode ACCESSING THE BADGE PANEL There are two ways to open the Badge Panel, press the Badge Panel button (Polaris Logo) the top of the touchscreen or the Polaris Menu hard button on the right of the display. -
Page 20: App Tray
FEATURES AND CONTROLS APP TRAY The App Tray provides easy access to key features on the display screen. Tap on any of the listed icons to navigate to that display screen. For example, tap the Maps button to navigate to the Map Screen, or press the Music button to navigate to the Audio Screen. -
Page 21: Engine Overheat Indicator
FEATURES AND CONTROLS ENGINE OVERHEAT INDICATOR If the engine goes over temperature, a red banner will appear at the top of your display stating: ENGINE OVERHEATING – STOP IMMEDIATELY. The appearance of this banner indicates continued operation of your ATV could result in serious engine damage. -
Page 23: Operation
OPERATION OPERATION ALL SETTINGS From All Settings, you can view important details about your vehicle and personalize your touchscreen display. The settings menu is comprised of four categories: Vehicle Info, General, Time, and Vehicle Settings. To open Settings, press the Badge Panel button on the display and then the All Settings button... -
Page 24: General Info
OPERATION GENERAL From the General tab you can do the following: • Connect to Ride Command account • Manage wireless internet connections (Wi-Fi) • Manage Bluetooth® devices • Change the display language • Set the speed units of measure (mph or km/h) •... -
Page 25: (P.a.s.s.)
PIN ACTIVATED SECURITY SYSTEM (P.A.S.S.) The optional PIN Activated Security System (P.A.S.S.) is to prevent unauthorized use. When enabled, the vehicle cannot be operated until a valid passcode has been entered using the Ride Command display screen. ENABLE P.A.S.S. NOTICE After activating P.A.S.S. -
Page 26: Iphone® Pairing
• In your iPhone® settings turn on Bluetooth®. • If available, make your phone discoverable to other devices in your phone’s Bluetooth® settings. ON THE RIDE COMMAND DISPLAY • Go the Settings menu by pressing the Badge Panel button followed by the All Settings button. -
Page 27: Android® Pairing
ON YOUR SMARTPHONE • A request will appear to pair with the display. Ensure the confirmation code matches between the Ride Command display and your phone. • Press OK. • For an optimal experience enable notifications and sync contacts from your smartphone’s Bluetooth®... -
Page 28: Headset Pairing
OPERATION HEADSET PAIRING The Ride Command touchscreen display can be connected to a smartphone and headset simultaneously. The display can connect with Polaris-approved Bluetooth® headsets to listen to music, take phone calls, and talk with other riders. To connect your Bluetooth® headset to your display, do the following: ON YOUR HEADSET •... -
Page 29: Fi (If Equipped)
OPERATION CONNECTING DEVICES USING WI-FI (IF EQUIPPED) The Ride Command display can connect to a home network or mobile hotspot. To connect using wi-fi, do the following: 1. Go the Settings menu by pressing the Badge Panel button followed by the All Settings button. -
Page 30: Audio Screen
NOTICE There is no built-in microphone in the display. Phone call audio will play through the phone speakers or a Polaris approved headset if connected. Some dial options may be unavailable at speeds greater than 3 mph (5 km/h). AUDIO SCREEN NOTICE Your vehicle is not equipped with a speaker system. -
Page 31: Map Screen
OPERATION MAP SCREEN Press the Map button from the App Tray in the Badge Panel or press the Back button to cycle to the map screen. The map will center you based on the location of the in-vehicle GPS. NOTICE Controls on the map surface disappear after 10 seconds of inactivity, return with a tap anywhere on the map. -
Page 32: Map Orientation
OPERATION MAP ORIENTATION The compass icon on the right side of the screen toggles how the map orients itself during navigation. There are two orientation options: North Up and Course Up. Pressing the Compass icon will also re-center your vehicle if not already centered. -
Page 33: Waypoints
OPERATION WAYPOINTS Waypoints are user-defined locations on the map. Waypoints can be saved and shared with friends. ADD A WAYPOINT To add a waypoint, do the following: 1. From the Map Menu, tap the Add Waypoint from available options. 2. A menu for the waypoint will pop-up. -
Page 34: Group Ride
Go to Nav does not provide turn-by-turn directions to a POI. GROUP RIDE Invite your friends to a group to see their live location on the map of your smartphone, tablet, or in-vehicle Ride Command display. For information on how Group Ride... -
Page 35: Cellular-Based Group Ride
OPERATION CELLULAR-BASED GROUP RIDE Features of using your mobile phone for group riding: • Works within cellular range • Requires a tethered mobile phone • Infinite range between vehicles • Works with friends using the mobile app Use the following procedure to set up a cell-based Group Ride: NOTICE The display requires a GPS lock, indicated by a blue navigation arrow marker, before you are able to setup or join a group ride. - Page 36 • Verify that your Bluetooth® tethering is active before proceeding. 8. Press the Log In button to login to your Ride Command account. If you do not have a Ride Command account, sign up at ridecommand.polaris.com.
-
Page 37: Creating A Group
OPERATION VEHICLE TO VEHICLE (V2V) ANTENNA Features of using the Vehicle-to-Vehicle antenna for group riding: • Works anywhere, no phone required • 1+ miles range between vehicles • Messaging to other vehicles utilizing V2V communications Use the following procedure to set up a V2V Group Ride: NOTICE The display requires a GPS lock, indicated by a blue navigation arrow marker, before you are able to setup or join a group ride. -
Page 38: Join A Group
OPERATION 3. Enter a name in the Group Name field. 4. Select whether to enable a passcode. When enabled, you will be prompted to enter a 4–digit passcode. NOTICE If Passcode Required is left unselected, any rider can freely join your Ride Group. -
Page 39: Riding With A Group
OPERATION NOTICE You can only be active in one ride group at a time. Close the pop-up to show the map view of your chosen ride group. Other riders appear as dots on the map. If a rider is moving, the dot includes a heading arrow pointing in the direction they are riding. -
Page 41: Maintenance
5. You should receive a confirmation email from Polaris within 24 hours of creation. Add Your Vehicle 6. After signing into your Ride Command account, click on Garage from the top menu bar. 7. Press the + button to add vehicle. -
Page 42: Software & Map Updates
1. Download and install the Polaris Ride Command app from your phone’s application store. 2. You may receive a prompt that “Ride Command” wants to access to location information. Click Continue. 3. Tap the menu button and select Log In or Sign Up from the dropdown menu. -
Page 43: Usb Drive
ON YOUR ATV 1. Plug the USB drive into your vehicle's USB port and turn on the display. 2. On the Ride Command display, press the Badge Panel button at the top of the screen, followed by All Settings. 3. Select General from the tabs on the left, and scroll down to Update Software or Update Maps / Trails. -
Page 44: Usb Hardware
2. Remove and reconnect the USB flash drive securely. 3. Ensure display files are not inside a folder on the flash drive. 4. Only Polaris display files should be on the flash drive while performing updates. Remove other files, if necessary. -
Page 45: Faq
Settings tab. Press Update Software. 2. How do I update my display software? • If your software is out-of-date, log in to your Ride Command account at ridecommand.polaris.com to download the latest software data. For detailed instructions for updating display software, see page 41. -
Page 47: Table Of Contents
(P.A.S.S.) ....... 23 Gauge Screen ......13 Ride Command... - Page 48 Badge Panel......17 Ride Command Buttons ....12 Ride Command Overview.
- Page 50 For your nearest Polaris dealer, call 1-800-POLARIS (765-2747) or visit www.polaris.com Polaris Industries Inc. 2100 Highway 55 Part No. 9940303 Rev 01 Medina, MN 55340 Printed in USA...
Need help?
Do you have a question about the RIDE COMMAND and is the answer not in the manual?
Questions and answers