Polaris RIDE COMMAND User Manual
For ranger, rzr, and general off-road vehicles
Hide thumbs
Also See for RIDE COMMAND:
- User manual (60 pages) ,
- User manual (59 pages) ,
- User manual (50 pages)
Advertisement
Quick Links
Advertisement

Related Manuals for Polaris RIDE COMMAND


Summary of Contents for Polaris RIDE COMMAND
- Page 1 USER’S GUIDE RIDE COMMAND...
- Page 2 For more information go to www.P65Warnings.ca.gov/passenger-vehicle. For videos and more information about a safe riding experience with your Polaris vehicle, scan this QR® code with your smartphone.
- Page 3 RIDE COMMAND User’s Guide For RANGER, RZR, and GENERAL Off-Road Vehicles WARNING Operating, servicing, and maintaining a passenger vehicle or off-road vehicle can expose you to chemicals including engine exhaust, carbon monoxide, phthalates, and lead, which are known to the State of California to cause cancer and birth defects or other reproductive harm.
- Page 4 Unless noted, trademarks are the property of Polaris, Inc. Ride Command® is a registered trademark of Polaris, Inc. iPhone® and iPod® are registered trademarks of Apple Inc. The Bluetooth® word mark and logos are registered trademarks owned by Bluetooth SIG, Inc.
- Page 5 WELCOME Thank you for purchasing a POLARIS vehicle, and welcome to our world-wide family of POLARIS enthusiasts. Be sure to visit us online at www.polaris.com for the latest news, new product introductions, upcoming events, career opportunities and more. Here at POLARIS we proudly produce an exciting line of utility and recreational products.
- Page 6 SAFETY SYMBOLS AND SIGNAL WORDS The following signal words and symbols appear throughout this manual and on your vehicle. Your safety is involved when these words and symbols are used. Become familiar with their meanings before reading the manual. DANGER DANGER indicates a hazardous situation which, if not avoided, WILL result in death or serious injury.
-
Page 7: Table Of Contents
TABLE OF CONTENTS Introduction ....7 Getting Started ....11 Features and Controls . -
Page 9: Introduction
• Familiarize yourself with the features and operations of the Display while the vehicle is stationary. • Download the Polaris RIDE COMMAND App from the Apple® App Store® or Google Play® store and create your personalized account. • Check your display to ensure you have the appropriate maps and trails visible for your area. - Page 10 MANUFACTURER 9200 Series Display RC-7 Polaris Industries Inc. This device complies with part 15 of the FCC Rules. Operation is subject to the following two conditions: (1) This device may not cause harmful interference, and (2) this device must accept any interference received, including interference that may cause undesired operation.
- Page 11 0.2432 W *Other transmitting radio frequencies may exist outside of EU markets. Hereby, Polaris Industries Inc. declares that the above radio equipment is in compliance with Directive 2014/53/EU. The full text of the EU declaration of conformity is available at the following internet address: https://www.polaris.com/en-us/radio-conformity/...
-
Page 13: Getting Started
GETTING STARTED GETTING STARTED OVERVIEW Ride Command Buttons Icon Bar Driveline Mode Gauge View Mode Widgets Speedometer/Tachometer Settings Gear Status RIDE COMMAND BUTTONS BUTTON DESCRIPTION FUNCTION Menu Button Press the Menu button to access the settings. To reboot the display, press and hold for 5 seconds. - Page 14 GETTING STARTED BUTTON DESCRIPTION FUNCTION Map Button Press the Map button to access the map, manage your rides and waypoints, and to see your friends on the map with Group Ride. Phone Button Press the Phone button to access your Bluetooth®...
- Page 15 GETTING STARTED DRIVELINE MODE INDICATOR DESCRIPTION FUNCTION When the switch is on 2WD, the front drive is disengaged so the vehicle is in two-wheel drive. Both rear wheels drive at the same speed. When in All-Wheel Drive, the front drive is engaged with the front differential in the open state.
- Page 16 To access the Setting menu, press the Menu button You can also navigate to the settings menu by pressing the POLARIS logo at the top of the display screen . This will open the Control Panel. From the Control Panel,...
- Page 17 GETTING STARTED ICON BAR ICON DESCRIPTION FUNCTION Headset Displays icon if headset is connected Signal Strength Displays current cell signal strength Wireless Internet Displays current wireless internet signal Signal Strength (if strength (if equipped) equipped) Fuel Level Displays current fuel capacity percentage Vehicle Direction Displays vehicle direction...
-
Page 19: Features And Controls
FEATURES AND CONTROLS FEATURES AND CONTROLS MENU/POWER Press the Menu/Power button once to access the Badge Panel. The Badge Panel provides quick and easy access to key display features, for more information on the Badge Panel, see page 18. Press and Hold the Menu/Power button for five seconds to perform a hard reboot of the display screen. - Page 20 The badge panel provides easy access to frequently used features, basic display and vehicle controls, and a list of recent notifications. To access the Badge Panel, press the Polaris logo at the top of the display screen, or press the Polaris Menu/Power hard button.
- Page 21 FEATURES AND CONTROLS SCREEN BRIGHTNESS From the Control tab , select screen brightness by moving the touchscreen slider to the left or right . Press the AUTO check box to allow the screen to adjust automatically based on ambient light conditions. DISPLAY MODE From the Control tab , select the display mode from the available options...
- Page 22 FEATURES AND CONTROLS GAUGE SCREEN Press the Gauge Screen button to toggle between gauge screens. The display comes loaded with two different gauge screens. Additional gauge screens can be added or deleted. Each gauge screen is customizable and can be set up in the following configurations: •...
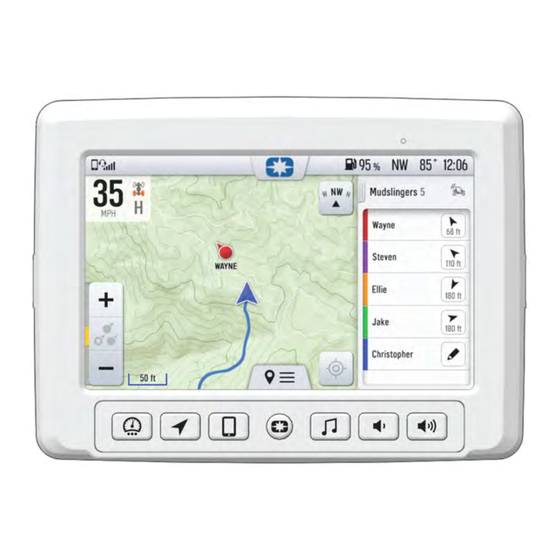
- Page 23 FEATURES AND CONTROLS MAP SCREEN Press the MAP SCREEN button shown above to display the map screen. The map will center you based on the location of the GPS. NOTE Controls on the map surface disappear after 10 seconds of inactivity, return with a tap anywhere on the map.
- Page 24 FEATURES AND CONTROLS MAP ORIENTATION The COMPASS icon on the right side of the screen toggles north up and course up. It will also re-center your vehicle if not already centered. MAP ORIENTATION MAP ICON North Up view locks the maps orientation so that North is always at the top of the screen, regardless of your vehicle’s position or direction.
- Page 25 FEATURES AND CONTROLS WAYPOINTS Waypoints are user-defined locations on the map. Waypoints can be saved and shared with friends. To add a waypoint, do the following: 1. From the map screen, tap the map menu icon at the bottom of the display screen 2.
- Page 26 Connect a smart phone and headset to listen to audio, make and receive calls and text messages, access a phone’s contact list, and call history. CONNECT YOUR PHONE TO THE DISPLAY The Ride Command display is compatible with Android and iOS. Go to https://ridecommand.polaris.com/en-us/supported-devices for latest operating system compatibility.
- Page 27 FEATURES AND CONTROLS 3. Ensure the confirmation code on the screen and your phone are the same then press “Pair” on your phone. 4. For optimal experience, enable notifications and sync contacts from your smartphone’s Bluetooth® settings. ANDROID To connect you Android device to the display, do the following: 1.
- Page 28 3 MPH. CONNECTING YOUR BLUETOOTH® HEADSET WITH THE DISPLAY The display can connect with Polaris approved Bluetooth® headsets to listen to music, take phone calls, and talk with other riders. To connect your Bluetooth® heaset to your display, do the following: 1.
- Page 29 FEATURES AND CONTROLS AUDIO SCREEN 1. Press the audio screen button shown above to display the audio screen. 2. Use the source button in the top left corner to change between FM, AM, Weather, Bluetooth®, and USB Audio. 3. Press the tune up or down icons to change the radio station by small increments or press the scan up or down icon to search for the next quality signal station.
- Page 30 FEATURES AND CONTROLS USB / IPOD AUDIO NOTE Media navigation is only available if music is streamed through Apple Music and saved to the device storage of the phone. • Show currently playing song, artist, and album, if available • Show song duration and current progress •...
- Page 31 (IF EQUIPPED) — RIDE COMMAND The optional PIN Activated Security System (P.A.S.S.) is to prevent unauthorized use. When enabled, the vehicle cannot be operated until a valid passcode has been entered using the Ride Command display screen. ENABLE P.A.S.S. NOTICE After activating P.A.S.S.
- Page 32 Invite your friends to a group to see their live location on the map of your smartphone, tablet, or in vehicle Ride Command Display. For information on how...
- Page 33 FEATURES AND CONTROLS GROUP RIDE SETUP There are two ways to set up a group ride. Mobile Phone Group Ride: • Works within cellular range • Requires a tethered mobile phone • Infinite range between vehicles • Works with friends using the mobile app Vehicle-to-vehicle Group Ride: •...
- Page 34 • Connect your phone via Bluetooth®. If you phone is currently connected you MUST disconnect and reconnect it. • Press the login button to login to your Ride Command account. If you do not have a ride command account, sign up at ridecommand.polaris.com...
- Page 35 FEATURES AND CONTROLS You are now able to join a group ride with other riders who have a V2V antenna installed. Press the back button to go back to the group ride screen and join your Group Ride. If you would like to ride with friends who do not have a V2V antenna, complete the setup instructions below to set up a mobile phone group ride.
- Page 36 FEATURES AND CONTROLS RIDING WITH A GROUP 1. Tap the handle by the group name minimize the panel and show more map. 2. After 10 seconds of not interacting with the screen, the map controls will disappear. Tap the screen to make them visible again.
- Page 37 PLOW MODE (IF EQUIPPED) NOTE Plow Mode is a feature available for use with RANGER XP 1000 vehicles that have a factory installed Ride Command System with a winch and auto stop winch fairlead as part of the factory wiring harness. NOTE It is not recommended to use plow mode with winch in rapid recovery mode.
- Page 38 FEATURES AND CONTROLS MANUAL PLOW MODE Manual Plow Mode allows you to use the Ride Command touchscreen display to raise and lower the plow. To raise and lower the plow, do the following: 1. To raise the plow, press the up arrow on the touchscreen display and slide it to the left.
- Page 39 Mode” button on the Ride Command display. PLOWING IN HIGH RANGE Polaris does not recommend plowing in High Range. Excessive belt wear and belt failure, plow damage, and vehicle damage can occur. The system by default will not allow automatic operation when the vehicle is in High Range. This lockout can be beneficial while plowing as it allows the operator to shift to High Range to move the vehicle forward without lowering the plow automatically.
-
Page 41: Operation
OPERATION SETTINGS To access the Setting menu, press the Menu/Power button, or tap the POLARIS logo at the top of the display screen. This will open the control panel. From the Control Panel, select the settings tab, and then tap the All Settings button located in the lower right corner of the display screen. - Page 42 OPERATION TIME Select the Time tab to do the following: • Set Time from GPS • Select Time Zone • Enable/Disable Daylight Savings Time • Set Time • Set Date • Enable/Disable 24–Hour format AUDIO Select the Audio tab to do the following: •...
- Page 43 OPERATION ENGINE OVERHEAT INDICATORS NOTICE See your vehicle owner’s manual for more information. A flashing indicator indicates continued operation could result in serious engine damage. The engine management system will automatically reduce engine power and set a fault. Stop the engine immediately. Allow the engine to cool down.
-
Page 45: Dynamix Dv Active Suspension (If Equipped)
DYNAMIX DV active suspension features FOX® electronically controlled shocks driven by a custom Polaris-designed suspension control module (SCM). The suspension control algorithms and software were designed and developed by Polaris’ engineering team, leveraging our expertise and deep knowledge of off-road vehicle dynamics. - Page 46 Read your User Guide. Always ride with the latest maps and trails data from polaris. com/ridecommand. Your vehicle is equipped with an advanced Ride Command display. The suspension control screen provides additional information about the operation of your DYNAMIX DV active suspension system.
- Page 47 DYNAMIX DV ACTIVE SUSPENSION (IF EQUIPPED) Front Left Compression Damping Front Right Compression Damping Front Left Rebound Damping Steering Angle Event Indicator Front Right Rebound Damping Rear Left Compression Damping G-ball (Longitudinal/Lateral Acceleration) Brake Switch Rear Right Compression Damping Rear Left Rebound Damping Rear Right Rebound Damping COMPRESSION AND REBOUND SWEEP NOTICE...
- Page 48 DYNAMIX DV ACTIVE SUSPENSION (IF EQUIPPED) DYNAMIX DV SYSTEM COMPONENTS SUSPENSION CONTROL MODULE (SCM) The Suspension Control Module (SCM) contains the logic for suspension control, including communications, operator inputs, and shock drivers. The SCM also has an internal 6-axis inertial measurement unit which is used to monitor and adjust the performance of the vehicle by the suspension control algorithms.
- Page 49 DYNAMIX DV ACTIVE SUSPENSION (IF EQUIPPED) ELECTRONIC STEERING RACK (EPS) This vehicle also has an electronically controlled power steering rack that has been developed to work with the DYNAMIX DV system in multiple ways: • This power steering has modes that adjust the power steering performance to the DYNAMIX DV ride setting.
- Page 50 DYNAMIX DV ACTIVE SUSPENSION (IF EQUIPPED) ICON NAME SUSPENSION ELECTRONIC DESCRIPTION POWER STEERING DESCRIPTION Track Mode Medium compression Best feeling of the and high rebound front wheels for damping for aggressive cornering aggressive cornering events. events. Comfort Mode Low compression High assist level and and rebound bump rejection for...
- Page 51 DYNAMIX DV ACTIVE SUSPENSION (IF EQUIPPED) BAJA MODE MODE CHARACTER • Trophy truck • High dynamic ride height • Loose body movement • Nose high (front end high) • Ideal for rough/large input terrain USE AREAS • Desert/Baja • Whoops •...
- Page 52 DYNAMIX DV ACTIVE SUSPENSION (IF EQUIPPED) ROCK MODE MODE CHARACTER Developed for rock crawling. It maximizes ride height and improves pitch and roll stability during slow speed crawling maneuvers. Ideal for driving over obstacles and traversing hill peaks. Incorporates Angle Based Damping.
- Page 53 DYNAMIX DV ACTIVE SUSPENSION (IF EQUIPPED) On Slope: Lean the vehicle into the hill with shocks. Increased compression and decreased rebound downhill. Decreased compression and increased rebound uphill. TRACK MODE MODE CHARACTER Brings aggressive flat cornering, lowest dynamic ride height, and the best tire grip and feedback.
- Page 54 DYNAMIX DV ACTIVE SUSPENSION (IF EQUIPPED) COMFORT MODE MODE CHARACTER Developed to maximize ride comfort to give the passengers a “plush” ride. Ideal for non-aggressive driving and rides with smaller suspension inputs, such as cruising home at the end of the day. USE AREAS •...
- Page 55 DYNAMIX DV ACTIVE SUSPENSION (IF EQUIPPED) DYNAMIX DV SYSTEM FEATURES NOTE These features are tuned differently based on the selected Ride Mode. ACTIVE PITCH CONTROL Dynamix DV constantly monitors pedal input and engine torque to predict when the vehicle is going to pitch forward or backward and applies damping to control the motion.
- Page 56 DYNAMIX DV ACTIVE SUSPENSION (IF EQUIPPED) BRAKING CONTROL The system continuously monitors the brake pedal position and vehicle deceleration rate reducing body motion and increasing braking stability in harsh terrains. This is the opposite of Acceleration Control. During hard braking events, the system will increase front compression to prevent vehicle nose...
- Page 57 DYNAMIX DV ACTIVE SUSPENSION (IF EQUIPPED) CORNERING CONTROL Shock compression and rebound damping are adjusted when cornering. The inside shocks increase in rebound damping while the outside shocks increase compression to control body roll. The inside shocks decrease in compression to stabilize the vehicle for any bumps on the inside wheels while the outside shocks may reduce rebound in some cases to promote traction.
- Page 58 DYNAMIX DV ACTIVE SUSPENSION (IF EQUIPPED) • While Airborne: Rebound damping is reduced to promote shock extension while compression is increased to 100% to ensure a nice plush landing. • After Landing: Rebound damping is increased to stabilize the landing and prevent loss of wheel traction or hopping of the vehicle.
- Page 59 DYNAMIX DV ACTIVE SUSPENSION (IF EQUIPPED) ANGLE-BASED DAMPING When riding on a slope or navigating obstacles, the shock dampers adjust based on the angle to lean the vehicle into the hill. • Increases compression and decreases rebound for downhill wheels. •...
- Page 60 DYNAMIX DV ACTIVE SUSPENSION (IF EQUIPPED) EXAMPLE MANEUVERS • Slow driving on banked turn • Side hilling • Circles on hill DYNAMIX INSTANT COMPRESSION BUTTON When the DYNAMIX button is pressed, the system will increase compression damping to improve bottom out performance. The increased compression will persist as long as the button is pressed and momentarily after the button is released.
-
Page 61: Maintenance
ON YOUR VEHICLE 1. Connect the USB flash drive to the USB cable and power up your vehicle. 2. On the RIDE COMMAND display, select the Settings menu on your display by pressing the POLARIS icon at the top of the screen. - Page 62 4. Try using a different USB flash drive. UPDATE MAPS To update the maps on your display, do the following: 1. Go to ridecommand.polaris.com/update and download the map update to a USB flash drive. 2. Insert USB flash drive into the USB port on your vehicle.
- Page 63 Braking Control ..... . 54 Ride Command ..... . 29 Cornering Control .
- Page 64 Buttons ....... . 11 Driveline Mode..... . . 13 Gauge View Mode .
- Page 66 For your nearest Polaris dealer, call 1-800-POLARIS (765-2747) or visit www.polaris.com Polaris, Inc. 2100 Highway 55 Part No. 9939949 Rev 04 Medina, MN 55340 Printed in USA...
Need help?
Do you have a question about the RIDE COMMAND and is the answer not in the manual?
Questions and answers