
Related Manuals for Viega 8332.3


Summary of Contents for Viega 8332.3
- Page 1 Functional unit Instructions for Use for tile-level installation of the WC flush plate, natural stone cov- ering supplied by others Model Year built: 8332.3 from 06/2009 en_INT...
- Page 2 Functional unit 2 from 15...
-
Page 3: Table Of Contents
Table of contents Table of contents About these instructions for use Target groups Labelling of notes About this translated version Product information Intended use 2.1.1 Areas of use Product description 2.2.1 Overview 2.2.2 Technical data Handling Assembly information 3.1.1 Required material and tools Assembly 3.2.1 Mounting the functional unit... -
Page 4: About These Instructions For Use
This restriction does not extend to possible operating instructions. The installation of Viega products must take place in accordance with the general rules of engineering and the Viega instructions for use. -
Page 5: About This Translated Version
About these instructions for use About this translated version This instruction for use contains important information about the choice of product or system, assembly and commissioning as well as intended use and, if required, maintenance measures. The information about the products, their properties and application technology are based on the current standards in Europe (e. -
Page 6: Product Information
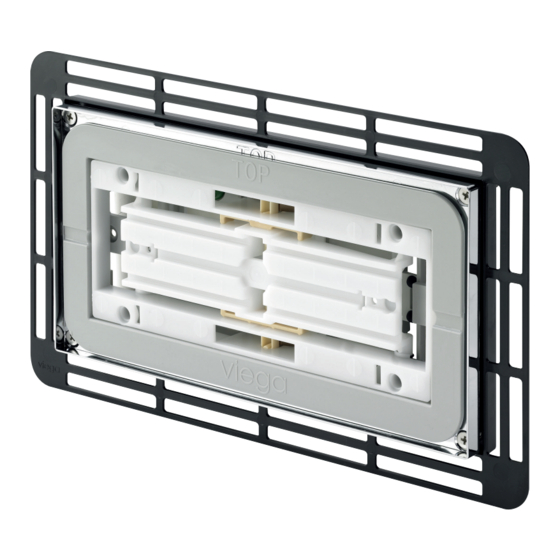
The functional unit is suitable for concealed cisterns of the following pre-wall systems: Viega Steptec Viegaswift Viega Eco Plus Product description 2.2.1 Overview Fig. 1: Component overview 2.2.2 Technical data... -
Page 7: Handling
Handling 3 Handling Assembly information 3.1.1 Required material and tools Material The following material is required for mounting: Pactan cleaning agent 14 Pactan silicone adhesive 7043 Natural stone panel Functional unit 7 from 15... -
Page 8: Assembly
Use a keyhole saw to cut the cladding panel out along the dimen- sion line. Clad the remaining pre-wall according to the Viega specifications. Dispose of the cover of the revision shaft. Align the installation frame centrally over the revision shaft. - Page 9 Handling Shorten revision shaft flush with the chrome-plated internal frame. INFO! – First, cut the corners of the revision shaft. – Then fold the sides. Mount the cover onto the internal frame. Have the tiler tile the pre-wall. Functional unit 9 from 15...
-
Page 10: Prepare Cistern
Handling Fig. 2: Dimensional drawing 8332.3 Cut the natural stone coverings according to the dimensional drawing. Take the tolerance and thickness of the covering into consideration. Ensure that the plastic surfaces are clean, dry, and free of grease. Apply Pactan adhesive cleaner 14 to the plastic surfaces to which you will attach the stone coverings –... - Page 11 Handling Requirements: The cistern is fitted into the pre-wall. The pre-wall is tiled. Remove cistern cover. Remove and keep the threaded bolts from the cistern cover. INFO! Only for assembly of the flush plate in cistern 2H or on the front of cistern 2L.
-
Page 12: Mount Flush Actuation
Handling Turn the mechanism's lock by 90° in an anti-clockwise direction. ð The mechanism is unlocked and can be removed. Remove and dispose of mechanism. INFO! Only with the cistern 2H. Remove and keep spacer. 3.2.3 Mount flush actuation Mount Bowden cable unit Functional unit 12 from 15... -
Page 13: Mounting The Flush Plate
Handling Push the Bowden cable unit onto the drain valve from the left. The Bowden cable unit must be felt to click into place on the drain valve. INFO! Only with the cistern 2H. Re-insert the spacer. 3.2.4 Mounting the flush plate Requirements: The flush actuation has been mounted. -
Page 14: Commissioning
Handling Insert the threaded bolts so deeply that the upper edge of the threaded bolt sticks out approx. 20 mm behind the upper edge of the tiles. Fasten threaded bolts with a 90° turn. Mount Bowden cable unit onto the rear side of the basic panel. INFO! Observe the colour of the adapter! Screw on basic panel. -
Page 15: Error, Faults And Remedy
Handling Set the flush volume on the drain valve of the cistern. Error, faults and remedy Error Cause Remedy WC does not flush Cistern is not yet completely full Wait until the cistern is sufficiently full No water in cistern, corner valve is Open corner valve closed WC flush runs through...
Need help?
Do you have a question about the 8332.3 and is the answer not in the manual?
Questions and answers