
Related Manuals for Viega 8310.0


Summary of Contents for Viega 8310.0
- Page 1 Drain valve set Instructions for Use for concealed cistern 1H, concealed cistern 2H, retrofit to flush plate Visign for Style or Visign for More Model Year built: 8310.0 from 07/2007 en_INT...
- Page 2 Drain valve set 2 from 15...
-
Page 3: Table Of Contents
Table of contents Table of contents About these instructions for use Target groups Labelling of notes About this translated version Product information Area of application Product description Handling General mounting instructions Assembly 3.2.1 Setting the flush volume 3.2.2 Removing the existing installation 3.2.3 Inserting the spare parts Disposal... -
Page 4: About These Instructions For Use
This restriction does not extend to possible operating instructions. The installation of Viega products must take place in accordance with the general rules of engineering and the Viega instructions for use. -
Page 5: About This Translated Version
About these instructions for use About this translated version This instruction for use contains important information about the choice of product or system, assembly and commissioning as well as intended use and, if required, maintenance measures. The information about the products, their properties and application technology are based on the current standards in Europe (e. -
Page 6: Product Information
Product information 2 Product information Area of application The drain valve set is intended for retrofitting existing WC installations in such a way that one of the following Viega flush plates can be mounted: Visign for Style – Model 8315.1 –... -
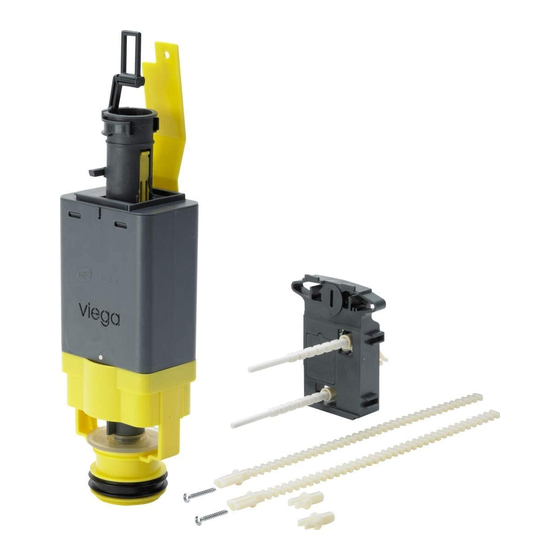
Page 7: Product Description
Product information Product description Fig. 1: Drain valve set mechanism actuating rods threaded bolts and screws for fastening the flush plate support drain valve seat drain valve Flushing technology The drain valve was developed for the dual flush technology with a small and a large flush volume. -
Page 8: Handling
Handling 3 Handling General mounting instructions When you intend to install a new flush plate after retrofitting to the new flush valve, the parts of the existing flush plate can be discarded after dismounting. Assembly 3.2.1 Setting the flush volume Before mounting the drain valve set, set the flush volume at the drain valve as follows: Set the small flush volume at the slide control at the side of the... -
Page 9: Removing The Existing Installation
Handling 3.2.2 Removing the existing installation The flush plate installed in your existing installation may differ from the plate shown in the illustration. However, the steps for removal will usually correspond to the steps shown in the following. To remove the existing installation, proceed as follows: Remove the flush plate. - Page 10 Handling Loosen the threaded bolts with a 90° turn. Remove the threaded bolts. Remove the cover straight forward from the installation shaft. Use a flat-blade screwdriver to turn the lock of the mechanism anti- clockwise through 90° to release the mechanism. Remove the mechanism from the installation shaft and dispose of it.
- Page 11 Handling Remove the drain valve and dispose of it. Loosen the flap of the drain valve seat. Remove the drain valve seat and dispose of it. Drain valve set 11 from 15...
-
Page 12: Inserting The Spare Parts
Handling 3.2.3 Inserting the spare parts Requirements: The water supply of the cistern has been closed. All parts of the existing installation you intend to replace have been removed. Insert the new drain valve seat into the cistern. Push the bottom end of the drain valve seat into the drain hole of the cistern as far as it will go. - Page 13 Handling Open the corner valve to enable the water supply. Insert mechanism. Ensure that the edges of the mechanism sit exactly in the recesses in the shaft opening of the cistern. Hang the bow of the drain valve in the clip of the mechanism. Turn the mechanism's lock by 90°...
- Page 14 Handling Re-mounting the old flush plate Insert the old threaded bolts so deeply that the upper edge of the threaded bolt sticks out approx. 9 mm in front of the upper edge of the tiles. Fasten threaded bolts with a 90° turn. Screw the actuating rods into the threaded holes of the mechanism.
-
Page 15: Disposal
Handling Hang the flush plate from above in the basic panel press in below. Disposal Separate the product and packaging materials (e. g. paper, metal, plastic or non-ferrous metals) and dispose of in accordance with valid national legal requirements. Drain valve set 15 from 15...
Need help?
Do you have a question about the 8310.0 and is the answer not in the manual?
Questions and answers