
Related Manuals for Viega 8310.76


Summary of Contents for Viega 8310.76
- Page 1 Filling valve set Instructions for Use for wall-mounted cisterns by various manufacturers Model Year built: 8310.76 from 04/2017 en_INT...
- Page 2 Filling valve set 2 from 12...
-
Page 3: Table Of Contents
Table of contents Table of contents About these instructions for use Target groups Labelling of notes About this translated version Product information Area of application Product description Handling Assembly 3.1.1 Mounting the filling valve set 3.1.2 Cleaning / replacing the membrane valve Disposal Filling valve set 3 from 12... -
Page 4: About These Instructions For Use
This restriction does not extend to possible operating instructions. The installation of Viega products must take place in accordance with the general rules of engineering and the Viega instructions for use. -
Page 5: About This Translated Version
About these instructions for use About this translated version This instruction for use contains important information about the choice of product or system, assembly and commissioning as well as intended use and, if required, maintenance measures. The information about the products, their properties and application technology are based on the current standards in Europe (e. -
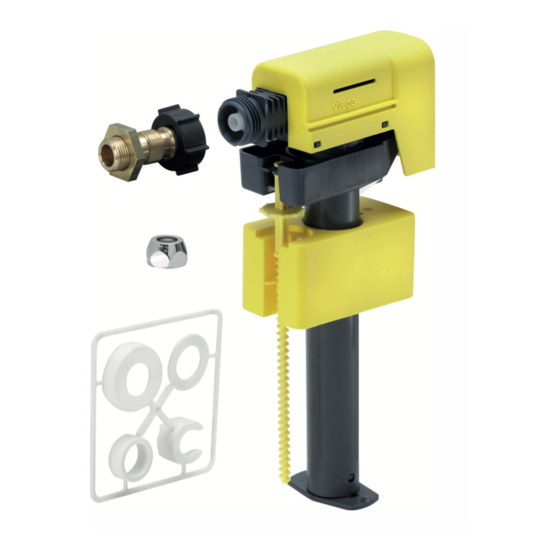
Page 6: Product Information
Product information 2 Product information Area of application The filling valve set is intended for filling a flush-mounted cistern. Product description Fig. 1: Filling valve set filling valve union nut nipples Clamp connector cistern fastening (3-pc.) spacer Filling valve set 6 from 12... -
Page 7: Handling
Handling 3 Handling Assembly 3.1.1 Mounting the filling valve set Push the nipple through the union nut. Place the spacer on. Insert the group (consisting of union nut and spacer) in the filling valve. Hand-tighten the union nut. Mounting on the left side Push the filling valve with the nipple through the opening of the cis- tern and fasten it. - Page 8 Handling Push the filling valve with the nipple through the opening of the cis- tern and fasten it. Fasten the nipple from the outside at the cistern. Connect the nipple with union nut / flexible hose or Cu pipe / clamp connector.
-
Page 9: Cleaning / Replacing The Membrane Valve
Handling 3.1.2 Cleaning / replacing the membrane valve Dismantle the filling valve. Fold up the catches on the cover. Remove the cover upwards. Filling valve set 9 from 12... - Page 10 Handling Bend up the holder for the float. Slide the holder downwards. Use snipe nose pliers to release the fixing rim by rotating through 45° in anti-clockwise direction. Remove the closing piece. Filling valve set 10 from 12...
- Page 11 Handling Remove the membrane valve. NOTICE! Do not dismantle the membrane valve into its compo- nents to avoid damage. If necessary, clean the membrane valve by holding it under running water. Mount the membrane valve, checking for correct seating. Filling valve set 11 from 12...
-
Page 12: Disposal
Handling Tighten the fixing rim by rotating through 45° in clockwise direction. Re-mount the holder of the float on the closing piece. Mount the cover. Ä Chapter 3.1.1 „Mounting the Mount the valve in the cistern, see filling valve set“ on page 7 . Check the function.
Need help?
Do you have a question about the 8310.76 and is the answer not in the manual?
Questions and answers