Festo CPLab Manual
Hide thumbs
Also See for CPLab:
- Manual (114 pages) ,
- Original operating instructions (90 pages) ,
- Manual (39 pages)
Table of Contents

Subscribe to Our Youtube Channel
Related Manuals for Festo CPLab


Summary of Contents for Festo CPLab
- Page 1 ® CPLab Manual Branch SAP Number 8058667 Festo Didactic CP Lab 05/2018...
- Page 2 Festo Didactic accepts no liability for injury or harm to trainees, the training company and/or any third parties which may occur when the installation is used beyond a genuine training situation, except Festo Didactic has caused such injury or harm intentionally or by grossly negligence.
-
Page 3: Table Of Contents
4.2.3 The PLC can be reset _______________________________________________________________ 32 5 Components _____________________________________________________________________________ 34 5.1.1 RFID Read/Write system ____________________________________________________________ 34 5.2 Controller Festo CECC __________________________________________________________________ 35 5.3 Valve terminal ________________________________________________________________________ 36 6 Extensions ______________________________________________________________________________ 37 © Festo Didactic CP Lab ° Branch... - Page 4 Content 6.1 Extension with an active corner _________________________________________________________ 37 6.2 Extension with a passive corner _________________________________________________________ 39 7 Spare part list ____________________________________________________________________________ 41 © Festo Didactic CP Lab ° Branch...
-
Page 5: General Safety Instructions
If not otherwise specified in the technical data, the device is not equipped with an integrated fuse. Warning This is a Class A product. In a domestic environment, this product may cause radio interference in which case the user may be required to take adequate measures © Festo Didactic CP Lab ° Branch... -
Page 6: Pictograms
Failure to pay attention to this symbol may result in damages to the machine or to its surroundings. Information This symbol indicates operational tips and especially useful directions. This symbol assists you to make optimal use of all of your machine’s functions. © Festo Didactic CP Lab ° Branch... -
Page 7: Safety Sockets
(green-yellow) signal input/output (black) The specified protection class and safe use can only be assured if laboratory safety cables supplied by Festo Didactic are used. Damaged laboratory safety cables must be immediately barred from further use and removed from the test area. -
Page 8: Handling The System
Do not uncouple any tubes under air pressure supply. Exception: Fault finding. In this case, keep on holding the end of the tube. Do not exceed the permitted operating pressure. See data sheets. © Festo Didactic CP Lab ° Branch... -
Page 9: Maintenance - Servicing - Malfunction Removal
There is a risk of fire if power supply is not of the energy limited (150VA) type 1.3.8 Safe handling Safe handling of heavy equipment must be guaranteed! There is a risk of musculoskeletal harm if instructions are not followed. © Festo Didactic CP Lab ° Branch... -
Page 10: Personnel
All persons who have been entrusted to work with the system undertake to complete the following steps before beginning work: Read the chapter concerning safety and the warnings in this manual Observe the basic regulations on occupational safety and accident prevention. © Festo Didactic CP Lab ° Branch... -
Page 11: Introduction
Catastrophes as a result of foreign bodies and vis major. Festo Didactic herewith rules out any liability for damage or injury to trainees, the training company and/or other third parties which may occur during the use/operation of the system other than purely in a training situation, unless such damage has been caused intentionally or due to gross negligence by Festo Didactic. -
Page 12: Resources
The training equipment of the system consists of several resources. They are used depending on the process selection. The following resources are available: Pallet carrier These pallet carriers are available for transporting the pallets. Pallet These pallets are available for receiving always one workpiece. © Festo Didactic CP Lab ° Branch... - Page 13 CP fuse on the right CP part fuse on the right no 213 no 1213 CP fuses both CP part both fuses no 214 no 1214 CP part customer no 1210 freely selectable © Festo Didactic CP Lab ° Branch...
-
Page 14: Design And Function
To ensure fault-free operation a load-bearing floor is required to avoid settling. Allow sufficient distance between the installation and the wall of the room. Any dust originating from construction work has to be kept off the installation (by covering). © Festo Didactic CP Lab ° Branch... -
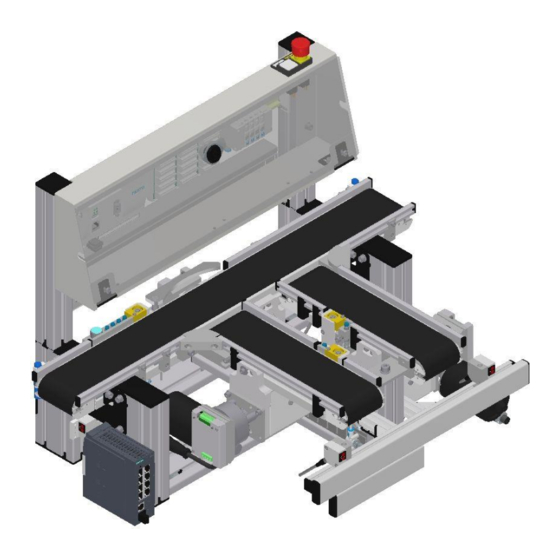
Page 15: The Cp Lab Branch
The task of the CP Lab switch is to carry out warp carriers with and without workpieces on CP Factory Module or a Robotino. In addition, goods can be imported from CP Factory modules or from a Robotino into the CP Lab system. © Festo Didactic CP Lab ° Branch... - Page 16 Emergency switch 24V Power supply XZ2 – motor MA2 Switch automatic on SF2 24V Power supply XZ1 – motor MA1 Capacitive sensor conveyor end Festo PLC CECC-LK Conveyor / insert conveyor Branch Insert stopper Q4MB4 Stopper main conveyor Separating stopper Q4MB3...
- Page 17 Design and function CP Lab branch rear view Position Description Position Description Starting current limiter QA3 - motor MA3 Starting current limiter QA1 - motor MA1 Coupling sensor next station BG14 © Festo Didactic CP Lab ° Branch...
-
Page 18: Stopper Unit
574334 / SMT-8M-A-PS-24V-E-0,3-M8D 150395 / SIEN-M8NB-PS-S-L Stopper Inductive sensor 157211 / AEVUZ-16-5-P-A 150395 / SIEN-M8NB-PS-S-L Flow control supply air RFID read-write head M18 193967 / GR-QS-4 Siemens 6GT2821-1AC32 Flow control exhaust air 193967 / GR-QS-4 © Festo Didactic CP Lab ° Branch... -
Page 19: Branch
Lever to separate carriers 193967 / GR-QS-4 Turning cylinder One-way flow control valves outlet air 1565425 / DSM-T-6-90-P-FW 193967 / GR-QS-4 Proximity switch 551373 / SMT-10M-PS-24V-E-2,5-L-OE Branch position straight BG1 Branch position separating BG2 © Festo Didactic CP Lab ° Branch... -
Page 20: Connecting The Cp Lab Switch
7.9 mm, it is possible to exchange the quick coupling plug of the service unit for a bigger one (adapter 1/8 to 1/4 necessary). Now the station can be supplied by 6 Bar and the pneumatic commissioning is completed. The connection is made at the valve terminal (1) © Festo Didactic CP Lab ° Branch... -
Page 21: Electrical Commissioning
Now the CP Lab branch has to be supplied with electrical voltage (24V). The controller gets its voltage from the XZ1 and is hard-wired. The power supply is connected to the XZ1 (1). The voltage is 24 V. XZ1:X1- 24VB XZ1:X2 - 24VA XZ1:X3 – 0V XZ1:X5 - PE © Festo Didactic CP Lab ° Branch... -
Page 22: Emergency Stop System
The CP Lab branch is equipped with an emergency stop push button. The emergency stop button is connected to the PLC via a 2-pin cable. Cable (1) from emergency stop to PLC is hard-wired. © Festo Didactic CP Lab ° Branch... -
Page 23: Operation
The CP-Lab switch has no operating functions. The station is set to automatic mode by means of the automatic switch. The control system is adopted by MES. 4.1 Start the automatic sequence 1. Unlock the emergency stop button 2. Automatic Press a key © Festo Didactic CP Lab ° Branch... -
Page 24: Software Festo
Step 1: Double click in this field Step 2. Device window Devices announcement In case Festo Field Device Tool is installed, the devices can be found with this tool Step 3: Type IP address here Insert IP Address and confirm with OK. - Page 25 Operation The view for the Device can be changed in Tools --> Options --> Device Editor 1. Scan network to find devices. © Festo Didactic CP Lab ° Branch...
- Page 26 Operation 1. POUs window: the project elements here will be downloaded to all devices 1. In the Devices window, open the required device, right click and set as active application © Festo Didactic CP Lab ° Branch...
- Page 27 Operation 2. Then the title becomes dark. 3. Finally, choose the right device and set as active path as well. 4. The title of the chosen device becomes dark. © Festo Didactic CP Lab ° Branch...
-
Page 28: Download The Project
Operation 4.2.2 Download the project 1. Click on the build button (F11) 2. No errors © Festo Didactic CP Lab ° Branch... - Page 29 4. This is downloading the project as well 5. After downloading the project, the PLC always in stop mode (7) 6. The green colour shows that the PLC is logged in (4) 7. Then click on Start (5) © Festo Didactic CP Lab ° Branch...
- Page 30 Operation 8. PLC is running After logged in the PLC always in debug mode: the state is visible in runtime 9. Wrong hardware configuration shown with a red triangle © Festo Didactic CP Lab ° Branch...
- Page 31 12. Create boot application: this project will be start at the next startup of the PLC (In case the boot application is not used, and a mistake appears in the code, by switching off and on the PLC, the original project will be restarted) © Festo Didactic CP Lab ° Branch...
-
Page 32: The Plc Can Be Reset
1. Reset warm: just reinitializing the variables – mostly used 2. Reset cold: restart the PLC 3. Reset origin: clears the project from the PLC When the program needs to be edited, it has to logout from the PLC 1. Logout button © Festo Didactic CP Lab ° Branch... - Page 33 3. Logging into debug mode without the changes 1. In case there are pointers or other special tools used in the project, after editing the code, a “Clean all” is recommended. This recalculates the memory allocation. © Festo Didactic CP Lab ° Branch...
-
Page 34: Components
Clamp read-write head Cable I/O Link TF1:1 / 24 V XTF1:1 / BN XG1/X12:1 - L+ TF1:3 / 0V XTF1:3 / BU XG1/X12:3 - L- TF1:4 / Data XTF1:4 / BK XG1/X12:2 - C/Q © Festo Didactic CP Lab ° Branch... -
Page 35: Controller Festo Cecc
Komponenten 5.2 Controller Festo CECC The Festo control consists of only one component (order no. 574418-CECC-LK) Festo CECC Position Description Comment USB Interface For extern memory Ethernet Interface RJ 45 For a PC (to program with CodeSys) or for external operation panel CDPX... -
Page 36: Valve Terminal
If this is pressed (groping), the corresponding cylinder moves out / on for the duration of the pressure. When the manual override is pressed and turned (locked), the cylinder will permanently open / close. Valve terminal 525675 / 80P-10-1LIT-PB-N-SLC-4M+T © Festo Didactic CP Lab ° Branch... -
Page 37: Extensions
CP Lab conveyor. The coupling sensors of the conveyors are simply forwarded to the following CP Lab conveyor using light guide bridges. Example concatenation 4 CP Lab conveyors with active corners © Festo Didactic CP Lab ° Branch... - Page 38 Components Position Description Outside guard railing Turning table Inside guard railing Motor Coupling sensor transmission Coupling sensor transmission Screw Motor connection (see Circuit diagram p.13) © Festo Didactic CP Lab ° Branch...
- Page 39 The coupling sensors of the conveyors are simply forwarded to the following CP Lab conveyor using light guide bridges. Example concatenation 6 CP Lab conveyors with passive corners © Festo Didactic CP Lab ° Branch...
- Page 40 Components Position Description Ball caster Passive guard railing Coupling sensor transmission Coupling sensor transmission © Festo Didactic CP Lab ° Branch...
- Page 41 Spare part list 7 Spare part list Key 8027302 24V cable 381525 © Festo Didactic CP Lab ° Branch...
- Page 42 Components Festo Didactic SE Rechbergstraße 3 73770 Denkendorf Germany Internet: www.festo-didactic.com E-mail: did@de.festo.com © Festo Didactic CP Lab ° Branch...
Need help?
Do you have a question about the CPLab and is the answer not in the manual?
Questions and answers