
Related Manuals for Accu-Scope EXI-600


Summary of Contents for Accu-Scope EXI-600
- Page 1 MANUAL EXI-600 RESEARCH GRADE INVERTED BIOLOGICAL MICROSCOPE SERIES 73 Mall Drive, Commack, NY 11725 • 631-864-1000 (P) • 631-543-8900 (F) www.accu-scope.com • info@accu-scope.com...
- Page 3 Biological Microscope User Manual This manual is written for EXI-600 research grade inverted biological microscope. To ensure the safety, obtain optimum performance and to familiarize yourself fully with the microscope, it is strongly recommended that you read this manual carefully before operating the microscope and put this manual in...
- Page 4 The warning and notice signal used in this manual We provide you the most safety and reliable instruments, but improper operate and ignorance of precautions may lead to a personal injury or a loss of property. To insure the right operating method, we hope you read this manual carefully before you use the product.
-
Page 5: Table Of Contents
CONTENTS S af et y pr e ca ut i on s ..................4 Ⅰ. -
Page 6: Safety Precautions
Safety Precautions Lamp House Transport handle Lamp House Transport handle 1. Avoid placing the microscope in a place exposed to direct sunlight, with high temperature, with high humidity or easily vibrated, make sure the platform is flat, horizontal and stable enough. ( weight of the mainframe is 29.5kg) 2. - Page 7 completely. ★the indicate bulb: 12V 100WHAL high brightness halogen bulb (OSRAM) ★the fuse should load the correct melting current, do not use a temporary fuse in case of the broken circuit. 6. Connect the power wires correctly, make sure the instrument is grounded in case of lightning stroke.
-
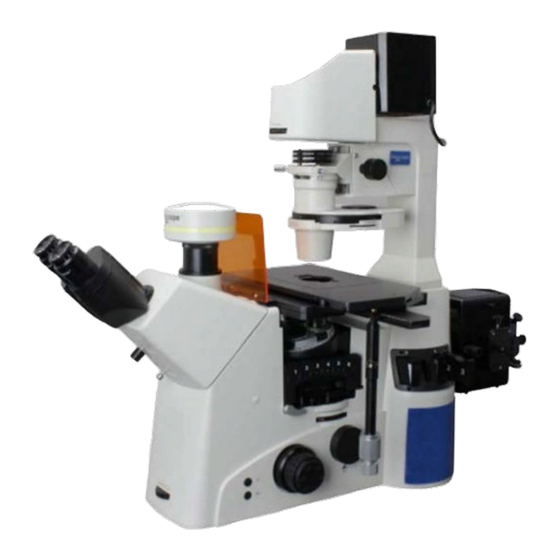
Page 8: Ⅰ Structure And Names
Ⅰ Structure and Names Pic. 1... - Page 9 Component names: 1 Power switch 2 Left camera port 3 Left coarse/fine focusing handwheel 4 Side ports converter(light path convert—left and right side ports/observe) 5 Eyepiece 6 Trinocular tube 7 Brightness adjustment knob 8 Transmitted illumination shutter 9 Reflected illumination shutter 10 Right coarse/fine focusing handwheel 11 Middle magnification converter 12 Right camera port...
-
Page 10: Ⅱ Applications
Ⅱ Applications The EXI-600 inverted biological microscope is mainly used to study the cells, cultured organization and sediment in culture bottles and culture dishes using transmitted and reflected light. This device can be used in bright field, dark field, phase contrast, differential interference contrast, polarized light and fluorescence observation. - Page 11 Transport handle ④ Mainframe Pic.2 Assembly 1. Trinocular tube ①Use a 2mm hexagon screwdriver to loosen Bolt of trinocular tube the bolt, take out the dust cover. ②Calibrate the trinocular tube and the swallow tail, fix it by 2mm hexagon screwdriver. ★Do hold the trinocular tube tightly in case Trinocular tube of fallen down.
- Page 12 Dust cover Eyepiece Centering telescope Pic.4 Pic.4 3. Graduated ocular Zero visibility The added line scale may cause a slightly shift of Zero point the image, rotate the visibility adjusting ring to focus the line scale of the eyepiece. Line scale base Visibility adjusting ring Line scale Only need to screw off the line scale base to...
- Page 13 Dust cover 5. Objective Objective Screw off the dust cover on the converter, screw the objective into the trapped hole The objectives should match the lettering on the converter by their magnification. Screw the dust cover into other vacancies. 6. Sample platform Pic.
- Page 14 7. Turntable condenser Align the guiding dowel of the condenser to the guiding groove of the support and fix the condenser with the bolts after inserting it into the transmitted illumination support. Condenser centering bolt Guiding dowel Guiding groove Fixing bolt Illumination support Condenser Pic.
- Page 15 8. Microscope power port Please off the power before installing any parts and accessories. ★The TL lamp house switch can control the transmitted lamp house without turning off the power. ★The RL lamp house switch can control the reflected lamp house without turning off the power.
- Page 16 9. Illumination lamp house (halogen) Insert the swallow tail of the lamp house to the socket, make the lamp house parallel to the stable table Lamp house Swallow socket and then fixed it with bolts Fixing bolt Connect power wires by the port position shown in pic.11.
- Page 17 Assemble the diffuser Locate the two round grooves of the diffuser to the two bulged on the swallow tail socket and screw the diffuser into the socket groove. Screw it reversely when taking the diffuser out. Pic.13...
-
Page 18: Ⅳ Operating And Adjusting
Ⅳ Operating and adjusting 1. Coarse and fine focusing hand wheel move range:10mm coarse focusing hand wheel:2mm/cycle fine focusing hand wheel:0.2mm/cycle ★Focusing hand wheel is set at both side Fine focusing hand wheel (scale) Of the mainframe Pic.14 The left hand wheel has scales The right hand wheel has no scales 2. - Page 19 3. Turntable condenser (transmitted light) NA:0.55 WD:26mm Aperture diaphragm plate Condenser turntable/6 positions Centering bolt Condenser turntable Bright field:H Phase contrast:PH1, PH2, PH3 Pic. 16 Ⅱ Adjust the aperture diaphragm: rotate the diaphragm plate 6 position adjust: rotate the condenser tunable, if you turned the bright field/H into the light path, make the mark “H”...
- Page 20 4. Transmitted light field diaphragm When using transmitted illumination, screw the tunable to adjust the field diaphragm. Screw the condenser lift hand wheel to lift the condenser and set the observe height. Field diaphragm tunable The condenser is fixed by fixing bolts. Condenser Screw the 2 condenser centering bolts to centering bolt...
- Page 21 6. Multi-function modules 6 modules optional .Turn over the scale cover plate, turn down the locking handle, you can insert and extract the turntable. Scale cover Polarization cover Locking handle Multi-function turntable Pic. 20 Install the multifunction module Make the module sides along the lower-spring to insert it into turntable and press the module tightly by the Upper-spring...
- Page 22 7. Aperture/field diaphragm of reflected light Adjust the diaphragm by move the lifting lever Centering bolt Diaphragm Set the diaphragm center to the optical path center by adjust two centering bolt Lift lever using 3mm hexagon screwdriver. Pic.22 8. Trinocular tube Trinocular tube:...
- Page 23 Cautions in observation 1. Objective ① When rotating the converter to change objectives, a sound of click can be heard if the objective is right at the center of the light path. ② when operating, firstly search and focus the sample by a low magnification objective(4X or 10X) and then change to a high magnification objective to observe according to your needs.
- Page 24 ②Interpupillary distance adjustment Rotate the binocular hinge to adjust the pupil distance and unity the field of two eyes, also adjust the height of exit pupil. Pic. 26 Range of pupil distance:55~75mm The scale on the pupil distance board corresponded with the dot “· ” is the value of pupil distance.
- Page 25 2. Phase contrast observation , lower lift level Trinocular tube------ upper lift level Condenser--------PH1/PH2/PH3 Middle magnification converter------1X Multi-function modules ----transmitted module (number 3) ① The magnification of phase contrast objective should match the condenser phase contrast mark. PH1/10X-20、PH2/40X、PH3/60X ② Centering phase contrast ring shown in pic.28. If the phase contrast ring is not centered, use 1.5mm hexagon screwdriver to adjust by following steps: a.
- Page 26 3. Differential Interference Contrast (DIC) observation , lower lift Trinocular tube----- upper lift level level Condenser--------DIC、DICⅡ Dust cover Middle magnification converter------1X DIC prism socket Multi-function modules ----transmitted module (number 3) Pic. 29 Side port converter------ The condenser DIC mark should match the DIC prism in the socket of objective converter.
- Page 27 2. Dark field observation Trinocular tube----- upper lift level , lower lift level Middle magnification converter------1X Multi-function module ----dark field module (number2) 3. Reflected polarization and cone light observation , lower lift level Trinocular tube-----upper lift level Middle magnification converter------1X Multi-function module-----polarization light module (number4/single polarized, 5/polarized, 6/circular polarization light) Side port converter------...
-
Page 28: Ⅵ Microscopy Imaging
Ⅵ Microscopy imaging 1. Side port imaging Left side port Right side port Splitting label screw thread screw thread Pic.30 20%vis: 80% camera left 0%vis: 100% camera right 2. Trinocular tube imaging 上 Trinocular port screw thread upper lift level: 100%vis lower lift level Upper lift level... -
Page 29: Ⅶ. Technical Specifications
Ⅶ Technical specification 1. Main technical specification Optical system Infinite system Observe tube Hinge binocular tube,45° tilt 10X wide field eyepiece with line field ofФ25mm Eyepiece Objective converter Six-hole converter Objective Infinite plan phase contrast:10X, 20X, 40X, 60X Focusing Coarse and fine coaxial focus Coarse focusing 2mm/cycle Fine focusing 0.2mm/cycle Stroke (from the plat focal point):up 7mm,down 2mm... - Page 30 2. Objective parameters Class Magnification Number Working Conjugate Parfocal Glass aperture distance distance distance Slide thickness (N.A) (mm) (mm) (mm) (mm) Infinity plan 0.30 apochromatic 0.45 7.5-8.8 ∞ objective 0.60 3-4.4 0.70 1.8-2.6 0.1-1.3...
- Page 31 Ⅷ Configuration diagram of EXI-600 inverted biological microscope...
-
Page 32: Ⅸ. Trouble Shooting
Trouble shooting In particular cases, the performance of this device may be affected reversible by some non- deficit factors. If trouble occurs, take the proper solution listed by the following chart. If the trouble is still not solved, please contact the sales department of our company. Problem Cause Solution... - Page 33 effect gained The bright field objective is used Use the phase contrast objective The condenser ring is not match Adjust the condenser ring to match the objective the objective ring ring The light ring is not centered with Adjust the centering bolts phase contrast The objective is not compatible Use a objective compatible with the phase contrast...
- Page 34 3. Observe tube The field of one eye is not Pupil distance is wrong Adjust the pupil distance coincide with the field of Diopter is not correctly adjusted Adjust the diopter another eye Have not adapt the microscope When observing from the eyepiece, observe the observation yet whole field of view before concentrate on the sample, it is benefit to look up or faraway before...
-
Page 35: Ⅹ.maintenance
Ⅹ Maintenance 1. Use gauze to swipe glass components slightly. If you want to remove the fingerprints and oil stains, use thimbleful alcohol and diethyl ether mixed liquor (3:7) or dimethylbenzene to wipe ★Diethyl ether and alcohol are both extremely flammable, DO NOT get them near to open flames or any potential electro sparks such as the switch of electrical device.
Need help?
Do you have a question about the EXI-600 and is the answer not in the manual?
Questions and answers