
Subscribe to Our Youtube Channel
Related Manuals for StarTech.com ARMUNONB


Summary of Contents for StarTech.com ARMUNONB
- Page 1 Monitor Mount with Articulating Arm and Laptop Riser Actual product may vary from photos User Manual SKU#: ARMUNONB For the latest information and specifications visit www.startech.com/ARMUNONB Manual Revision: 05/22/2019...
- Page 2 This manual may make reference to trademarks, registered trademarks, and other protected names and/or symbols of third-party companies not related in any way to StarTech.com. Where they occur these references are for illustrative purposes only and do not represent an endorsement of a product or service by StarTech.com, or an endorsement of the product(s) to which this manual...
-
Page 3: Safety Statements
• Montering av kabelavslutningar får inte göras när produkten och/eller elledningarna är strömförda. • Kablar (inklusive elkablar och laddningskablar) ska dras och placeras på så sätt att risk för snubblingsolyckor och andra olyckor kan undvikas. To view manuals, videos, drivers, downloads, technical drawings, and more visit www.startech.com/support... -
Page 4: Table Of Contents
Attaching the Spring Arm to the Extension Arm ................19 Adjust the height tension of the spring arm ................... 21 Adjusting the Swivel Tension of the Display Mount ..............22 Routing the Cables ........................... 22 To view manuals, videos, drivers, downloads, technical drawings, and more visit www.startech.com/support... -
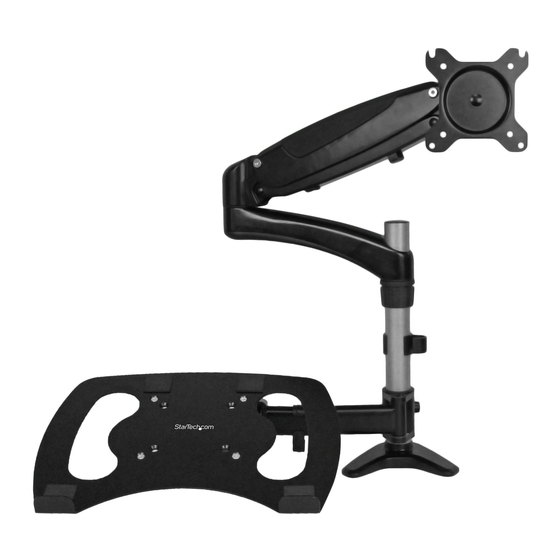
Page 5: Product Diagram
Product Diagram Rubber Pads Cable Management Laptop Tray Pole Extension Arm Height-Adjustment Ring Swivel Arm Cable-Management Clip Monitor Mount To view manuals, videos, drivers, downloads, technical drawings, and more visit www.startech.com/support... -
Page 6: Product Dimensions
Product Dimensions To view manuals, videos, drivers, downloads, technical drawings, and more visit www.startech.com/support... -
Page 7: Technical Specifications
15 to 27 in. (381 mm to 686 mm) Monitor Mount Weight Capacity Up to 17.6 lb. (8 kg) Laptop Tray Weight Capacity Up to 17.6 lb. (8 kg) To view manuals, videos, drivers, downloads, technical drawings, and more visit www.startech.com/support... - Page 8 Tilt -900 to + 850 Swivel 1800 Rotate 3600 VESA Monitor Mount 75 x 75 mm 100 x 100 mm To view manuals, videos, drivers, downloads, technical drawings, and more visit www.startech.com/support...
-
Page 9: Product Information
Product Information Package Contents Swivel Arm Extension Arm Qty: One Qty: One Laptop Tray Spring Arm Qty: One Qty: One To view manuals, videos, drivers, downloads, technical drawings, and more visit www.startech.com/support... -
Page 10: Cable Management
Pole and Clamp M4x12 Screws Qty: One Qty: Four M4x30 Screws M5x12 Screws Qty: Four Qty: Four M6x25 Screw Cable-Management Clip Qty: One Qty: One To view manuals, videos, drivers, downloads, technical drawings, and more visit www.startech.com/support... -
Page 11: Height-Adjustment Ring
M3 Hex Key M5 Hex Key M5 Nuts Height- Adjustment Ring Qty: Four Qty: One Spacers Cable-Management Clip Qty: Four Qty: Two To view manuals, videos, drivers, downloads, technical drawings, and more visit www.startech.com/support... -
Page 12: Installation Requirements
Attaching the Clamp to a Surface Note: The desk clamp can be attached to a desk or table up to a thickness of 9 cm 90 mm). To view manuals, videos, drivers, downloads, technical drawings, and more visit www.startech.com/support... -
Page 13: Attaching The Laptop Tray To The Swivel Arm
Attaching the Laptop Tray to the Swivel Arm Insert the four M5x12 screws through the laptop tray and into the four holes in the VESA mount on the swivel arm. To view manuals, videos, drivers, downloads, technical drawings, and more visit www.startech.com/support... - Page 14 Remove the backing from the four rubber pads and affix them to the laptop tray where appropriate to prevent the laptop from slipping. Fixing the Rubber Pads on the Laptop Tray To view manuals, videos, drivers, downloads, technical drawings, and more visit www.startech.com/support...
-
Page 15: Attaching The Swivel Arm To The Pole And Clamp
Pulling the Height-Adustment Ring off of the Pole Slide the swivel arm down the pole and clamp. To view manuals, videos, drivers, downloads, technical drawings, and more visit www.startech.com/support... - Page 16 Once the swivel arm is at the desired height, use the M5 hex key to turn the screw in the swivel arm clockwise to tighten it in place. Use the M5 Hex Key to Tighten the Screw To view manuals, videos, drivers, downloads, technical drawings, and more visit www.startech.com/support...
-
Page 17: Attaching The Extension Arm
Sliding the Extension Down the Pole To adjust the swivel tension of the extension arm, use the M3 hex key to turn the screws in the extension arm clockwise or counterclockwise. To view manuals, videos, drivers, downloads, technical drawings, and more visit www.startech.com/support... -
Page 18: Attach A Display To The Spring Arm
M4x12 screws through the VESA mount on the spring arm and into the mounting holes on the back of the display. Use a Phillips screwdriver to tighten the screws. To view manuals, videos, drivers, downloads, technical drawings, and more visit www.startech.com/support... - Page 19 Insert the four M4x30 screws through the VESA mount on the spring arm, into the four spacers, and into the mounting holes on the back of the display. Use a Phillips screwdriver to tighten the screws. To view manuals, videos, drivers, downloads, technical drawings, and more visit www.startech.com/support...
-
Page 20: Attaching The Spring Arm To The Extension Arm
Mounting the VESA Mount Using Spacers Attaching the Spring Arm to the Extension Arm Carefully lift the spring arm with the display attached and place it onto the extension arm. To view manuals, videos, drivers, downloads, technical drawings, and more visit www.startech.com/support... - Page 21 Insert the M6x25 screw through the extension arm, the spring arm, and into the plastic cap. Attaching the Plastic Cap Use a screwdriver to tighten the M6x25 screw. To view manuals, videos, drivers, downloads, technical drawings, and more visit www.startech.com/support...
-
Page 22: Adjust The Height Tension Of The Spring Arm
To decrease the tension, use the M5 Allen key to turn the • screw in the spring arm counterclockwise. Adjusting the Height Tension To view manuals, videos, drivers, downloads, technical drawings, and more visit www.startech.com/support... -
Page 23: Adjusting The Swivel Tension Of The Display Mount
Thread the display cable through the cavity in the underside of the extension arm. Hold the display cable against the pole and clamp while you slide the cable-management clip (pole) over the cable and onto the pole. To view manuals, videos, drivers, downloads, technical drawings, and more visit www.startech.com/support... - Page 24 (laptop arm). To adjust the placement of cable-management clip (laptop arm) on the swivel arm, slide the cable-management clip left or right. Routing the Cables To view manuals, videos, drivers, downloads, technical drawings, and more visit www.startech.com/support...
- Page 25 Limitation of Liability In no event shall the liability of StarTech.com Ltd. and StarTech.com USA LLP (or their officers, directors, employees or agents) for any damages (whether direct or indirect, special, punitive, incidental, consequential, or otherwise), loss of profits, loss of business, or any pecuniary loss, arising out of or related to the use of the product exceed the actual price paid for the product.
- Page 26 StarTech.com is an ISO 9001 Registered manufacturer of connectivity and technology parts. StarTech.com was founded in 1985 and has operations in the United States, Canada, the United Kingdom and Taiwan servicing a worldwide market.
Need help?
Do you have a question about the ARMUNONB and is the answer not in the manual?
Questions and answers