
Subscribe to Our Youtube Channel
Related Manuals for Kramer RC-43SL


Summary of Contents for Kramer RC-43SL
- Page 1 USER MANUAL MODEL: RC-43SL 6-Button Room Controller P/N: 2900-300450 Rev 1 www.kramerAV.com...
-
Page 4: Table Of Contents
Configuring the RC-43SL Technical Specifications Figures Figure 1: RC-43SL 6-Button Room Controller Figure 2: Connecting the RC-43SL 6-Button Room Controller Figure 3: RS-232 Connection Figure 4: K-NET Pinout Connection Figure 5: Mounting the RC-43SL in a Wall Box RC-43SL – Contents... -
Page 5: Introduction
Introduction Welcome to Kramer Electronics! Since 1981, Kramer Electronics has been providing a world of unique, creative, and affordable solutions to the vast range of problems that confront video, audio, presentation, and broadcasting professionals on a daily basis. In recent years, we have redesigned and upgraded most of our... -
Page 6: Getting Started
Avoid interference from neighbouring electrical appliances that may adversely influence signal quality Position your RC-43SL away from moisture, excessive sunlight and dust This equipment is to be used only inside a building. It may only be connected to other equipment that is installed inside a building. -
Page 7: Recycling Kramer Products
Kramer Electronics has made arrangements with the European Advanced Recycling Network (EARN) and will cover any costs of treatment, recycling and recovery of waste Kramer Electronics branded equipment on arrival at the EARN facility. For details of Kramer’s recycling arrangements in your particular country go to our recycling pages at http://www.kramerelectronics.com/support/recycling/. -
Page 8: Overview
Overview The RC-43SL is a highly versatile, all-in-one extended remote control panel for control of AV equipment—especially projectors and associated equipment—in any room (such as classrooms, boardrooms, or auditoriums). It streamlines operations and simplifies control by integrating audio, video, and computer-video sources into a centralized system. -
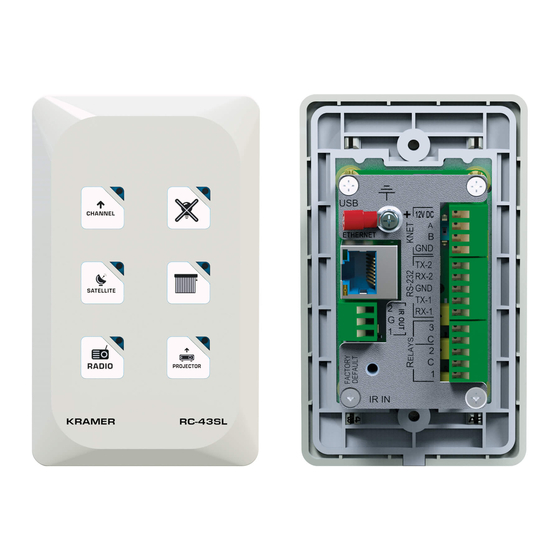
Page 9: Defining The Rc-43Sl 6-Button Room Controller
Defining the RC-43SL 6-Button Room Controller This section defines the RC-43SL. Figure 1: RC-43SL 6-Button Room Controller Feature Function Six Touch-sensitive Buttons Program button functions on the connected room controller Six LEDs Flash yellow when the button is touched. Each... -
Page 10: Connecting The Rc-43Sl
You do not have to connect all the inputs and outputs, connect only those that are required. To connect the RC-43SL as illustrated in the example in Figure 1. Connect the RELAY terminal block connectors as follows: ... -
Page 11: Connecting The Rs-232 Port
Figure 2: Connecting the RC-43SL 6-Button Room Controller Connecting the RS-232 Port To connect an AV device to the RC-43SL, connect the RS-232 9-pin D-sub port on your device to the RS-232 terminal block on the rear panel of the RC-43SL... -
Page 12: Connecting The Ethernet Port
To connect the RC-43SL to a network: 1. Connect the Ethernet port of the RC-43SL to the Ethernet port on a network hub or network router, via a straight cable with RJ-45 connectors. 2. Over the network, connect to a PC running Site-CTRL. -
Page 13: Installing The Front Panel Buttons
Installing the Front Panel Buttons The RC-43SL is supplied with preprinted buttons from which you can choose the six that best represent the functions you wish to assign the buttons. To install the front panel buttons: 1. Remove the cover plate by carefully prying it away from the printed circuit board (PCB) frame using a small screwdriver being careful not to damage it. -
Page 14: Installing The Rc-43Sl In The Wall Mounting Box
To install the RC-43SL in the wall mounting box: 1. Remove the cover plate of the RC-43SL. 2. Insert the RC-43SL into the wall mounting box and secure it using the two M3 x 10mm screws supplied. 3. Replace the front panel of the RC-43SL. -
Page 15: Configuring The Rc-43Sl
Configuring the RC-43SL Configure the unit using Kramer K-Config configuration software. Download the software from the Kramer Web site: http://www.kramerelectronics.com/support/product_downloads.asp RC-43SL - Configuring the RC-43SL... -
Page 16: Technical Specifications
1 set of button labels, 1 screwdriver, 2 screws External IR receiver (C−A35M/IRR−50) and IR receiver extension OPTIONAL: cables (C−A35M/A35F−50). Specifications are subject to change without notice For the most updated resolution list, go to our Web site at http://www.kramerelectronics.com RC-43SL - Technical Specifications... - Page 18 SAFETY WARNING Disconnect the unit from the power supply before opening and servicing For the latest information on our products and a list of Kramer distributors, visit our Web site to find updates to this user manual. We welcome your questions, comments, and feedback.
Need help?
Do you have a question about the RC-43SL and is the answer not in the manual?
Questions and answers